I've been busy working on scrapbook pages recently. Thanks to my good friend Rachel who has been coming over each Wednesday to scrap...she has been helping to inspire me and also helps keep me to stay on track and finish some pages. The addition of Project Life into the SU! product line has helped to inspire and simplify as well. Here's a traditional two page layout showing some gorgeous Northern Michigan Fall photos from last year.
I used the Autumn Accents Bigz die to cut out the leaves and then used the Faux Fossil Technique to add color and texture to them. It's hard to believe those leaves started out as Very Vanilla card stock, isn't it? I explain more on the Faux Fossil Technique in this post.
The Cajun Craze layer was stamped using the Gorgeous Grunge stamp set. The DSP I used here is retired, but you can probably find it, or at least similar, on My Digital Studio. Here's a look at both pages together...
I took so many photos over this weekend so I also made a couple Project Life pages with more of the photos and did lots of journaling. I'll share those with you next time.
It actually feels more like Fall here the past few days...cool temps. Not very good pool weather, but perfect for scrapping with a friend...which is what I plan to do today. You have a GREAT day too!
▼
Wednesday, July 30, 2014
Monday, July 28, 2014
Embossed Wedding Photo Card
My beautiful niece got married this past weekend. I wanted to create the wonderful couple a keepsake card for the special occasion, and here is what I came up with.
I used a cute photo of them from when they were first dating and printed it in sepia tone. It fit perfectly inside the embossed frame from the retired Papaya Collage stamp set. After embossing with White EP on Whisper White card stock, I sponged it with Crumb Cake ink so that the detail popped. I did the same with the double heart image from the Wedding Elegance set. It's finished off with a pretty bow made from White Organdy Ribbon and a couple tags using the Tiny Tags set. With the exception of the ribbon, everything else used for this is retired.
Friday, July 25, 2014
Flower Shop Blendie Pair
Here are a couple cards I created using the Flower Shop stamp set along with the Blendabilities Markers. This first card is fairly quick & easy to make.
I love being able to color the Basic Pearls with my Blendie pens to match my project! The next card I created used basically the same layout and supplies, but I stepped it up a bit by adding more detail...
For this one I inked up my Honeycomb Embossing Folder with Early Espresso ink before running it through the Big Shot. I also used some Typeset DSP cut into a hexagon shape. To finish the card I used some of the new Early Espresso Seam Binding Ribbon...love having so many new colors of my favorite ribbon!
Have a great weekend!
Wednesday, July 23, 2014
Christmas Cuties
I cannot think of many things more adorable at Christmastime than either a baby or a kitten opening gifts. Both seem to be more interested in the packaging than what is inside. This page shows my 1 1/2 year old great-nephew opening one of his presents and my Mom's kitten playing inside an opened box.
I used some of last years beautiful Winter Frost Specialty Paper...it is hard to capture, but there is silver metallic in a couple of the sheets that really add to the shimmer & sparkle. I stamped and embossed various Festive Flurry snowflakes and easily cut them out using the coordinating framelits. While the DSP used here is now retired, the Festive Flurry stamp set & the Festive Flurry Framelits are still available on the Holiday Carryover List...until August 27th. (when the 2014 Holiday Catalog goes live on 8-28, they will be retired) so make sure to check out the list to see what is still available!
Isn't this little snowman adorable? He is a Sizzix Bigz Die that has a coordinating Embossing Folder. I bought him a while back at a scrapbook convention and never used him. I used some Silver Dazzling Details to highlight one of his embossed snowflakes. With the addition of Project Life into SU!'s product line I've been supplementing my album with some PL pages along with traditional 12x12. So the above page is the left page and this PL page will come next...
This really frees me up to make some really quick pages using lots of photos and journaling yet still be more creative with some coordinating pages. You may notice that I used the stamp set Endless Wishes on my titles for these pages. This was a super popular photopolymer set that was available last year over the holidays. It was so popular that it sold out very quickly! Well, I'm happy to say that this set will be available in the upcoming Holiday Catalog...so if you missed out last time you'll be able to get it soon.
Back in early December, I shared these two pages. They were all ready to add my Christmas photos & a little journaling. Here's what they look like now that I completed them...
and the right...
and the full two pages...
When I originally created these pages, I used temporary adhesive for the photo mats and a few of the embellishments in case I wanted to move them. Good thing, as I ended up adding an extra photo.
I used some of last years beautiful Winter Frost Specialty Paper...it is hard to capture, but there is silver metallic in a couple of the sheets that really add to the shimmer & sparkle. I stamped and embossed various Festive Flurry snowflakes and easily cut them out using the coordinating framelits. While the DSP used here is now retired, the Festive Flurry stamp set & the Festive Flurry Framelits are still available on the Holiday Carryover List...until August 27th. (when the 2014 Holiday Catalog goes live on 8-28, they will be retired) so make sure to check out the list to see what is still available!
Isn't this little snowman adorable? He is a Sizzix Bigz Die that has a coordinating Embossing Folder. I bought him a while back at a scrapbook convention and never used him. I used some Silver Dazzling Details to highlight one of his embossed snowflakes. With the addition of Project Life into SU!'s product line I've been supplementing my album with some PL pages along with traditional 12x12. So the above page is the left page and this PL page will come next...
This really frees me up to make some really quick pages using lots of photos and journaling yet still be more creative with some coordinating pages. You may notice that I used the stamp set Endless Wishes on my titles for these pages. This was a super popular photopolymer set that was available last year over the holidays. It was so popular that it sold out very quickly! Well, I'm happy to say that this set will be available in the upcoming Holiday Catalog...so if you missed out last time you'll be able to get it soon.
Back in early December, I shared these two pages. They were all ready to add my Christmas photos & a little journaling. Here's what they look like now that I completed them...
and the full two pages...
When I originally created these pages, I used temporary adhesive for the photo mats and a few of the embellishments in case I wanted to move them. Good thing, as I ended up adding an extra photo.
Wednesday, July 16, 2014
Swallowtail in the Spotlight
Today I have a couple cards to share using basically the same supplies & the same technique, but the second one is has a little more detail. I used the Swallowtail stamp and the spotlighting technique.
I stamped both the white panel and the background at the same time using Memento Tuxedo Black Ink. Then I colored the focal image using my Blendabilities. For my second card I followed the same steps as above, but changed up the color and added a few more details for a stepped up version, see...
I used Gorgeous Grunge for the background and also added some sparkle with a layer of Silver Glimmer Paper. I didn't add a sentiment to this one...but can do that when I'm needing a card.
Have a beautiful day!
Monday, July 14, 2014
Multi-Color Embossed Mixed Bunch
Have you ever wished you could emboss a detailed design using multi colors of embossing powders and be able to designate where each color would go on the design? Check out this multi-color embossed flower using the Mixed Bunch set to see what I mean...
It is super easy to get this embossed multi-color look using White Embossing Powder and your new Blendabilities Markers! All you need to do is emboss your line art design on dark card stock with White Embossing Powder...then just color away using the brush tip of your Blendabilities! How easy is that?!
Using dark card stock, such as Basic Black shown on my sample, hides any accidental "out of the lines" occurrences...so no worries about being super precise. Using line art verses solid images works better because using bolder images may show your brush strokes. Here's my finished card...
To color my flower, I used the medium shade from each color set...Old Olive, Rich Razzleberry, Coastal Cabana & Pumpkin Pie. Because I was coloring over the white gloss of the embossing powder, the colors appear more pastel in tone. I even colored my Basic Rhinestone center using my Pumpkin Pie Blendability...I love being able to add jewels and pearls to match my projects. I first saw this technique shared on Mary Fish's Blog, and was super excited to try it. Hope you like this technique as well!
You are now able to order each of the color sets used on this card, plus Cherry Cobbler, Daffodil Delight & the six color Skin Tone Assortment! If you haven't order these yet...you are missing out on a lot of coloring fun! Check out my Online Store to learn more.
Wednesday, July 09, 2014
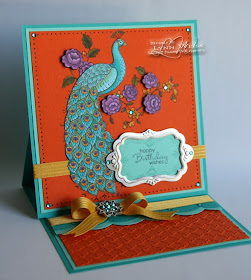
Perfect Peacock Easel Card
Here's an extra special card that I made for my dear Aunt's birthday.
I know she just loves the new Perfect Peacock image, so I decided to give him the extra special treatment. I colored him with my Blendabilities and then fussy cut him out. I stamped him again onto Tangelo Twist card stock so that all the little curls of his feathers would be there without having to cut those. (I don't mind a little fussy cutting but I'm not crazy! )
Then I set to work bleaching the card stock area inside the flowers, leaves and plumage on top of his head so that I could color those as well.
After painting on numerous coats of bleach using my Aqua Painter, I managed to get the color down to a shade of yellow, which would be fine for coloring the Old Olive and Daffodil Delight areas, but not for the Rich Razzleberry flowers. Those I colored on Whisper White and cut out.
I attached the Razzleberry flowers using Stampin' Dimensionals. I colored some Basic Rhinestones using my Coastal Cabana Blendabilities for some bling on the flower centers, and in each corner, etc... I even colored in the rhinestones on one of those gorgeous Frosted Finishes Embellishments I had left from last years Holiday Catalog...just love those! It made a beautiful center to the Hello Honey satin bow.
The silver frame that fits the Decorative Label punch is something else I had in my stash. To complete the base I embossed the Tangelo layer using the Fancy Fan EF...it's design compliments the feathers well. A strip of Coastal Cabana card stock and one in Bermuda Bay were scalloped using the Scallop Edgelit.
Thanks for visiting today!
Tuesday, July 08, 2014
Christmas in July
Today, Stampin' Up! has released three new stamp sets! Two of them are Christmas sets. The first one is a beautiful line art set called Beauty of the Season which will be available in the new Holiday Catalog. This one is available in either clear mount or wood mount.
The cardinal will be so pretty water colored or colored with the Blendabilities, don't you think?
The other Christmas set is a photopolymer set of fun & festive solid images along with sayings called Christmas Bliss. This one looks very versatile!
Do you have any little boys in your life? Then I think you will love the last new set released today...it's called Dear Heart. The girl version of this set was called Sweetie Pie and was so popular it SOLD OUT pretty quickly .
To see these newly released stamp sets please visit my Stampin' Store.
Also...today is Tuesday which means new Weekly Deals!
Monday, July 07, 2014
Work of Art Chevron Thank You Cards
I needed some quick thank you cards that didn't "have bows or other stuff "on them for my son to send out.
The first one is a monochromatic color combo using Pool Party, Bermuda Bay & Coastal Cabana.
For the next one I got a little wild and added some Wild Wasabi!
This one is really wild 'n crazy with some Calypso Coral added...
These cards are a little plainer & simpler than I normally make, but I had fun playing with the Work of Art & Gorgeous Grunge sets and more importantly they met my "clients" strict stipulations.
Wednesday, July 02, 2014
Big News Birthday
Woo Hoo!...it's you birthday! Well, maybe not yours exactly, but I'm sure maybe someone, somewhere, reading this is having a birthday today. Anyways...here's a quick & easy card to make using the Big News set.
The little candle and woo hoo! banner stamps included in this set make this card a lot of fun! With a few extra minutes and a few more accessories, you can create a stepped up version like this one...
I used the same color combo of Coastal Cabana, Pear Pizzazz, Crisp Cantaloupe, Strawberry Slush with a pop of Basic Black on both cards, but changed up the background panel by swapping colors and embossing folders. I just love that new Zig Zag Embossing Folder! Since I added ribbon to this one I embossed the Crisp Cantaloupe layer instead of stamping it with the cute candle stamp.
Using the fine tipped Project Life Journaling Pen, I added a little doodle border around the main image to sorta match the hand drawn look of the banner, and finished it off with a Basic Rhinestone in each corner.
With the start of the new month, Stampin Up! has a great new special! When you buy three packs of Designer Series paper...you'll get the third one FREE! (Specialty paper & stacks are not included in this offer)
Also...don't forget to check out this weeks new Weekly Deals for more great discounted items! Thanks for visiting today!