Wednesday, November 26, 2014

Thankful Cone-nucopias

I came across this idea of creating little cornucopias from ice cream cones on Pinterest a few years ago and thought they were adorable. That year, I forgot to make them  for Thanksgiving...but came across my forgotten pin again recently and decided to make them this year...with a Stampin' Up! spin of course!


The instructions I found online were kind of vague but I used that for my guide to start with. What I found worked out best for me is as follows...

First, gather up your supplies.

You are going to need a cup of very warm/hot water. I just used from the tap...so not boiling or anything. 

  1. Dip the pointed end of the cone into the water and submerge the entire bottom... leaving about the top 3 inches or so dry. Hold in water for approximately 20 seconds. 
  2. Place the dampened cone onto a microwave safe plate and place in microwave on high for 30 seconds. Since microwaves vary, you might have to adjust this time. I started with 20 seconds and that just wasn't enough time.
  3. Remove plate with cone from microwave and place the seam side of cone down. 
  4. Use a wooden spoon handle to carefully flatten the cone from the middle on down to the tip. 
  5. Once you are at the tip, curl the tip upwards around the handle of the spoon. Note: You need to work rather quickly with the warm cone once removing from microwave.
  6. Hold cone in desired shape for a minute or so to cool and hold its shape
  7. Place onto foil lined cookie sheet and proceed until you have shaped all your cones.
After finishing shaping all 12 of my cones they were still a little sticky where they had been dampened. So to speed up the drying time I popped them in the oven set at 325 degrees. Luckily I checked on them after just a few minutes, and noticed that the ends were starting to uncurl a bit with the heat. So I pulled them out, turned off the oven and turned the cones so they were all standing up on their circular base with curls pointing down. I then stuck them back in the warm oven. When I checked about 1/2 hour later they were all dry and no longer sticky. 

After they were thoroughly cooled I spooned in a mixture of salted peanuts, Dark Chocolate M&M's and Peanut Butter M&M's. (luckily nobody in my family has peanut allergies!) then I covered the end with a small square of plastic wrap - secured with a rubber band. You could use candy corn or whatever mixture your family enjoys.

They were cute just like that...but thanks to SU! I made them cuter!


I started by covering the rubber band with some Autumn colored ribbon. I wanted to use up some retired ribbon I had on hand, so I went with grosgrain in Pumpkin Pie, Chocolate Chip & More Mustard...mmm kind of sounds like Thanksgiving! I used a bit of double sided adhesive on bottom of rubber band so the ribbon wouldn't slide on the plastic wrap.I could have stopped with just the ribbon...but got busy in my rubber room and whipped up some cute tags as well.

First I used the Autumn Accent Bigz Die and cut out 24 acorns...12 in Cajun Craze & another 12 in Crumb Cake. I cut the Crumb Cake colored shape down into just the cap for the acorns and sponged the edges with Early Espresso ink. The now retired Square Lattice Embossing Folder gives the perfect texture to the cap of the acorn...so loaded all 12 caps in the folder and with one pass through the Big Shot they were done.

For the tags I knew I wanted to use the "thankful for you" sentiment from the Good Greetings stamp set, but couldn't decide which background pattern I liked better. So I used both the striped design from Gorgeous Grunge shown above, and the chevron design from Work of Art, shown below, to add a little texture. 

To finish the little tags I just adhered the stamped strip to the back of the acorn and punched a hole in the stem. Using a small bit of Linen Thread, I attached the tag by sliding thread under the grosgrain ribbon (using a large needle helped with this) and knotting it. With the first few I made a little bow with the Linen Thread, but that was a little too tedious...so the rest just got plain knot.

Here's a look at all of them...

They were pretty easy to make, and surprisingly I didn't crack any of the cones...until I was finished and had placed them all in a large tupperware container for "safe keeping". Upon letting the air out to seal the lid, I heard a "crunch"...DOH! Luckily, the couple that got cracked are still holding together, so that's good! I think they will be a cute addition to our Thanksgiving table. 

Wishing all my American readers a very HAPPY Thanksgiving Day tomorrow!


Tuesday, November 25, 2014

Tutorial for All Is Calm 6 x 6 Pocket Album

It took me much longer than anticipated, but I have finally finished the tutorial for my All Is Calm 6 x 6 Pocket Album!

This is a a very detailed 14 page tutorial loaded with photographs and step by step instructions to complete the cover with its fun shaker detail, plus all 14 inside pages of this beautiful keepsake album.
Note: Pages consist of three two page layouts, which equal 6 pages plus an additional 4 double sided pocket pages for a total of 14 pages. Once you learn how to create this fabulous little album, you will want to create more for all different occasions!

If you would like to purchase my All Is Calm 6 x 6 Pocket Album Tutorial for only $5.99, just click on PayPal button below. After receiving payment, I will send the PDF file to the email provided with your payment. I usually check my email a few times daily, but please allow up to 24 hours for delivery to your inbox.


Each kit includes the full tutorial with an additional bonus card, pre-cut supplies...including all cardstock, twelve 6x6 sheets of All Is Calm DSP, die cuts, embellishments and even a set of 6 shaker frames. You will need to provide adhesive, stamps & inks along with washi tape if desired. Kits will be shipped to you for only $32.99 (shipped inside US only)

Read more info, including full supply list  here.

If you would like to purchase my All Is Calm 6 x 6 Pocket Album Kit for only $32.99, please contact me as I only have a couple kits left.

Thank you so much for the positive response I've received for this project so far.

Monday, November 24, 2014

Online Extravaganza!

Ready for some HOT DEALS? Today is the start of the Online Extravaganza Sale!

There are great savings like embossing folders for only $5! Or the Gift Box Punch Board for only $13.96! But hurry...those are DOORBUSTERS for today only!


There are also a lot of items at 50% off! I picked up a few punches I didn't already have plus some pretty ribbons. Check out the 1/2 Off Specials
You don't already have the Magnetic Platform for your Big Shot yet? Well, now is the time to get it...for 40% off! What about In Color Marker Sets...those are also...wait for it...40% OFF!
There are several great bundles right now for 30% OFF! Along with some accessories too...all are 30% OFF!
Make sure to check out the 20% Off items for some stamp sets & framelits that are on your wish list...along with some other goodies too...all at 20% OFF!
Want to download the entire Online Extravaganza Sale PDF? Here it is.

There will be another 24 HOUR SALE to finish out the Extravaganza on Monday, December 1st. There will be an awesome Project Life Bundle available as well as the entire set of Blendabilities Markers!

Remember...the sale is good only while supplies lasts.

Wednesday, November 19, 2014

Very Merry Mosaics

I've been busy working hard on my tutorial for my All Is Calm 6x6 Pocket Album Kits. I'm so happy with the nice response to this project. As a "thank you" bonus to all that have ordered my kit so far...and to the next 6 who also order one of my kits, I will include the supplies & instructions to complete this adorable shaker card with your kit order.
I've been using the All Is Calm DSP with it's soothing color combo of Soft Sky, Pear Pizzazz and Lost Lagoon a lot...so to change it up a bit I swapped the Lost Lagoon for Real Red. The Mosaic Madness set with coordinating punch is perfect for creating the ornaments. The Pear Pizzazz ornament features a fun shaker element filled with sparkling snow.

For all those that have asked, yes, I do plan to sell just the tutorial for my All Is Calm 6x6 Pocket Album. My kits come with pre-cut product, embellishments and the complete tutorial as well. (and above bonus card) I will post when the tutorial is ready. For me, this is the hardest part...I for sure like the creating process so much better than sitting at the computer typing instructions & editing photos. Hopefully I'll be done soon! (Scroll down to see more on my kit.)

Thanks for visiting!

Saturday, November 15, 2014

All Is Calm 6x6 Pocket Album Class & Kits

I'm excited to finally share a project I've been working on for a while.  This sparkly 6x6 pocket album uses many of my favorite products from the Holiday Catalog! I'm offering this as one of my upcoming classes in my home to those who live locally (Livingston County, Michigan) and for my blog readers...I am taking orders for kits in the mail!


The album features a fun shaker element on the cover and the inside contains 6 pages...four of which have pockets containing additional pages. That is a total of fourteen 6x6 pages! This little album would make a lovely keepsake gift holding treasured memories from the holiday season. Or maybe you have a new little one in the family? It would also make an adorable Baby's 1st Christmas album.

Here's a little peek of a couple pages showing details from inside the album...


Each kit contains the supplies to create the album and all pages, including twelve 6x6 sheets of All Is Calm Specialty Designer Paper (one sheet of each design), cardstock, die cuts and embellishments, along with a detailed PDF tutorial loaded with photos.

Once you learn how to make the basic album you can change the theme and fill with cherished photos to give as a thoughtful keepsake gift for any occasion!

You will need to provide your own adhesive, inks, stamp sets & some punches. In addition to my kit, here is a list of supplies you will need to provide to complete the book as shown:


  • Envelope Punch Board (133774)
  • Stamp Sets: Festival of Trees (135059) & Endless Wishes (136829)
  • Inks: Soft Sky (131181), Pear Pizzazz (131180), Lost Lagoon (133644), Versamark (102283)
  • All Is Calm Washi Tape (135844)
  • Silver Embossing Powder (109131) & Heat Tool (129053)
  • Dazzling Details Silver Sparkle - optional (124117)
  • Punches: Tree (135859), 1/2" Circle (119869), 3/4"Circle (119873), 1" Circle (119868) & 1-1/4" Circle (119861)
If you do not have these supplies already, and would like to purchase them, please visit my Online Store

The All Is Calm 6x6 Pocket Album Kit will be shipped to you for only $32.99. (Additional postage will apply to those living outside the U.S., so please contact me prior to purchase.) Each kit includes the full tutorial with an additional bonus card, pre-cut supplies...including all cardstock, twelve 6x6 sheets of All Is Calm DSP, die cuts, embellishments and even a set of 6 shaker frames. You will need to provide adhesive, stamps & inks along with washi tape if desired. 

If you would like to purchase my All Is Calm 6 x 6 Pocket Album Kit for only $32.99, please contact me as I have only a couple kits left.

If you would just like to purchase just the tutorial for this project, I now have that available as well. It consists of 14 pages loaded with photos and step by step instructions to complete this album. 

Please click the button below if you wish to purchase just the All Is Calm 6x6 Pocket Album Tutorial for only $5.99.


Tuesday, November 11, 2014

Calm Festival of Trees

I just love the Festival of Trees set combined with the All Is Calm products! Here's another Christmas card using these items.
This one really has some shimmer & sparkle thanks to the Dazzling Diamonds Glimmer Paper used for the snowy hill, the Silver Sparkle Dazzling Details used on each of the trees & the Basic Rhinestone Jewels on the Bitty Banner. Adding a bit of pretty silver metallic shine is the All Is Calm Washi Tape along the bottom and a bit of 1/8" Silver Ribbon added to the center of the bow.

The pretty snowflake patterned DSP is from the All Is Calm Specialty Pack.

For now, I am happy to only be seeing make believe snow...I'm not ready for the cold Winter weather yet! Today is going to be in the mid 50's and they are saying this will be the last we'll see the warmer temps for a while. ENJOY your day!

Thursday, November 06, 2014

Color Me With Blooming Kindness

Here's a card I created using the Blooming With Kindness stamp set.

To add interest, the main panel was cut into 1 inch strips after stamping.

The color combo of Blackberry Bliss, Cajun CrazeCrushed Curry comes from the Color Me Autumn Washi Tape pack...which I used on both the inside of the card and on the front along with Blackberry Bliss Stitched Satin Ribbon.

If you have wondered why I have not posted in a while, scroll on down to see some photos of what has been keeping me busy.

Thanks for visiting!

Too Busy Clowning Around...

I've been so crazy busy this past month that I haven't had much time to post...sorry about that! We had our annual Halloween party this past weekend, and we spent a LOT of time getting ready for that. We hold the party in our barn, so we have to clear it of all tools, etc that are normally out there in order to transform it into a totally creepy, haunted space complete with zombies, witches, etc... It is mostly fun getting out all the props and creating new ones each year...but now I am stuck with the dreaded task of putting it all away until next year...not so fun!

I do have a card to share with you, but thought first I'd create a post sharing some of my Halloween creations, costumes & decor that I spent the better part of the month of October working on. So here goes...
New this year are these 7 foot columns topped with gargoyles at the entrance to our graveyard...which you must walk through to enter the barn. My hubby & I built them which turned out to be a much more time consuming task than I bargained for since neither one of us could be considered carpenters, lol. We got it done with very few arguments and are pretty happy with how they turned out.
Once we finished building them I painted the pillars and added some dry brush detail to the gargoyles and a little moss to make them look like they've been there a while.

No Halloween party is complete without a few carved pumpkins! Here are the ones we carved this year...plus our "little helper" Stevie.

I carved the grim reaper...here's another shot of him.
Along with pumpkins and decor we had to have costumes for the party, right? Here's my hubby & I clowning around at the party...
I don't sew, but I'm good with a glue gun! I was lucky to find the major pieces for our costumes at a thrift shop. (I know, it's hard to believe my hubby didn't already have those pants and shirt in his closet!) Have you seen the show American Horror Story? This year they have a creepy clown named Twisty on the show. I did my make up inspired by Twisty the Clown.
I even used a few Stampin' Up! products for my necklace...see the Basic Rhinestone jewels and the black Raven Lace on the skeleton hand cuffs? Here's the full view of my costume.
We had some pretty amazing costumes at our party this year...check out a couple of the winners:
This is my friend Amy as the Ice Queen. She won the award for the Most Creative costume. She looked just gorgeous with so many exquisite details including her staff which lit up and changed colors. We also had a couple of Green Army Men who hammed it up and stayed in character for a good part of the night.
They won the award for the Best Couple. I always try to come up with something different each year for the prizes...this year I made Boney Awards. I forgot to get a good photo prior to handing them out...but here are 3 of them...
The Boney Awards were "engraved" with category & date and of course made of solid gold! (spraypaint!;-) 

My dear Auntie who loves SU! came as a ghostly bride. Check out her headpiece...she used the Spiral Flower Die to create black roses for her costume.
We had a lot of good food...I make some and our guests bring some. I loved the guacamole puking pumpkin and deviled eggs with "spiders" on top that a couple guests brought. By the end of the night we have a hard time fitting all the food onto the buffet tables, so I tried to create some layers by raising some plates up higher. Here's one of the risers I created...
It's an urn planter that I picked up at the thrift store, spray painted it and added some Witch's Brew Washi Tape and a glittered spider. I forgot to take a photo at the party with my platter full of goodies, but it did work out well and I plan to make some more for next year. 

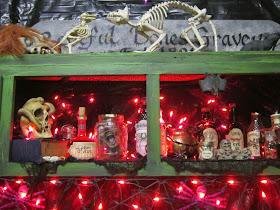
Some of the potion bottles I've made over the years are displayed in my witches cabinet...
Despite the bone-chilling cold weather, we had a good turn out...approximately 70 guests, most of which wore a costume. So it was definitely worth all of our hard work because we had a lot of fun seeing everyone and we made some great memories. Be on the lookout for scrapbook pages soon...In the meantime, I DO have a card to share as well, but will make a new post.