I can't believe that Sale-A-Bration is already drawing to an end for another year! If you have not placed your orders...please do ASAP so you don't miss out. You could choose the Inside the Lines DSP as your FREE item. I used it here on this card.
The intricate dragonfly was cut using the Detailed Dragonfly Thinlits. The detailed layer was cut from Sweet Sugarplum Glimmer Paper (sold out) and the solid layer from Vellum Cardstock. I then sponged the vellum with colors used when coloring the Inside the Lines DSP on the bottom half of card. Here's a closer look...
The embossed background was created using the Hexagons Dynamic Textured EF...it's my new favorite embossing folder!
Remember...last chance to Sale-A-Brate! Place your order today!
Have a great weekend!
▼
Friday, March 31, 2017
Wednesday, March 29, 2017
Inside the Lines Poppies
I sat down the other night and finally did some watercoloring using the Watercolor Pencils and Inside the Lines DSP. It's so relaxing to sit and color. My favorite sheet in the pack is this poppy patterned piece.
I used my Aqua Painter and Calypso Coral, Old Olive, Bermuda Bay & Daffodil Delight pencils. After I was done I used Wink of Stella on the bees wings and on the center of each flower. The sentiment, from Dragonfly Dreams, is embossed in Gold Embossing Powder on Vellum. The pretty lace trim along the edge is an image from the Delicate Details stamp set embossed with White Embossing Powder. Gold 1/8" Ribbon finishes off this card.
Don't miss out...
There's only a couple more days to place your Sale-A-Bration order and get the Inside the Lines DSP, Delicate Details stamp set or any of the other great products available through March 31st. Place your order with me and use the Hostess Code: 3HR4GYDR and I will send you out a card kit to create 3 beautiful cards as an extra bonus from me.
So don't delay...place your order today!
Friday, March 24, 2017
Special Reason Pair
Back in the early days SU! carried very little DSP. If you wanted background paper to compliment the main stamped image on your project you had to create it yourself. So when stamping with my new Special Reason set, I decided to go "old school" and have some fun creating my own DSP.
I love that this set has smaller versions of the flower & leaf, so it really lends itself well to creating a smaller background like I did fr these cards. As you can see, I used two color combos. The first one uses Bermuda Bay & Island Indigo for the flowers and Mint Macaron with Wild Wasabi for the leaves.
The second card features Melon Mambo & Rich Razzleberry flowers. On each of the handstamped background papers I lightly inked over the design using the line image from Gorgeous Grunge inked in Sahara Sand, along with a few ink spotches thrown in for good measure.
For the solid color strip on the left of each card I used the great new Hexagons Dynamic Embossing Folder. I just love the deeply embossed pattern it leaves...don't you? If you don't have this one yet, I highly recommend it!
Thanks for visiting..have a great weekend!
Wednesday, March 22, 2017
Special Reason Spring Flowers
Hello there! I've been away on vacation and now that I'm back home and back in the swing of things I finally had some time to stamp. Since the calendar says it's Spring (I wish Mother Nature got that memo!) I thought some Spring flowers were in order!
Since it had been a while since I had stamped, I needed a little inspiration. Before I started stamping I looked on Pinterest for a fun card using the Special Reason stamp set and the coordinating Stylish Stems Framelits. I came across this beautiful card created by Kris and loved the layout she used. I chose my colors...and got rolling...
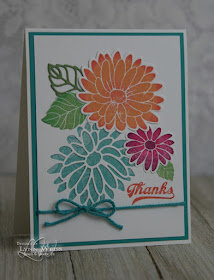
I love that the Stylish Stems Framelits have both intricate and sold shapes to mix and match. I placed a piece if Cupcakes & Carousels DSP behind the intricate cut flower.
Here's a look at this pair of cheery cards...
Thanks to Kris for the inspiration for these cards! With Pinterest and so many talented stampers out there who take the time to share on their blogs, it's easy to find inspiring ideas for any stamp set. You know what is also easy? Taking a minute to credit your source of inspiration. ;-) So if you find a project online that inspires you enough to re-create it and then share it on your own website, please take a minute to acknowlege the person who inspired you. Leaving them a nice message or linking back to their original creation (or both) is always a nice courtesy which can totally make someones day.
Since it had been a while since I had stamped, I needed a little inspiration. Before I started stamping I looked on Pinterest for a fun card using the Special Reason stamp set and the coordinating Stylish Stems Framelits. I came across this beautiful card created by Kris and loved the layout she used. I chose my colors...and got rolling...
Rock'n Rolling! I inked each image in the lightest color and rocked & rolled the edges in a darker color to give a shaded look. To blend the colors even more, I used a Sponge Dauber. The center of each flower was colored using the darker color. The colors I used are:
- Peekaboo Peach & Calypso Coral
- Melon Mambo & Rich Razzleberry
- Bermuda Bay & Island Indigo
- Wild Wasabi & Cucumber Crisp
I love that the Stylish Stems Framelits have both intricate and sold shapes to mix and match. I placed a piece if Cupcakes & Carousels DSP behind the intricate cut flower.
Here's a look at this pair of cheery cards...
Thanks to Kris for the inspiration for these cards! With Pinterest and so many talented stampers out there who take the time to share on their blogs, it's easy to find inspiring ideas for any stamp set. You know what is also easy? Taking a minute to credit your source of inspiration. ;-) So if you find a project online that inspires you enough to re-create it and then share it on your own website, please take a minute to acknowlege the person who inspired you. Leaving them a nice message or linking back to their original creation (or both) is always a nice courtesy which can totally make someones day.
Wednesday, March 08, 2017
Project Life Wedding Pages
Today I have a few more pages to share with you from the Project Life Album I created as a gift for some dear friends.
Their wedding ceremony was just perfect...from the beautiful weather to the gorgeous cliff-side setting of Cresent Bay in Laguna Beach. I embellished a few photos with gold embossed shells from the Stippled Shells stamp set (retired) and some Gold 1/8" Ribbon. The photo at top right is stamped in White Stazon Ink with the pretty swirl from Creative Elements. (retired) Yes, I do keep my favorite stamp sets to use in my scrapbooks.
The top, left photo is stamped with and the word love from the Wonderful Words stamp set...that one goes WAY back to my firsr days as a SU! demo. Along with the oldies I've also used a current SAB stamp set...Any Occasion. Mr & Mrs from that set is stamped on the die-cut watercolored heart.
More gold embossed shells from the Stippled Shells embellish the photos at left. The single photo at right uses Falling In Love DSP from the current Occasions Catalog. It's just perfect for wedding photos! I embossed a lace border from the Delicate Details stamp set along the bottom of the photo. Both Delicate Details and Any Occasion are FREE selections during Sale-A-Bration. Here's a closer look...
Sorry about the glare from the page protector. I used the Remember This (retired) stamp set on these pages as well. Both sides of the Falling in Love DSP were perfect for thses photos, so here's a look at the flip side.
Their smiles say it all! It was such a wonderful day!!! Check back again to see more pages from this Project Life Album.
Friday, March 03, 2017
Project Life - Road Trip Pages
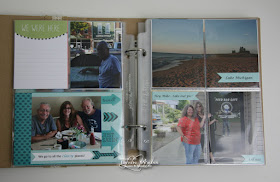
Recently I shared the cover of the 6x8 Project Life Album I created for some dear friends here. Today I have a few pages to share with you.
The first page of the album starts off with my friends' engagement. I used the retired Wedding Words Jumbo Wheel inked in Crumb Cake for the entire background and then inked it again in Early Espresso to emphasize a few of the phrases.
Sometimes you need to get creative so that the photos fit into the pockets...especially if they are portrait vs landscape. If you don't want to crop out any of the details, you can cut the photos in half to fit in the pockets like I did here.
It's fun to stamp overlays or even stamp right onto the photo using Stazon Ink. The photo at the top left is stamped with White Stazon. The journaling cards were left blank in the album so that my friends could write their memories.
Again, I created an overlay using a Window Sheet stamped with White Stazon for the photo pocket on the bottom left. The full sized pocket pages, like that shown at the right, allow you to create more tradional pages or you could use them to place souvenirs or mementos. I chose to create a full page layout and embellished the photo with beautiful Flourish diecut from Gold Foil Sheets. The DSP is from the Serene Scenery Paper Stack.
The next page also features a fun, full sized layout with overlay and DSP from the Serene Scenery Paper Stack. I used several retired stamps here including Painted Petals & Remember This.
The first page of the album starts off with my friends' engagement. I used the retired Wedding Words Jumbo Wheel inked in Crumb Cake for the entire background and then inked it again in Early Espresso to emphasize a few of the phrases.
Sometimes you need to get creative so that the photos fit into the pockets...especially if they are portrait vs landscape. If you don't want to crop out any of the details, you can cut the photos in half to fit in the pockets like I did here.
Again, I created an overlay using a Window Sheet stamped with White Stazon for the photo pocket on the bottom left. The full sized pocket pages, like that shown at the right, allow you to create more tradional pages or you could use them to place souvenirs or mementos. I chose to create a full page layout and embellished the photo with beautiful Flourish diecut from Gold Foil Sheets. The DSP is from the Serene Scenery Paper Stack.
The next page also features a fun, full sized layout with overlay and DSP from the Serene Scenery Paper Stack. I used several retired stamps here including Painted Petals & Remember This.
The Everyday Adventure Project Life Cards (retired) are perfect for these road trip photos! My friend will be able to easily jot down her favorite memories of their trip. On the photos used on the right page I cut them both in half to fit the small 3x4 pockets. Check back next week to see more of the album.
Have a GREAT weekend!
Wednesday, March 01, 2017
Stepped Up Lift Me Up
My last blog posting a shared a cute, fairly simple card using the Lift Me Up stamp set. Todays card is a stepped up version.
This time I used Rich Razzleberry for the main panel and embossed it using the Festive Embossing Folder. I matted my image and also added some popped up, die cut clouds as well as a couple more balloons. I finished off the card with some Bakers Twine and a die cut flower and Basic Rhinestone. Here's a look at the two cards together.
Everyone who places a Sale-A-Bration order of $50 with me during the month of March and uses the Hostess Code will recieve a card kit to make these two cards + one more...which will remain a surprise! It will contain complete instructions as well as envelopes. I will ship out all the kits at the end of the month. Visit my stampin' store to order the supplies today.