Creations by Lynn Weiss ~ Independent Stampin' Up! Demonstrator

ENJOY ~ INSPIRE ~ CREATE ~ SHARE


Showing posts with label Washi Tape. Show all posts

Friday, December 12, 2014

Flippin' Fridays - A Merry Little Wish

What a week! So much to do...and unfortunately I spent several days sick in bed. :-( Right now I'm feeling better, but very far behind with everything I need to get done before Christmas. So, I actually really am flippin' out this Friday!

I've been busy today working on my Christmas cards..hopefully I'll get them in the mail early next week. I'm taking a little break and thought I'd share a Christmas flip card with you using..

surprise!!!... the Festival of Trees stamp set & All Is Calm DSPAll Is Calm Washi Tape! I guess if you are a regular visitor of my blog, by now I'm sure you have figured out what my favorite items from the Holiday Catalog are, and hopefully you are not sick of seeing my many projects made with them.

I just love these colors together along with the shimmer & shine from the Silver Embossing Powder used on the  tree and the Dazzling Diamonds Glimmer Paper.
I came up with this card as I was working out my design for my Christmas cards this year. I'll share those once they are mailed.
Have a wonderful weekend!

Friday, December 05, 2014

Celebrate the Season

I just love this cute little washi tree created with the All Is Calm Washi Tape and the Tree Punch!

There is so much sparkle & shimmer on this card, that the photo just doesn't do it justice...from the pretty Dazzling Diamonds Glimmer paper - which adds the prefect snow-like sparkle for the background to the soft & satiny 5/8" Silver Satin Ribbon layered with the 1/8" Silver Ribbon which blends nicely with the silver metallic washi tape. I also used some of my favorite pattern of paper from the All is Calm DSP...wish I could buy a whole bunch of this one pattern!

Have you checked out the Clearance Rack for new year end closeouts yet? It's been updated today with lots of new great items just in time for Christmas!


I don't know about you...but I still have a LOT of things to do before the holidays are here! I'm heading out to do some Christmas shopping today and going to put up the tree later. Once our tree is decorated, I'll be done as far as decking the halls.

Have a GREAT weekend!

Tuesday, November 11, 2014

Calm Festival of Trees

I just love the Festival of Trees set combined with the All Is Calm products! Here's another Christmas card using these items.

This one really has some shimmer & sparkle thanks to the Dazzling Diamonds Glimmer Paper used for the snowy hill, the Silver Sparkle Dazzling Details used on each of the trees & the Basic Rhinestone Jewels on the Bitty Banner. Adding a bit of pretty silver metallic shine is the All Is Calm Washi Tape along the bottom and a bit of 1/8" Silver Ribbon added to the center of the bow.

The pretty snowflake patterned DSP is from the All Is Calm Specialty Pack.

For now, I am happy to only be seeing make believe snow...I'm not ready for the cold Winter weather yet! Today is going to be in the mid 50's and they are saying this will be the last we'll see the warmer temps for a while. ENJOY your day!

Thursday, November 06, 2014

Color Me With Blooming Kindness

Here's a card I created using the Blooming With Kindness stamp set.


To add interest, the main panel was cut into 1 inch strips after stamping.

The color combo of Blackberry Bliss, Cajun CrazeCrushed Curry comes from the Color Me Autumn Washi Tape pack...which I used on both the inside of the card and on the front along with Blackberry Bliss Stitched Satin Ribbon.

If you have wondered why I have not posted in a while, scroll on down to see some photos of what has been keeping me busy.

Thanks for visiting!

Wednesday, October 22, 2014

Wicked Wednesday: Toil & Trouble Potion Bottles

Eye of newt. Toe of frog. Wool of bat...

Do you have a hard time keeping all your essential witches brew ingredients neat & organized? Now that I have created these stylish, yet functional potion bottles I can keep all my ingredients fresh and at my warty fingertips! ***insert witches cackle here***


I picked up these bottles at a yard sale a while back (only .75 cents for all three...what a deal!) with the intention of making them into potion bottles for Halloween and I finally got around to doing it.  I was pleased to find that this Shakespeare quote stamp from the Toil & Trouble set fit almost perfectly on the bottles. I used some retired DSP scraps from three different packs... Cast-a-spell,  Pick Your Poison & Witches Brew. The Witches Brew paper is still available right now on the Clearance Rack...so snatch yourself up a pack! I also used some Witches Brew Washi Tape and some Raven Black Lace Trim around the neck of each bottle. The Raven Trim is still available on the Clearance Rack as well.

We're getting ready for our annual party so I've been busy making all sorts of spooky projects. Take a look at these melting black candles I made. I'll have these set out on our food table and not have to worry about anyone setting their costume or wigs on fire.


Can you guess what they are made from? The cardboard rolls from plastic wrap & foil packaging, a glue gun & hot glue sticks, black spray paint and those battery operated votive candles. Pretty awesome way to recycle and a super cool, yet inexpensive prop for our party. I cannot take credit for thinking this up though...I saw it on a Halloween site a few years ago and thought it was a great idea.

Thanks for stopping by...have a wicked good day!

Wednesday, October 15, 2014

Wicked Wednesday: Starry Night Kitty

When I first saw the latest group of In Colors I couldn't wait to see the Halloween DSP! I thought for sure Tangelo Twist & Blackberry Bliss were going to be the main colors ...but unfortunately I was wrong. Oh well...with my ink & cardstock I can create my Halloween projects in any colors I would like...and I like me some purple!


I stamped these images from the Bite Me stamp set in Tuxedo Black onto Whisper White and then sponged on some Tangelo Twist & Blackberry Bliss. I love the Color Me Autumn Washi Tape in Blackberry Bliss...it adds a fun splash of pattern below the image. The Lucky Stars Embossing Folder adds the perfect background texture for this spooky card.

Thanks for visiting!

Friday, October 10, 2014

Flippin' Friday: Color Me Autumn Flower

It's been a while since I did a Flippin' Friday post...and today is Friday! I have a flip card...so why not!? I thought a cute flip card was the perfect opportunity to use some of the Color Me Autumn Washi Tape.


I pulled my color combo of Cajun Craze, Crushed Curry & Blackberry Bliss from the pack of Color Me Autumn Washi Tape found in the Holiday Catalog...perfect for a fall Birthday.

The Hardwood Background stamp used on the Crushed Curry panel gives it a rustic look which I think goes right along with the Autumn feel.

Have a fantastic Friday!

Monday, September 08, 2014

Bearing Gifts

At the end of last week it was my UPS man who was bearing gifts when he delivered my Holiday Catalog order! I always love unpacking a box of Stampin' Up! goodies...it feels just like Christmas! I had a busy weekend, but managed to get in a little play time using some new stuff. Of course I had to try out my absolute  favorites first!

Hands down, my most favorite image in the Holiday catalog is this adorable polar bear with the cute kiddos riding on his back called Bearing Gifts. It's a single stamp with the greeting below the image. For greater flexibility when using this stamp, I cut the sentiment off the bottom and mounted it on the side...so mine is now essentially a two stamp set.

My other new favorites used on this card is my favorite DSP from the Holiday catalog...the beautiful All Is Calm Specialty paper. I couldn't decide on a favorite as far as accessories go, so I used all my favorites!

  • All Is Calm Washi Tape - there are 5 different patterns in this set!
  • All Is Calm Snowflake Embellishments - metal charms to tie onto your projects with a pretty silver finish
  • Lost Lagoon Silky Taffeta Ribbon - just like it's name...very silky and easy to work with.
I had fun using my Blendabilities Markers to color this...but...when I was almost finished, and just about to add just a little more shading with the darkest Coastal Cabana marker, I didn't remember to open my marker away from my artwork. In not doing so, you run the risk of getting splatters of unwanted color on your work if the brush tip hits the side of the cap as you pull it off. Which is what happened to me. Other times when this has happened, I've been lucky and able to use the Color Lifter to remove most of the color to make it virtually unnoticeable, but this time I wasn't so lucky. Can you see where the unwanted Coastal Cabana splatters are?


Hopefully not...because to camouflage them I used dots of Dazzling Details for a sparkly snowfall background. So my mistake turned out to be a good thing.


Check out the new Holiday Catalog...what are your favorites?

Wednesday, June 04, 2014

Thanks Traveler

One of my favorite new catalog sets is Traveler. I love all the vintage style images perfect for masculine cards or vacation scrapbook pages. Here's a masculine card that my local customers had the opportunity to create when they picked up their new catalogs last week. It is suitable for any occasion.

The World Map background stamp seems to go hand in hand with the images in this set. It's shown here stamped in Basic Gray onto it's coordinating card stock. The polaroid frame from the On Film Framelits frames this image well. The Epic Day Washi Tape makes the perfect embellishment. The embossed stripes of the frame along with the stripes on the washi tape remind me of railroad tracks, so I really like the way this turned out.

Thanks for visiting today!

Saturday, May 10, 2014

Recycled Blendability Caddy

Whenever we add new supplies to our crafting space we are faced with finding a good storage solution to help keep things organized. I not only  want to be organized, but it is also important for me to have my supplies easily accessible. If the storage solution is attractive that's a bonus...if it is also low cost even a bigger bonus! This caddy I created for my new Blendabilities meets all the above criteria.


It's cute AND functional, and the best part it was basically FREE! A few years ago my Aunt had given me a few Crystal Lite containers that I had stashed away thinking I could alter them somehow. When I was searching for a way to store my new markers I found that these containers were a perfect fit. Since they are flat on the sides they are easily stacked. Lucky for me she had several more of these stashed away (thanks Aunt Roberta!) so I decided 6 was a good number to start with. Each cubby can comfortably hold 10 Blendies...so I should be good for a while!

All I did was adhere some washi tape around each edge...I used a pattern from Epic Day and one from Season of Style (this is actually on the Clearance Rack right now). Then I adhered them together using Wafer Thin Velcro Fasteners. This way if I decide to change the configuration later or swap out the washi tape design it will be easy to do so. Here's how my new caddy looks sitting on my desk.


I keep my other markers in these acrylic containers* along with my ink pads, and I like that the recycled Crystal Lite containers are clear so they all kind of match. I work so much better when my work space is uncluttered and I know where things are. Hopefully this idea will inspire you to reuse/recycle something you have laying around and turn it into something functional.

 Check out my other Stampin' Space posts if you would like to see other low cost organizing ideas.

HAPPY Mother's Day to all you Moms! Have a wonderful weekend!!!


*Every time I post photos of my work space I get a LOT of questions regarding my ink storage containers. I purchased these on line quite a while back from a company called Dzyntec. Unfortunately, they have since gone out of business.

Friday, December 13, 2013

Flippin' Friday: Creative Elements Style

I cannot believe it's flippin' Friday already! This week has flown by! Too much to do, and just not enough time to do it...tis that time of year! I did finally finish all my Christmas cards, so next week I'll be sharing those. (some of the recipients occasionally look at my blog, so I wouldn't want them to see it here first) This one isn't a Christmas card, but I did use some products from the Holiday Catalog in a non-holiday way.

Doesn't the stamped main image look like I took a lot of time coloring and then tediously cutting it out? It was actually stamped on Whisper White in Cherry Cobbler and then I used a sponge dauber to lightly add a bit of color.

Then I masked off the flower, with a post it note cut in the shape of the flower...stamp on a post it and then cut. I read a smart tip not long ago: cut several masks at the same time by cutting through several post it notes at once. DOH! Wish I had thought of that, or at least read it a lot sooner...I've been doing it the hard way, one at a time! Once you take the time to cut out the mask, it can be used over and over, so  just store in your stamp case for next time.

Anyways...once I had my mask over the flower, I sponged on some Early Espresso. Then added the pretty swirl design. The best part is when you pull off the mask...the image just pops!
I used paper from the Season of Style stack along with the coordinating Washi Tape and the die cut thx from the Circle Card Thinlits accessories that comes with this die set..

I have another busy weekend ahead of me...as I'm sure you do! Thx for stopping by today!
Supply List:

Wednesday, December 04, 2013

Happy Day File Folder Card

Sunday, Monday...Happy Days
Tuesday, Wednesday...Happy Days
Thursday, Friday...Happy Days
Saturday...what a day!
Goovin' all week with you!

I'm sorry...but every time I see the name of this stamp set (Happy Day) I break out into song (in my head, not out loud...luckily for those around me)! When I was a kid, (waaaaay back in the 70's) Happy Days was one of my favorite TV shows. Anyways...on to todays stampin' creation. Surprise! it's made using the Happy Day set!


It was after seeing so many of the cute file folder cards made with the Envelope Punch Board that I knew I needed to purchase one. This is my first, of what I'm sure will be many, file folder cards.

It is super easy to create the tabs using the Envelope Punch Board. Here's how...

Start with an 8-1/2  x 5 -1/2  base, scored at 4- 1/4". (I used Pink Pirouette) I wanted my folder flaps to be staggered in width, so I trimmed 1/2" off the front of the card base, but you can skip that step if you wish.

Step 1 : Punch just the left edge of your card stock as shown below.
Step 2: Move your card stock down to the 3" mark on your Punch Board, as shown below, and punch a second time.
Step 3: There will be an area you will need to trim away with your paper trimmer. So start at valley and trim off to the right edge as shown below.

Step 4: Next you will want to round the corner as shown below. The corner rounder feature is one of my favorite parts of the Envelope Punch Board.
After rounding the corner, you will have one file folder tab complete.

Step 5: To do the other one, just flip your card stock (as shown below) and repeat steps 1-4.
This is what you will end up with...
Now it's the fun part...time to decorate your file folder! I used Season of Style Washi Tape & DSP along with Cherry Cobbler Seam Binding Ribbon on my folder.  Oh..and what stamp set did I use?
 
Happy Day(s) of course! If you are feeling a little nostalgic, click below. That way this tune can be stuck in your head as well! (you're welcome!)

Supply List:

Friday, November 22, 2013

Flippin' Friday - Fall Flip Card

Happy Friday everyone! Here's a couple of Fall Flip cards I made using the Label Card Thinlit Die and the ever versatile set Lovely As a Tree. This one is a thank you card, but it could just as easily work as a masculine birthday card or a Thanksgiving card as you will see in my other version below.

I randomly stamped the oak leaf image from this set (mask off the parts you don't want inked with post it notes) and then wheeled over the panel with the Timber wheel.
The panel on the right uses Early Espresso Core'dinations Card stock which I embossed using the Woodgrain Embossing Folder. The tree was colored with my Aqua Painter and various colors of Classic Ink.
This is the Thanksgiving version which has an extended panel.
The Charles Dickens quote was from the retired set Always Thankful. The embossed panel flips put for a larger space to write a message.
I just added a little interest with some stamped leaves in Crumb Cake and some Washi Tape from the Epic Day Collection.

Have a wonderful weekend!
Supply List:

Wednesday, October 16, 2013

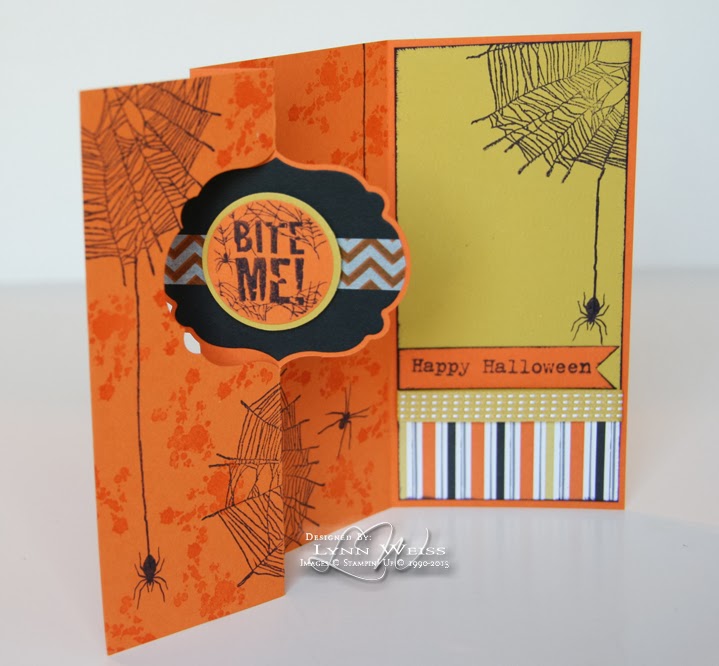
Wicked Wednesday: Bite Me Flip Card

I've been seeing so many fun cards created with SU!'s new Thinlits Flip Card Dies that I finally decided I needed to get a set to try out for myself. I had a hard time deciding between the two sets offered, but ended up going with the Labels set first...mostly because I like the little added extras better than the ones included in the Circle set. (but who am I kidding...I'm sure I will be adding that one to my collection before too long as well!)

These flip cards are even easier to make than I had imagined and I've already been having lots of fun playing with these dies! I also just got the newly released Photopolymer set Bite Me. So here is my first creation using both of these items.


With all the Halloween sets I own, can you believe I don't have one with a large spider web?! So I was super excited to get this set just for that one image alone...but actually all the images are pretty useful. I especially like the splotch that I used here to create a background. Here's what the card looks like as you start to open it...
and here is is all the way opened...
I used a little trick when cutting the base for this card that created the extra panel on the end. (the one with the Summer Starfruit layer) Here's how to do that...
You still start with the same 1/2 sheet of card stock, but cut it just a sliver smaller...1/16th of an inch shy of the 5-1/2' measurement, which equals 5-7/16 inch wide. This enables you to easily pull the one end up and over the end of the Thinlit Die as shown above. So instead of cutting it as it goes through the Big Shot, it will create a crease...and that is where you will fold it.

The extra panel is perfect if you want to include a hand written message. Here's a better look at how I decorated the inside of the extended panel. (the other side is covered in Witches' Brew DSP as shown in 1st photo)
BEWARE...HEED MY WARNING!!! 
Please be careful when using this stamp set if the sight of a spider freaks you out. While stamping this card I tested out a few of the stamps on scrap before I stamped them onto my card stock. Later when cleaning off my messy desk, I lifted some scraps and...
YIKES!!!! There was a spider on my desk!!! OK...so he doesn't look too huge, hairy & horrific in this photo, but in the brief second when I saw him "lurking" under my scraps, I have to admit I let out a loud scream!

So, I guess the TRICK was on me! Hope your day is filled with TREATS!