Creations by Lynn Weiss ~ Independent Stampin' Up! Demonstrator

ENJOY ~ INSPIRE ~ CREATE ~ SHARE


Showing posts with label Stampin' Space. Show all posts

Saturday, May 10, 2014

Recycled Blendability Caddy

Whenever we add new supplies to our crafting space we are faced with finding a good storage solution to help keep things organized. I not only  want to be organized, but it is also important for me to have my supplies easily accessible. If the storage solution is attractive that's a bonus...if it is also low cost even a bigger bonus! This caddy I created for my new Blendabilities meets all the above criteria.


It's cute AND functional, and the best part it was basically FREE! A few years ago my Aunt had given me a few Crystal Lite containers that I had stashed away thinking I could alter them somehow. When I was searching for a way to store my new markers I found that these containers were a perfect fit. Since they are flat on the sides they are easily stacked. Lucky for me she had several more of these stashed away (thanks Aunt Roberta!) so I decided 6 was a good number to start with. Each cubby can comfortably hold 10 Blendies...so I should be good for a while!

All I did was adhere some washi tape around each edge...I used a pattern from Epic Day and one from Season of Style (this is actually on the Clearance Rack right now). Then I adhered them together using Wafer Thin Velcro Fasteners. This way if I decide to change the configuration later or swap out the washi tape design it will be easy to do so. Here's how my new caddy looks sitting on my desk.


I keep my other markers in these acrylic containers* along with my ink pads, and I like that the recycled Crystal Lite containers are clear so they all kind of match. I work so much better when my work space is uncluttered and I know where things are. Hopefully this idea will inspire you to reuse/recycle something you have laying around and turn it into something functional.

 Check out my other Stampin' Space posts if you would like to see other low cost organizing ideas.

HAPPY Mother's Day to all you Moms! Have a wonderful weekend!!!


*Every time I post photos of my work space I get a LOT of questions regarding my ink storage containers. I purchased these on line quite a while back from a company called Dzyntec. Unfortunately, they have since gone out of business.

Wednesday, January 08, 2014

Workspace Wednesday: Organizing Scraps

In my last posting I told you about how after a long break in stampin', due to the holidays, I had looked forward to an afternoon filled with stampin' only to discover that my rubber room was a total disaster due to a combination of me not putting things away and using it as a dumping ground while we had family staying with us. So instead of being creative, I had to clean first.
I shared my messy room photos and promised to share my more organized work area when I was done. Since it hasn’t been too long since my total room makeover, and I’ve done a decent job keeping if fairly neat, it was mainly just the little stuff…like those pesky scraps that needed to be organized and put away.

So here is a shot of my room as you walk in...
No more clutter on my desk or on wall behind me! Most of the previous junk had been piles of cut card stock, punched & die cut shapes, etc, that I just didn't want to pitch but didn't quite know what to do with them. Now, I think I may have finally found a good system for helping to keep all my scraps in check. Best part is that I was able to use things I already had on hand so it didn't cost anything.
These cute cardboard bins that I had picked up on various trips to Target finally became useful. (I found them in their Dollar Spot.) I used my Apothecary Art stamp set along with the Label & Bitty Banner Framelits to create labels for the bins. The first bin is "card parts" and what I did was sort various stamped images and put them into small ziplocks or cello bags as shown below. 
I had a stash of small ziplocks & cello bags saved from the packaging of some SU! items for shipping...so instead of throwing those bags away, use them to help organize your small stuff.


The next bin contains stamped backgrounds. They are mostly 1/4 sheets that are stamped and ready to be made into cards. Hopefully when I am in a hurry I can grab some of the parts from these various bins and make a quick card easily. These were mostly extra pieces I ended up not using on previous projects. The 3rd bin is full of completed cards that are ready to send. 
This 4th bin is much larger and I use it for my clear blocks. It's easy for me to grab the one I need and then throw it back into the bin when I'm done. All these handy bins are against the back wall behind where I sit, so I can just swivel my chair to grab them (or to put away).
As you can see in above photo, there is also a 4 drawer unit painted to match my room. I have shared with you in a previous post that this was a yard sale jewelry box in its former life. I use it to hold my embellishments. You can read more here if you would like.

I have one drawer that holds all the various punched & die cut shapes that I ended up not using.
I used small stamp cases and empty button/brad cases to sort like items. It makes it real handy to grab what I need when working on a project.
You probably noticed my peg board which is on the wall behind and next to me. One of my favorite parts of this is the gutter I have mounted the length of it. It has worked out really well for me to store my ribbon. In the past I've tried other storage for my ribbon but this has definitely been the best for me. I can easily see exactly what I have...so I actually use it, plus I'm able to take out the whole spool and put it back without having to deal with a dowel like many ribbon storage systems. My over flow ribbon goes into a couple plastic drawers shown here.
Here is another nice little storage bin I found at Target. Unfortunately, by the time I came across them on their clearance end cap they only had 2 left...but the good news was I got them both for super cheap. They have grommets & magnets on the back for easy mounting and 3 compartments for storage. I decorated them with ribbon, a flower from the retired Pretties Kit and a button with a rhinestone to finish off the flower. These have been really handy for holding some of my extras and I can easily see what I have at a glance. With the added embellishments they are not just useful, but pretty as well…and who doesn't like attractive storage solutions? 
Speaking of decorative storage solutions, I inherited a whole bunch of old buttons from my Grandma & my Mother-in-law and they were just sitting in a box, so I decided to put them in these antique canning jars that had been sitting in my fruit cellar. The buttons are in the two smallest jars and the largest one holds scraps of ribbon from the end of spools...same goes for the clear canister next to it. That one I decorated with some SU! rub-ons to make it a little cuter. These sit on top of my wood mount stamp shelving unit (it was a media shelf in it's previous life) below the window.

On the wall next to the window is a future project of mine...
I'd like to fill this antique printer’s drawer with little stamped images, old photos and trinkets that mean something to me. As you can see...I have a few things in it...hopefully I'll share more in the near future. Across from my desk is my cutting station and my closet.
The antique sideboard is where I keep my Big Shot and paper trimmer. We inherited the sideboard after it didn't sell at my Mother-in-Law's estate sale because nobody liked the color it was painted. LOL...it doesn't match my room exactly...but close enough, so it ended up working out well for me! You can read more in this post. 
See the pretty box covered in cone flowers, hummingbirds and butterflies drawn by Susan Winget? I just love her work! I picked that up on sale a Joann's one day hoping that it would fit my embossing folders.
If the box was just about ¼” taller it would have been absolutely perfect, but it is still working out pretty good for me. (I just cannot buy too many more embossing folders!) It looks pretty when not in use, but when I need an EF it's right there at my fingertips. Same goes for the bin that holds my framelits...I shared more in this post about organizing framelits. That bin was from the Target Dollar Spot just like the previous ones I showed you. It doesn't hold the larger Thinlit Card Dies but for the regular size it's perfect. I keep the larger and out of season framelits in the drawer under my Big Shot.


I hope you enjoyed this peek into my Stampin' Space. Sharing my space with you from time to time helps me to stay on track with keeping it better organized…we all need a kick in the pants sometime, right!? ;-)  Hopefully there was an idea or two that you found useful.

Monday, January 06, 2014

Peaceful Petals in a Chaotic Workspace

Towards the end of my last post I stated, "With our power back on, our houseguests back in North Carolina, and my hubby back at work after a week long vacation I finally have time to get into my stamp room and play with some new stuff!!! " Boy, was I dreaming! I walked into my room planning to stamp and unfortunately this is what I was met with...


I think the last time I was in here must have been to dump stuff on my desk to get it "out of the way". There was scraps of paper, partially made cards, stamped images & die cuts that didn't end up making it onto a card, and even Christmas wrapping supplies thrown onto every flat surface available. Forget about having a friend able to sit at my desk to stamp with me...there wasn't even room for me to stamp!
I have a hard time keeping all my scraps in check on a regular basis, but with the added busyness of the holidays, our power outage (yes...I'll keep blaming the power outage for all of my shortcomings! ;-) and houseguests I really let my room go unorganized. Normally, I like to keep the area behind where I sit (shown above) fairly clear so I can put my laptop there or pages that I'm working on...but as you can see all sorts of junk had taken over this prime space.

This is the view of my storage closet and cutting station from my seat. Luckily the closet was kept neat, but my cutting station was another story. Needless to say, I had to clean up before I could even think about stamping. I did reward myself after "finding" my desk top and I took a time out to create something with my favorite new goodies from the new Occasions Catalog. Check it out...

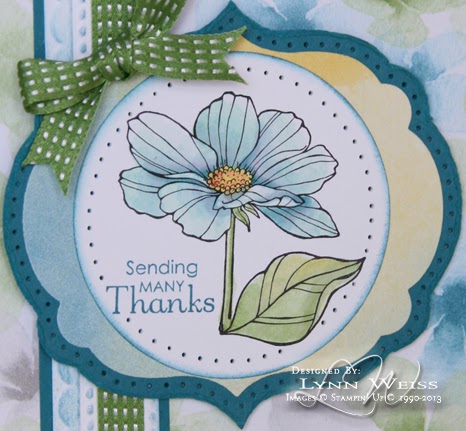
I used the pretty new set Peaceful Petals along with new DSP...Watercolor Wonder. I love the soft watercolor feel of this paper and used two patterns on my card and for the background in my photo. Here's a closer look at the watercolored flower.
Cosmos are one of my most loved annuals, so this image is probably my favorite in the set. The leaf image is separate, and not the proper foliage for Cosmos, but I took creative licence and added it anyways. 

Now that I've had my stampin' fix...it's back to my not so fun task...finishing my organization  project. Although it's not much fun, I have to admit, it's worth the effort because it's so much easier to work in a space that is clean and well organized...and what better time to get more organized in the New Year!

Check back on Wednesday for my Workspace Wednesday posting showing the after photos of my re-organized rubber room. If the rest of you have problems keeping all your unused stamped images, die cut & punched pieces & card parts in order like I do, you may find it helpful.  

Thursday, April 11, 2013

New Wood Mount Cases

How cool is this!? New cases for our wood mount stamps will match the Clear Mount boxes! Looks like they will have the printed labels as well! No more making copies of the label sheets before assembling stamps. It makes storing stamps, markers, etc...so much more simple (and pretty!) Check out the video...you even get a sneak peek of a new set.

Wednesday, April 03, 2013

Workspace Wednesday - Fabric Covered Box Tutorial

I'm always on the lookout for pretty storage containers to help keep my work space organized. I have a few sets of retired Sizzix Alphabet Dies from Stampin' Up! that I have always just kept in the corrugated cardboard boxes they came in...while on the lookout for a prettier storage solution. I never found any that were the right size, and I've had some Stampin' Up! fabric sitting her unused...so I decided to make my own pretty storage boxes by covering them in fabric.

Here's the first one I made. I had to use non SU! fabric, because the SU! fabric was not big enough to wrap all the way around the box. It turned out pretty good, but I made a few mistakes along the way. I'm sure you'll agree that it looks WAY better than it did!  This one holds 16 Bigz Dies.

After the trial and errors of my first fabric covered box I decided to give it another shot and take some photos along the way in case you would like to give it a try. The second box I covered using Stampin' Up! Springtime Vintage Fabric. The finished box holds 8 Bigz Dies.

These are the supplies you'll need:
First, cut the flaps off the top of your box with a heavy pair of scissors...I used my Craft & Rubber Scissors, but you could also use a box cutter. Just be sure to cut a nice smooth, straight edge for the top of your box. At this time I also measured, and then used my Crop-A-Dile to punch holes into the front of the box. This is where you will set the large eyelets after the box is covered with fabric.
Next, cut down your ironed piece of fabric with fabric shears. You will want it long enough so that it wraps around the entire box with about a 1/2" overlap at seam and is wide enough to fold inside and under the box. I used Sizzix Multi-Purpose Adhesive Sheets to adhere my fabric, so I also cut those with my paper trimmer so that they fit the sides of the box.
Next, you will want to adhere the strips of adhesive to the sides of the box. Use your bone folder to burnish it in place so that it adheres well to the cardboard. Note: When making my first box I applied the adhesive strips directly to the fabric and it was a  LOT harder!

After you get the adhesive burnished to all surfaces of the box that will be covered with fabric, peal off one section at a time (starting with the outside of box) and start wrapping the fabric around the box. I had the best luck starting this process by laying the box on it's side right on top of the fabric. If you mess up, don't worry, you can always gently pull the fabric off and start again. Carefully smooth out any bubbles or creases in the fabric. Pull off adhesive covering as you go until the whole outside of the box is covered.
At the back of the box there will be about 1/2" where the fabric overlaps. I used a small bead of Tombo Multi-Adhesive along this seam. Next, fold down the fabric inside of the box. Note: With this step, I had a hard time not leaving any creases in the fabric around the corners, but I planned to line my box with card stock to finish it, so I wasn't too concerned.

The bottom was easy...just like wrapping a present. I used my bone folder to help with adhering the fabric & keeping it smooth all around the box.

Next, I used my piercing tool to poke through the fabric where the holes in the box were so that I could easily insert the large eyelets. After I got them in place, I set them with my Crop-a-Dile. Then I added some ribbon that would become handles. After I got the ribbon handles in place, I used my hot glue gun to secure them to the inside front of the box as shown below.

To prevent my fabric from fraying and possibly coming away from side of box after using it for a while I thought it would be best to line the inside...plus it just looks nicer and finishes it off. To do this I just used some card stock which I measured and cut to fit. The bottom was a little tricky because I scored it about 1/2" on each side to form the base. That was adhered to the bottom using Tombo Multi-Adhesive. Then I fit it the front & back pieces which I also scored 1" on each end and then the 2 side pieces which were not scored at all. I used a generous amount of the Tombo and it worked out real well.

Don't forget to cover your bottom!
Here's how the boxes fit inside my cabinet...looks a lot nicer than the plain old cardboard boxes! Since they are inside a cabinet, I don't need to worry about a lid to keep out dust. I like how they are easy to grab out & put away when I'm done. With the alphabet dies in particular I find it easier to be able to take out the whole box when I'm working...because you are almost always going to need several of the dies to create the words you need.
Since we are on the subject of Sizzix Die storage, I figured I may as well show you how I store the rest of my dies. They fit perfectly in the 4 drawer Jetmax Craft storage cubes. I can fit 18 Bigz dies per drawer.
Hope this post inspires you to put some of the fabric you may have sitting around to good use. I don't sew, so for me the only way I use fabric is in some sort of crafty type project where I can use glue!

Wednesday, January 23, 2013

Workspace Wednesday - Cutting Station

It's been a while since I did a Workspace Wednesday post and I realized I never shared one of the favorite areas of my stampin' studio makeover...my cutting station. Before: I had space for my paper cutter but I had to run into the other room every time I wanted to use my Big Shot. So, one of my main goals when I created  my newly organized space was to have a cutting area for both my paper cutter & my Big Shot.

This antique buffet is the perfect height to comfortably use my Big Shot & my paper cutter more efficiently and offers storage space inside as well. This piece had belonged to my dear Mother-in-Law, who is the one that first got me into stamping, so I know she would love that it was being used in my studio. Since I don't have overhead lighting, the Ott lamp provides plenty of lighting while I work.
I hung a decorative curtain rod (previously used to hold my punches) over my work station to use as a way to display some of the recent scrapbook pages I've made. It will be fun to change them out. I got that idea from Pinterest when I was looking for organizing ideas for my room.
Here's a peek inside the cabinet. The drawer with dividers, meant for serving utensils, is perfect to hold all the cutting pads & platforms for my Big Shot. Underneath the drawers are 3 sections with shelves perfect for storing my larger dies, Sizzlet alphabets, my Bigz alphabets & more. I store my Framelits in the pink bin on top since I use them so often. My embossing folders and the rest of my Bigz dies are stored in the 4 drawer cube steps away from my cutting station as shown in the "after" photo below.
BEFORE
AFTER
I hope you enjoyed the peek inside my studio...I'm heading back down there now to get creative...hope you find some time today to get creative as well!

Wednesday, May 09, 2012

Workspace Wednesday - With a Little Paint

With just a little bit of paint you can take something old and worn and totally transform it into something useful to coordinate with your space. I did that with an old jewelry box that I picked up at at a yard sale for a couple bucks. The small drawers are perfect for holding embellishments and tools. I've had this for a while...here it is in my room before the makeover. (I thought I took a better before photo...but you'll get an idea of what it looked like.)

BEFORE

AFTER
I took out the drawers and spray painted the outside with glossy white spray paint. (It took 3-4 light coats to cover the old wood) The drawers were painted with the same paint I used for the walls and for my peg board, then I sprayed them with a glossy clear coat. The handles were spray painted with metallic silver to coordinate with the drawer pulls on my cube storage below. See how nicely this little jewelry box holds my embellishments and tools?
I can fit 20 packs of SU! buttons & brads per drawer. It was a good yard sale find I'd say! Makes me want to get out there and hit some sales...haven't done that in a while. You never know what kind of treasure you will find!

I'm in the middle of transforming an old chair that had belonged to my Grandma...again, with just a little paint.  It will be my guest chair for when I have a friend over to stamp. Hopefully next week I will have that ready to share with you.

Thanks for visiting my Stampin' Studio today.

Wednesday, May 02, 2012

Workspace Wednesday - Into the Closet

Wow, you all really liked my plastic drawer makeover I shared last week! My blog stats hit an all time high for page views on a single post. I'm afraid I don't have anything as exciting to share with todays Workspace Wednesday post, but hopefully you'll still like what you see, and possibly pick up an idea to use in your stampin' space.

Today I am showing you the BEFORE & AFTER of the 3rd wall of my room. This is just a very small wall because it is shared by both the doorway to the room as well the closet. Before, I had my TV on top of a large Sauder cabinet. Inside I stored mostly alterable items, retired holiday stamps & retired card stock. It was functional, but as you can see from my BEFORE photo, it was way too large for the space. (In my defense, I always kept the doors to this cabinet closed so you didn't normally see my mess inside)

BEFORE
AFTER
As you can see, now I am using 3 of the Jetmax storage cubes to hold the TV. This is a temporary fix until I find something that works better. (Or maybe get a flat screen to mount on wall!;-)  Even though the TV is small, it's so old that it's really heavy and I'm not too sure that these units can support the weight long term. Do I see another trip to IKEA in my future? The cabinet I had there previously is now in the closet...more on that in a minute.

First, I wanted to show you one of the drawers from the 4 drawer unit. I saw this good tip on Pinterest...use Altoid tins to organize small things that normally get thrown into the "junk drawer". Please tell me I'm not the only one who has a junk drawer?
This has been working out really well for me. I labeled each tin and I can easily find all sorts of little things that previously took up way too much space on my peg board or were just thrown in a drawer. I already had the tins because I was saving them to alter. (along with a BUNCH of other tins!) So at least now they are put to good use.

Here's a look at the right side of my closet...both before & after.
BEFORE

AFTER

I put my plastic 12 x 12 paper storage shelves inside. This holds most of my current 12 x12 card stock and DSP along with some scrapbook pages that are finished or in progress. I no longer have to worry about dust or fading from the sunlight. Here's another look.
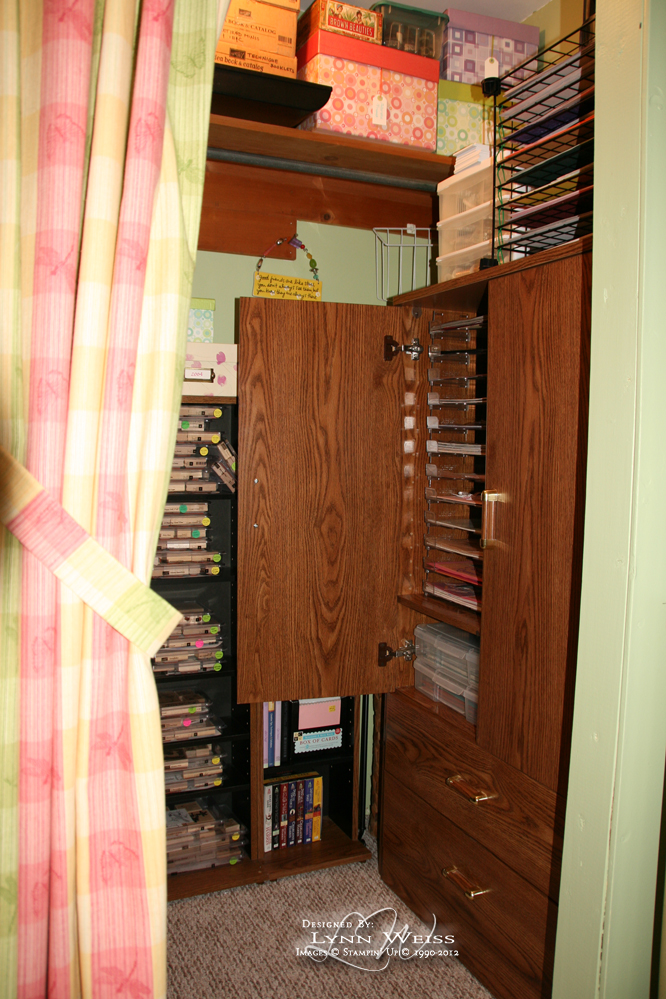
In the before shot of my closet above, you can see I was storing my stamp sets on DVD/CD shelving units. A couple of those were able to stay on the back wall of the closet, while the larger units were moved to the main room on the wall behind my desk. I store all my sentiment/word stamps (including retired) on one, directly behind where I sit so they are within easy reach. The rest of my retired stamp collection is now stored in this large oak filing cabinet. ($5 garage sale find) which now sits on the other side of the closet. Check it out...

The two drawers hold a LOT of stamps! Plus I have room in the top drawer for my retired 8-1/2 x 11 card stock as well. This file cabinet is so sturdy that I was able to put my other paper rack right on top of it. This makes it so much easier to see what I have because it is all at eye level...so much better than when it was sitting on the floor.
Before, this 2 drawer cabinet had been sitting behind my desk and I had it cram packed with stuff I didn't even know I had! Here's a reminder of how it looked before.
I think you'll agree that it is much more useful now! So far I've been doing good as far as putting everything back in its place when I'm done, so hopefully my drawers won't look like the above again!
I hate to leave you with the ugly image above, so here's something cute to look at...
Thanks for joining me on my tour!