Creations by Lynn Weiss ~ Independent Stampin' Up! Demonstrator

ENJOY ~ INSPIRE ~ CREATE ~ SHARE


Showing posts with label 2012 Holiday Catalog. Show all posts

Saturday, December 29, 2012

Snow Flurry Candle Wrap

I hope you had a wonderful Christmas! Today I want to share a sparkling table decoration I made for the holidays. I love the battery operated candles that you can get now. Especially the ones with timers that come on every evening...they even smell good, and I don't have to worry about my kitty burning his whiskers off or knocking them over when he gets curious. However, they are kind of plain...so I made a pretty wrap to dress them up.

I used: Snow Flurry Bigz Die, Silver & Champagne Glimmer Paper, Always Artichoke card stock embossed with Lacy Brocade Embossing Folder and spritzed with Vanilla Shimmer Smooch Spritz, Adorning Accents Edgelit, Vintage Faceted Designer Buttons and lots of Basic Rhinestones. Here's how they look on my table.
Isn't the quilted table runner gorgeous? It was a Christmas gift made by my talented Mom. She also made me a quilted wall hanging that holds Christmas cards...you can see part of it hanging on the wall behind the table. I'll have to get another photo so you can see the entire quilt. (she takes orders!)

The red vase/candle holder in the center was a happy find that really coordinates well...the snowflake even has rhinestones on it. I used velcro to secure the wrap to the candle, this way they are easy to remove and I can make different ones for each season. Here is one I made this past fall.

We got snow on Christmas Eve, so we were blessed with a white Christmas again this year. I'll leave you with a pretty shot of our Christmas sunrise view out our front window.

Thanks for stopping by today!

Sunday, December 23, 2012

Shimmering Christmas Deer

Here is another one of the Christmas cards I sent out to our family and friends this year.

I used Winter Wonderland embossing powder on the Christmas Deer image...which is white, and loaded with silver & iridescent sparkle. The Whisper White layer was embossed using the Lacy Brocade Embossing Folder and then spritzed with Vanilla Shimmer Smooch Spritz. I wish you could see just how these cards sparkle & shimmer but I just didn't get a good photo capturing the sparkle. Here's a closer look where you can kind of see the sparkle & shimmer...
I used Snow Festival DSP along with some retired Deck the Halls DSP to coordinate with the Cherry Cobbler & Always Artichoke card stock. Along with the Christmas Deer stamp set I also used Bells & Boughs (sentiment) and the swirl from Creative Elements.

This will probably be my last post before Christmas, so I want to wish you and your family a wonderful Christmas!

Stevie says Merry Christmas too!


Friday, December 21, 2012

Bells & Boughs With Ornament Keepsakes

This is one of the Christmas cards we made at my Christmas Card Class earlier this month. It is also one of 4 cards that I designed to send out to our family & friends this year.

The Raspberry Ripple layer was stamped with the pretty pine & poinsettia image from Bells & Boughs. The ornaments were all stamped in Wild Wasabi and cut out using the Holiday Ornament Framelits. The "Merry Christmas" sentiment is from the Mixed Medley Hostess Set available from the Holiday Catalog. This card was one of the favorites at the class...I hope my family & friends I sent it to liked it as well.

Here are some cute & quick tags I made for bags of cookies I took to my cookie exchange party. I used sparkly white embossing powder on those. They really dressed up my cookie bags.

I still have baking & wrapping to get done...so I better run!

Thursday, December 20, 2012

Snow Much Fun Luminary Easel Card

While browsing the SCS gallery one day I came across this beautiful card and thought it was such a fantastic idea to create a luminary from an easel card...so of course I had to try one!


I love the sparkly snowflake cut from Silver Glimmer Paper using the Snow Flurry Bigz Die! I colored a Basic Rhinestone with a sharpie marker to coordinate with the Gumball Green Stitched Satin Ribbon. I got my color combo of Baja Breeze, Gumball Green, Cherry Cobbler & Primrose Petals from the cute Snow Festival DSP. I used those color markers to color the cute snowman image which is embossed using Silver EP on Cardstock Vellum. The snowflakes from Snow Swirled were stamped using White Craft Ink. The "Warm Winter Wishes" sentiment is from my retired Snowflakes set. Here's a look at what they look like lit with a flameless candle.


Thanks for stopping by today!

Monday, December 10, 2012

Mixed Bunch Medley

I really love the bright, cheery color combo of this card we made at my recent All Occasions Card Class...especially on a dark dreary morning like we are having today.

The base is Pool Party, the embossed Perfect Polka Dot layer is Island Indigo, the Mixed Bunch flower is Primrose Petals, as is the Stitched Satin Ribbon. The strip at left is Raspberry Ripple and the leaves were punched from Certainly Celery using the Bird Builder Punch.

The sentiment, from the Blooming With Kindness set was stamped in Raspberry Ripple ink. The small, scalloped flower is from the Hostess set Mixed Medley and was punched using the 1-1/4" Scallop Circle Punch which is new in the Holiday Catalog. The Basic Rhinestone center was colored with a sharpie.

Thanks for stopping by today.

Tuesday, November 27, 2012

Mixed Medley Snow Flurry

We had some snow flurries here in SE Michigan over the weekend...but they sure weren't as pretty and sparkly as this snowflake created with the Snow Flurry Bigz Die and Silver Glimmer paper!


I used the triple time stamping technique to create my background. If you have not tried this yet, it's so easy...just cut 3 sizes of card stock...in this case Baja Breeze was used, and adhere together using temporary adhesive, centering each piece on top of the other. Stamp all three pieces at the same time, making sure to over lap the images onto more than one of the layers. I used the snowflake medallion image from the Mixed Medley Hostess Set inked in Not Quite Navy and the En Francais background stamp inked in Baja Breeze. After stamping, I adhered each layer to a piece of Not Quite Navy card stock cut 1/4" larger. I originally saw this technique shared by Dawn, and she has a great video showing exactly how to do it.


I used the largest & medium sized snowflakes adhered together with a dimensional, and the Merry Christmas image from Mixed Medley cut using 3/4" Circle Punch. Do you like the pretty blue rhinestones? I just colored SU! Basic Rhinestones with a sharpie marker...its a great way to have rhinestones or pearls in any color you would like!

Thanks for stopping by today.

Tuesday, October 30, 2012

Christmas Frame & Coordinating Card

Today I have the last project of the month from Craft Project Central...this on is a *bonus* project and was designed by Terry.


Make a framed tree with a banner to mark the year for your home-for-the-holidays, or for a one-of-a-kind gift! The card perfectly complements the frame if you’re giving it as a gift, or make a bunch and send them out as your card this year! This project makes a great holiday class or club project too!

To get the instructions for Terry’s bonus project, just subscribe to October and meet one of the bonus project requirements of subscribing to two or months in a row, putting the Craft Project Central badge on your blog, or referring a friend and when they subscribe, letting us know.

Thursday, October 18, 2012

Fall Basket & Apple Card

Here is another fun fall project for you from Craft Project Central! This one is designed by Monika.


Fall is here and apples are everywhere! Make this weaved basket for those yummy apple treats everyone loves this time of year! Perfect for a small party treat or a fun class project! To get the instructions for Monika’s project, just subscribe to October!

Reminder: You still have time to enter for my FREE month subcription to Craft Project Central! All you need to do is leave me a comment on this post.

Monday, October 15, 2012

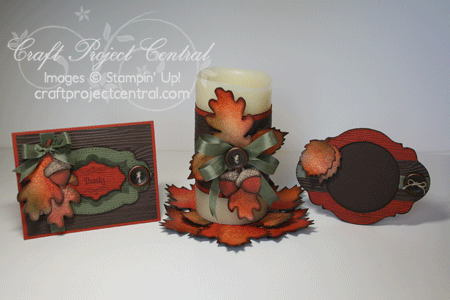
Autumn Accents Candle & Frame Set

I'm really excited to share the project that I created as a guest designer for Craft Project Central this month! I used some of my favorite new fall products from the Holiday Catalog, along with some other old favorites, to make this set. Hope you like it!


Rich colorful leaves with a touch of shimmer make this candle wrap with matching mat and chipboard frame the perfect addition to your autumn home décor. This would also make a lovely hostess gift during the fall season.
Wouldn't the candle wrap look lovely wrapped around a bottle of wine to give as a gift?


The chipboard frame would be easy to make for any holiday or occasion just by changing the colors. Check back to see a Halloween version of this frame tomorrow.

I actually made this set planning to give it as a gift...but I think I'm going to have to make another one, because I just cannot part with it now!

To get the complete instructions for my project just subscribe to October.

Leave me a comment here on this post before Friday afternoon and you could be the lucky recipient of a FREE month subscription to Craft Project Central!

Friday, September 28, 2012

Toxic Trick or Treat

With October only a few days away, I thought it was about time I shared something Halloweeny! Here's a cute, but simple card I created to demo for a workshop I had last week.


I have the clear mount Toxic Treats set, so it was easy to line up the "Happy Halloween" sentiment over the fence image right on my block and then stamp onto my card stock. After that I used the Apothecary Accent Framelits to cut the tag shape, and just cut the other rounded end at the bottom off. The rounded tab at the top is the perfect spot to add some sparkle using a Glimmer Brad.

Stamps: Toxic Treats
Card stock: Tangerine Tango, Basic Black, Lucky Limeade & Rich Razzleberry
Ink: Basic Black
Accessories: Apothecary Accent Framelits, Glimmer Brad, Spider Web Embossing Folder, 1/2" Striped Satin Ribbon, 3/4" Circle & 1-3/8" Square Punches

Hope you have a weekend full of treats!

Monday, September 10, 2012

Fossilized Autumn Accent

I'm baaaack! I hadn't realized I took such a long break from blogging until I signed in here this morning to make this post. I have been really enjoying the summer and getting some things done around here and I guess just not being particularly creative. The past week or so I've been back to stamping more, so I have some new stuff to share. Today I have a masculine birthday card I created using the Autumn Accents Bigz Die and the Faux Fossil Technique.


I just love the new Woodgrain Embossing Folder...I've been wanting an EF like this for quite some time! The Timber Wheel is also great...and works perfectly with this die and EF.

The Faux Fossil technique is a lot of fun...and so easy! I taught this at my Faux Much Fun Class yesterday and the ladies loved it! Besides your card stock & ink, all you need is a plastic page protector...
  • Cut off the bottom & one side seam (keep the side with the 3 holes attached)
  • pick out 2 colors of ink and ink up plastic...one color per side. (ink an area large enough to fit your card stock piece)
  • close the page protector and run hand along outside to blend colors. Air bubbles will form, and that's what will give you the fossil look.
  • Open page protector and insert two pieces of card stock (back to back) White or Vanilla works best.
  • Close the page protector and rub with fingers or a brayer to ink up your card stock.
  • Remove your two pieces of fossilized card stock and use as a background, stamp onto it or cut into shape as I did above.
I also added some sponging to my leaf to give it more of a vibrant fall color. Thanks to Carol at Crafty Cat for showing this great technique! I've been having lots of fun with it...and I hope you will as well!

Wednesday, August 08, 2012

Love & Laughter Cake

I just love the images made up of words in the Love & Laughter wedding set! The cake fit perfectly on the Window Framelit die cut...love that too! What I don't love is the bad quality photo I took before sending off this card. Oh well...have a look anyways.


I used the beautiful new Lacy Brocade Embossing Folder for the background and the new Festive Paper Piercing Pack to easily add the piercing on the Brushed Silver layer. The stamped images are embossed with Silver EP. The sheer white ribbon is lined with silver and went perfectly with the rest of the card...not sure where I got it, it's been in my stash for a while.

Hope your day is filled with love & laughter!

Monday, August 06, 2012

Floral District Happy Hour

It's been a while since I stamped and posted anything, but I had to create a fun card for a friends upcoming birthday, so it was just the excuse I needed to get in my studio and stamp! I used the super cute set Happy Hour along with a few goodies from the new Holiday Mini Catalog.

I used the new Window Frames Framelits to cut out the two layering shapes and then the Festive Paper Piercing pack to easily add some detail. I colored the glass image with my VersaMarker (which unfortunately is retired from SU!...but you could use a blender pen and VersaMark re-inker to do this) and embossed it with Clear EP to make it shiny like a glass...see the close up when the light hits it.

I got my color combo of Baja Breeze, Rose Red, Rich Razzleberry & Tangerine Tango from the fun print in the Floral District pack of DSP. I was also inspired by a M&T shown in a recent Stampin' Success for my layout. Even with all this inspiration, since I hadn't stamped for a while it seemed to take me forever just to create this one card! Tomorrow one of my friends is coming over to stamp, so hopefully I will find my mojo and have more to share here again soon.

Hope you are enjoying the summer! Thanks for stopping by today!