Creations by Lynn Weiss ~ Independent Stampin' Up! Demonstrator

ENJOY ~ INSPIRE ~ CREATE ~ SHARE


Showing posts with label Valentine. Show all posts

Monday, February 18, 2019

So Hoppy Valentine

I meant to post this card BEFORE Valentines day, but got busy with other things...sorry about that!  The little frogs in the So Hoppy Together set are just too cute, and just perfect for a Valentine or any occasion. This fun set can be yours for FREE during Sale-A-Bration!


The tiny hearts that the froggie is juggling and the "love you" sentiment are from the retired Bloomin' Love set. The DSP used here is also retired and is from the Stacked With Love Designer Series Paper Stack. The stack is loaded with cute Valentine themed prints and I had a lot of scraps left. This card layout is perfect for using up those scraps!

A quick brag to share my favorite sweet Valentine shown here in a surprise photo session I did for her Mommy & Daddy. The pennant banner in the background was created using SU! products.


She's at such a fun age and she sure brings so much joy into all our lives! Have a wonderful day!

Wednesday, February 14, 2018

Bloomin' Love Pandas

Happy Valentines Day! The Sale-A-Bration Party Pandas make adorable Valentine cards...especially when paired up with the Bloomin Love set. I used all the same supplies for three different looks.


The Pink Pirouette background panels are stamped using the Blooming Love stamp set. I used my Layering Circles & Stitched Shape Framelits to die cut the circles and layered them onto a Delicate White Doily.  The first card uses the bear holding a letter...for this one I didn't alter the image in any way...just stamped in Black Archival ink and watercolored using my Aquapainter. The "love you" sentiment is included in the Party Pandas set.


The second card features the panda floating away with a big heart balloon. For this card I just replaced the regular shaped balloon with a heart one. The XOXO sentiment is from the Bloomin' Love set (as well as the "friend" sentiment shown above) I sent this adorable balloon version to my granddaughter.


The last card required a little more work to create. I masked the letter in the pandas paws and then stamped it twice...once on Whisper White and again onto a scrap of Pink Pirouette cardstock. I then die cut the heart and stamped using the 'love you" stamp. It's popped up with Stampin' Dimensionals so  he's hugging the big heart.


The scalloped circles, hearts and flagged sentiment strips are all created using Berry Burst cardstock. This In Color is quickly becoming one of my favorite colors!

Do you have your Party Panda set yet? If not, place your $50 order during Sale-A-Bration and select either wood or clear mount for FREE. Also...don't forget to select me as your demo! I will send a free card kit at the end of the moth to all who order with me in February.

Have a SWEET day!

Monday, February 13, 2017

Baby Bear Valentine

I made a cute little Valentine card for my baby grand daughter's very first Valentine's Day...so of course sweet little Baby Bear was my first choice of stamps to use.


I used several shades of SU! pink ink...Pink Pirouette, Pretty in Pink & Regal Rose to stamp the three layers of the bear. Real Red was used on the sentiment. The large heart was die cut using the Up & Away Thinlit dies from Red Glimmer Paper. The border along the bottom that shows a peak through of the Red Glimmer Paper is cut using the heart border die in the Everyday Jars Framelits.

Along the bottom I stamped a lace border using the Sale-A-Bration set Delicate Details embossed in White Embossing Power.


Her's my sweet little Valentine with her card. She is already one month old!

Friday, February 10, 2017

Love is in the Air!

Valentine's Day is almost here...and the Lift Me Up Bundle was the perfect choice to make a cute card for my Valentine.


I just love the large, intricate die cut balloon and I was happy to see that after trimming away the top portion I could create a heart shaped balloon that is perfcet for Valentine's Day! I die cut Red, Silver & Gold Foil to paper piece the background of the balloon. I love that these dies has a die for each section of the balloon! Have I told you I LOVE these dies!???

I tried to keep this card more on the masculine side, but I couldn't resist adding a strand of the Gold Sequin Trim and some Red Glimmer Paper hearts. The large heart is included in the Up & Away Thinlit set and the tiny hearts are cut from a heart border die included in the Jar of Love Framelits.

The DSP along the bottom of the card is from This Christmas Specialty Paper.

Thnaks for visiting today...have a WONDERFUL weekend!

Sunday, February 14, 2016

Bloomin' Heart Canvas

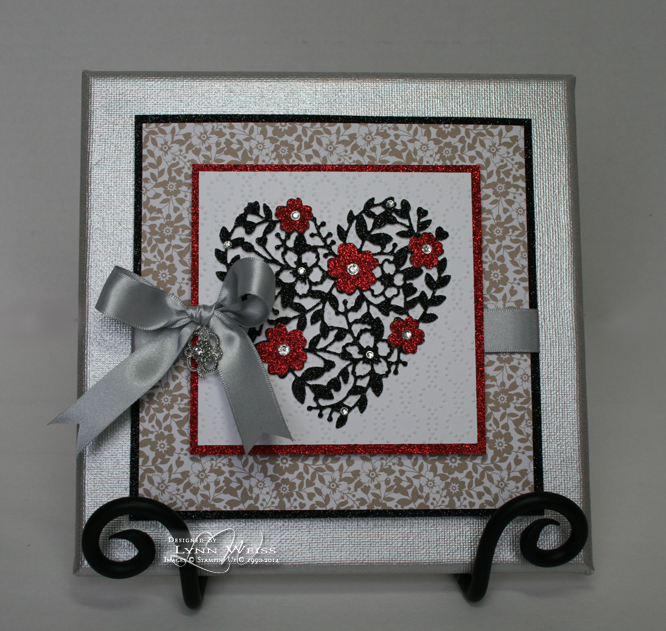
Happy Valentines Day! This beautiful canvas went together in no time thanks to the gorgeous Bloomin' Heart Thinlit Dies!


I had all my pieces ready, and had originally intended to use a heart cut from Red Glimmer Paper, until I saw this gorgeous card on Pinterest created by Karen Barber. I thought the heart looked so dramatic & elegant cut from Black Glimmer Paper, so thanks to Karen for the inspiration!

It's funny that I already had my embossed piece ready using the Elegant Dots Embossing Folder even before seeing her card. I think it layers nicely with the intricate heart. Here's a closer look...


Along with layers of Glimmer paper, I used a print from the Love Blossoms DSP Stack. A bow made from Silver Satin Ribbon and some Basic Rhinestones finish off my canvas.

Just a reminder...tomorrow is the last day to choose several items as your freebie during Sale-a-Bration. After February 15th, these items will no longer be available:

  • Sky is the Limit stamp set
  • Hello stamp set
  • Perfectly Artistic DSP
The good news is that three more great products will be taking their place!

Have a lovely day!

Friday, February 12, 2016

Flashback Friday: Bloomin' Love Banner

With Valentines approaching I knew I wanted to make a banner using the beautiful Love Blossoms Suite of products offered in the Occasions Catalog. While those products are new, I also used a few retired items as well, so I'm sharing as this weeks Flashback Friday post. Check it out...


The canvas banner pieces are part of the Build a Banner Simply Created Kit that was previously available in the  2014-15 catalog. I picked up some refill kits on the Clearance Rack a while back...there may still be some available there. If not, there is an updated version with different shaped canvas pieces and stencils on page 155 of the current catalog.

The die cut letters are cut from Blushing Bride Glimmer Paper using one of my favorite retired die sets - the Serif Essentials Bigz Dies which were last available in the 2011-12 Idea Book & Catalog. Each letter is layered onto a circle cut from Love Blossoms DSP...such super cute prints in that stack!


The stamped sentiments are included in the Bloomin' Love stamp set. As are the little flowers. The flowers also have coordinating dies to easily cut them out included in the Bloomin' Heart Thinlit Die set. However, the real showstopper in that set of dies has to be this gorgeous detailed heart...isn't it just beautiful cut from Blushing Bride Glimmer Paper?


Each canvas banner piece is stenciled using Sponge Daubers with Crumb Cake and Blushing Bride inks and Decorative Masks...it's really quite quick & easy!


On the jute twine between each canvas banner, I've attached a rose bud cut from Typeset Specialty Paper using the Spiral Flower Die. Before rolling the flower into shape I sponged with Crumb Cake and Blushing Bride inks and added some sparkle using the Wink of Stella Glitter Brush. Lots of Basic Rhinestones and Blushing Bride Sequin Trim add the finishing touches to this Valentine's Day banner. Here's a look at it hanging over my fireplace.


Have a lovely Valentine's weekend!

Wednesday, February 10, 2016

Bloomin' Love Fancy Fold Valentine

Here is a special Valentine card that uses many items in the Love Blossoms Suite of products available from Stampin' Up!'s Occasions Catalog.


 The Love Blossoms DSP stack has so many darling prints...I used three different prints here. The Bloomin' Love stamp set is also used along with the coordinating Bloomin' Heart Thinlit Dies. I hand cut the two large stamped hearts and the mats....too bad there was not a framelit for those.


The mats for the hearts are cut from Blushing Bride Glimmer Paper...it is so pretty & sparkly! The Clear Wink of Stella Brush also added some beautiful shimmer to the die cut flowers popped up on the hearts.


The card folds up flat to fit inside a standard sized envelope.

Friday, February 13, 2015

Love Canvas

Here's a special little Valentine gift I made for my hubby. I started with an 8x8 canvas, but everything else I used (besides a paint brush) was Stampin' Up!

To color the canvas I used a wash of re-inkers blended into each other. After that dried I sponged some hearts onto the background using the Heart Decorative Mask and a Sponge Dauber. Then I stamped some swirls from Everything Eleanor using the Aquamarine Chalk Ink and "tried" to add some of the tiny honeycomb  designs from the Basic Butterfly set to the background as well. Most of those didn't turn out like I wanted, so I blended them in with a damp sponge as best as I could. The background got a little muddy at bottom due to this, but I didn't want to start over so I went with it.

I wanted to add Pool Party to the color combo and that was easy using the two DSP packs I chose...both Typeset and Stacked With Love DSP have black and white patterns that makes it easy to sponge to fit whatever color scheme you can dream of. See the little Calypso Coral colored banner at the top of the canvas...that was sponged to add a pop of color.


The various sized hearts, cut using the Heart Framelits, the Tea Lace Paper Doily, and paper rose created using the Spiral Flower Die all add a romantic touch which is perfect for Valentines Day. As is the pretty font used for the word "love" in the Hello Life set that I used on the banner to the right of our photo.

I printed the photo in a sepia tone and then added a little Pool Party sponging to the background behind the palm trees and a little Crisp Cantaloupe and Crumb Cake around the edges as well. The photo is popped up with layered dimensionals.

When painting the canvas, I continued the color to the sides as well. The ribbon and Bakers Twine from the banner are continued around sides and secured in the back. I colored the rhinestone in the center of the Something Borrowed Embellishment with my Coastal Cabana Blendabilites Marker to finish off my canvas with a little sparkle. I may also add a few rhinestones as well.

Have a nice weekend and a Happy Valentine's Day!

Wednesday, February 04, 2015

Hello Love

Valentines Day is only 10 days away, so it's about time I share a Valentine card! This one uses the Hello Life set from the Occasions Catalog.

I used this weeks great sketch from Mojo Monday and the Stacked With Love Designer Series Paper Stack,so this card went together rather easily. The heart and the beautiful script "love" phrase were stamped in VersaMark ink and embossed with Black Embossing Powder.

Thanks for stopping by!

Friday, February 15, 2013

Subway Art Valentine

Today I'd like to share the Valentine card I created for my hubby. Since I wanted the card to be masculine looking, I thought it was a perfect opportunity to try the chalkboard technique and combine it with a subway art type background. Here's what I came up with...


The background is made up of 12 different stamps...both current and retired. I stamped each one in White Craft ink and then embossed with White Embossing Powder. I used my Stamp-a-ma-jig to aid in placement and to help keep each one straight (that was the hardest part!)

The "there's only one you" sentiment at top left is from the SAB set Vintage Verses...a FREE choice right now during Sale-a-Bration. The long "love" stamp is from the retired set Wonderful Words, but it is included in this months Best Of 25 Years anniversary set called Best of Love. Other current stamps used were Loving Thoughts & Occasions Alphabet.

After I stamped and embossed all the images on the Basic Black panel I inked the edges using my White Craft ink pad and sponged some random white ink to make it look like a chalk board. This is a fun technique that I'm sure I'll try again.

Have a wonderful weekend!

Friday, February 01, 2013

Two Unforgettable Valentines

Today I have two Valentines created with the adorable set, Henry Says. The first one in traditional pinks & red is perfect for a girl, the second one is a twist on the first card but more boyish. See for yourself...

I guess this one looks more like "Henrietta Says"! Just couldn't resist water coloring him pink, and I think it's perfect for this girly Valentine, don't you? The little tag and stamped heart images from the Tiny Tags set make the perfect little accents. Here's the more masculine version.
I eliminated the more feminine bow created with the Cherry Cobbler Seam Binding Ribbon above, and went with the Pool Party Satin Ribbon & Button instead. (ribbon & button available as part of the Sycamore Street Ribbon & Button Pack which is available for FREE during SAB) I think I'll send the cute boyish version to my sweet little Great-Nephew for his 1st Valentine's Day.

Henry & Henrietta make a cute pair...
See how easy it is to change a color scheme and accessories to have a totally different look? Henry Says is a fun set to work with because you can create cute cards for so many different occasions. He's available until May 31st from the Spring Catalog.

Thanks for stopping by today...hope your weekend is unforgettable!

Tuesday, February 14, 2012

You Are Loved Heart Easel Card

Yesterday I promised I'd have a more feminine Valentine card to share with you. So here ya go...

This was created using the Big Shot along with the Heart Framelits Dies and my favorite stamp set from the Holiday Mini catalog...You Are Loved. (I'm hoping this one will show up in the next Idea Book & Catalog!) I was inspired to make a heart shaped easel card when I saw this cute card on SCS.

You cannot really tell from my photo, but I added Dazzling Details to both the heart & the love images for a little sparkle. The little button in the center of my bow is one of the new Twitterpated Buttons...they are so cute! Here's a peek at the inside of the card...


Happy Valentine's Day!

Monday, February 13, 2012

Valentine...You're an 11

I had the worst migraine for several days...so unfortunately no computer time or stampin' time for me...just hanging out in the dark wanting to gouge my eyes out. Thankfully yesterday I felt good enough to make some Valentine cards. Here is one I created for my hubby.


When I create masculine cards I usually don't do bows or scallops...but couldn't help using the new Adorning Accents Edgelits with coordinating embossing folders and I just HAD to try out the new Heart Framelits...and of course the cutest one is the scalloped one! (plus someone challenged me to use it on a card saying it was too big and could only be used for scrapbooking.) I think it works here, but at just over 5 1/4" I'm sure I'll be using it more for scrapin'. As far as the bow...well...it just needed one! I think it's OK since it's Valentines Day, right?

At least the color combo of Cherry Cobbler, Basic Gray, Basic Black & Whisper White is quite manly. Along with the I {LOVE} Love Jumbo Wheel, I used the Hostess Set Perfect Words for the sentiment...emphasized with a Red Glimmer heart cut using the smallest of the heart framelits.

I have a little trick to share that I've been using to create more sizes to layer using the Framelits. Probably most of you have already thought of this, but in case I'll share anyways...See the Cherry Cobbler heart stamped with the wheel? That was cut using the 2nd largest heart framelit; but the Basic Gray layer behind it was cut by hand simply by tracing around the outer edge of the same framelit I used to cut the Cherry heart, since the cutting edge is on the inside edge of the die. So, if you don't mind a little hand cutting, using the framelits as a template is an easy option to create more layers.
Check back tomorrow for a feminine Valentine. Enjoy your day!

Friday, December 30, 2011

Sweet Pressed Cookie Box & Card

Today is the day I can finally share the project I created for Craft Project Central! I used one of my favorite sets from the Holiday Mini Catalog...You Are Loved. Your Valentine will know they are loved when you give them this pretty window box filled with cookies along with the matching card! 


This project is versatile enough to use for any holiday or occasion – just change the colors and stamps that you use! To get the instructions for my project (along with a recipe for my mom’s yummy shortbread cookies), just subscribe to December!

Have you tried the Sweet Pressed Cookie Stamps yet? They really are a fun way to beautify your baking! I had so many nice comments on the Christmas cookies I baked using them...even my Dad noticed and said he like them.
Martha may not live at my house(and that's a GOOD thing!;-) but it looks like she does when I use the Sweet Pressed Cookie stamps! Have a sweet day!

Monday, February 14, 2011

I {LOVE} Love Valentine

Today I have a couple of different cards to show you. They are both created with the same supplies, but they are quite different. The first one is a traditional card.

I {LOVE} the new red Glimmer Paper! It's so easy to add a nice glittery accent to a project without the mess. I'm also loving a new set I recently got...Tiny Tags which goes along with the Jewelry Tag Punch. Not sure what took me so long to get these two items...they add such a cute touch to cards or scrapbook pages. Using the same supplies, but a a different fold and a neat trick with the Movers & Shapers Die, here is another card I created.


When you open the card, here's how it looks...

I also used the heart from the FREE Sale-A-Bration set So Happy For You & the Scallop Trim Border Punch on this one. The way you create the sandwich and run it though your Big Shot enables you to create this fun fold out window design using the Movers & Shapers Die. I watched this great tutorial on Kay's blog  Stampin' to Share  to learn how to do this. Thank you for your great instructions Kay!

Happy Valentine's Day to you!

Friday, February 11, 2011

Eat Chocolate Cone

After seeing so many cute projects using the new Petal Cone Die, I knew I just had to have it! Here's my first project using it.

I also used the cute new set Eat Chocolate. I found this to be really easy to put together. I love the little banner that is on this die, and can see using it on cards and scrapbook pages. The little heart image is from the set Tiny Tags. I wanted to use the Decorative Label punch, with the stamp that had the border, but wanted the other saying. So I used my Regal Rose marker to ink up just the border and then used my Stamp-a-ma-jig with the "...I'm that friend" saying to get perfect placement.

Stamps: Eat Chocolate, Tiny Tags & Teeny Tiny Wishes
Card stock: Pretty in Pink. Whisper White & Regal Rose DSP
Ink: Pretty in Pink, Regal Rose, Crumb Cake & Chocolate Chip
Accessories: Petal Cone Die,  Decorative Label punch, Rose Red Seam Binding Ribbon, Stamp-a-ma-jig, Basic Rhinestones & CHOCOLATE!

Have a wonderful weekend!

Photobucket