Creations by Lynn Weiss ~ Independent Stampin' Up! Demonstrator

ENJOY ~ INSPIRE ~ CREATE ~ SHARE


Showing posts with label Stamp Set - Petite Pairs. Show all posts

Wednesday, May 04, 2016

Arrivederci Eleanor!

Another favorite retiring set of mine is Everything Eleanor...especially the beautiful swirl image! I used it several times on this card, stamping both the die cut label and the Mint Macaron layer at the same time.

Lots of retiring favorites were used on this card. The Deco Label Framelits, the Venetian Crochet Trim and the Petite Pairs stamp set are all retiring as well.

Shop my Stampin' Store to get your favorites before they are gone.

Monday, May 02, 2016

Sayonara Serene Silhouettes

Serene Silhouettes...another favorite that is soon to be retired. We used it at my Retiring Favorites Class last week to create this card along with the beautiful retiring In Colors.

Swipe each of the five In Color Markers across a clear block and mist with water to create the background. Then just stamp your image with Black Stazon after it's dried. I shared this free tutorial a while back if you want more info.

The sentiment is from Petite Pairs...I use that set a lot, but it is retiring as well. A pretty bow tied with White Seam Binding Ribbon finishes off the card. I'm sad to see all the Seam Binding Ribbon retiring...it is so soft and easy to work with. The stamped Whisper White layer is adhered to a Blackberry Bliss base...which is my absolute favorite retiring In Color.

For this next card, I swapped the Seam Binding Ribbon for Gold Sequin Trim and stepped up the card a bit with a few extra details...
Dazzling Details in Gold Glitz to be exact! I used it on the flowers and the added butterfly from Papillon Potpourri. 

The third card uses retired Blackberry Bliss Striped Satin Ribbon and some Basic Rhinestone Jewels.
The "HELLO" sentiment is from the Crazy About You stamp set...that one will be sticking around for a while longer. Here's a look at all three of the cards...
Which one do you like best?

Friday, April 29, 2016

Flippin' Friday: Flippin' For World of Dreams

I used to try and do a Flippin' Friday post weekly, but it's been a while! I used the Circle Card Thinlits Dies at my recent Retiring Favorites Class earlier this week so I figured it was a good time to revive the series for a final farewell. This card sure uses a LOT of retiring items...can you spot them all?


I used one of my very favorite retiring stamp sets - World of Dreams for the main image on this card. I just love the sweet little nesting birds. After stamping, it was punched out using the 2-1/2" Circle Punch. The 2-1/2" circle layers nicely onto the circle of the flip card. I'm really bummed they are retiring this large circle punch...it is one of my most used punches.

The Hardwood background (don't worry...Hardwood isn't on the chopping block!) along with the leafy image from World of Dreams was used to stamp the Lost Lagoon card base. That leafy image is really great for randomly stamping the perfect background for any of the images in this set. Lost Lagoon is one of the five retiring In Colors. It's one of my favorites in the set, second only to Blackberry Bliss.
The Crumb Cake label was cut with one of the accessory dies in the Circle Card Thinlits Set. The sentiment is from my much used Petite Pairs stamp set. It was punched using the Large Oval Punch, which is also retiring.
The flip side has one of the verses from World of Dreams along with the leafy image stamped off for a lighter look.

If you don't already have these favorites in your collection, visit my Stampin' Store to get yours today! The Circle Card Thinlits Dies are on sale for the discounted price of only $23.10
Have a wonderful weekend!

Thursday, April 28, 2016

Goodbye Corner Garden

I'm here today to share another favorite retiring item...the Corner Garden background stamp. This is a card we made at my Retiring Favorites Class here on Tuesday.


This stamp is just lovely and so much fun to color! I stamped the image twice...the first time on Wisteria Wonder using Rich Razzleberry ink. The second time with Black Stazon onto Whisper White. The flowers were all watercolored using my Aqua Painters and Classic Ink pooled in the ink pad lids. The birthday greeting is from Petite Pairs...which is also retiring...sniff, sniff. I use that set ALL the time!

To finish the card I just matted the colored piece onto Soft Sky, added a couple Basic Rhinestones and popped it up with Stampin' Dimensionals lining the image up with the one on the Wisteria Wonder layer.

If you don't already have the Corner Garden background stamp in your collection...GOOD NEWS...the Clear Mount version is discounted during it's retirement for only $12.75. Pick yours up today!

Thursday, February 11, 2016

Honeycomb Happiness Party Chick

Every now and then a "great" stamping idea pops into my head when I'm doing something totally unrelated to stamping. Many times I ether forget to try the idea or it ends up not working out as good as it did in my head. I hate that! LOL In this case, not only did I remember to try my idea, it actually worked out as I had envisioned! So, now you are probably wondering what my idea was??? I wondered if the ice cream cone in the Honeycomb Happiness set could also work as a party hat for the adorable little chick?


I think she looks so cute all decked out and ready to party! I don't know if I'm the first to come up with this idea...but I hadn't seen it done yet, so I was pretty happy my idea worked out as planned. Here's a closer look at the little chick ...


I used the Clear Wink of Stella glitter brush to add a little shimmer to the balloon, hat and sentiment piece. Isn't the Watermelon Striped Satin Ribbon gorgeous? I just love that stuff! I also really love the Birthday Bouquet DSP! I used the confetti piece along with a striped piece of It's My Party DSP. The little poof on the top of the hat was made using one of the framelits from the Botanical Builders Dies. (one of the little flower centers) I just smushed it up and glittered it with the Wink of Stella to match.


It's so cold here this morning! Keep warm and ENJOY your day!

Monday, November 09, 2015

Wild About Flowers Trio

This set of cards created using the Wild About Flowers stamp set would be perfect for any occasion. I changed up the look simply by changing the background stamp and the color of the main panel.


The flowers and leaves on all three cards use the same color of inks: Tangerine Tango, Blackberry Bliss, Wild Wasabi and Mossy Meadow. I created the card in the center first and actually shared it a while back in this post. I used that card for my inspiration when I needed some cards with more of an autumn feel to them.

I swapped out the Hardwood background used on my first card and used the crosshatch texture stamp from the You've Got This stamp set inked in Sahara Sand in it's place.


I love Blackberry Bliss paired up with Sahara Sand. It also looks good here with Tangerine Tango.

Thanks for stopping by.

Wednesday, September 16, 2015

Vintage Leaves Thanks

Autumn is coming...(I like the sound of that better than "Winter is coming.") This week we've been blessed with a few more warm & sunny 80 degree days, but it sure has been getting chilly at night! We only have a few trees just starting to change color, but soon our maple trees will be the gorgeous hues of Delightful Dijon, Tangerine Tango and Cherry Cobbler as shown below.


After embossing the maple leaf from Vintage Leaves in white I sponged on the ink colors listed above. The background got the same treatment with the addition of some texture from Gorgeous Grunge. The pattern from the Boho Chic Embossing Folder along with the Natural Chevron Ribbon remind me of fall sweater textures so I thought they were a good fit for this fall inspired card.

Thanks for visiting today!

Monday, August 24, 2015

Dragonfly Birthday

Recently my Mom asked me if I could make her a dragonfly birthday card. She makes beautiful quilts, purses and tote bags and she had made a bag for a gift. I asked her for some of the fabric so that I could try to match the colors. Here was my inspiration.


This is the card I created for her using the Awesomely Artistic stamp set.


To match the colors as best possible, I had to pull out some retired purples to create the background. I used the largest SU! Clear Mount Block F and inked it with the following colors: Bermuda Bay, Pear Pizzazz, Orchid Opulence, Lavender Lace and Melon Mambo. After spritzing it with water I inked my Whisper White card stock. I added some splotches in various colors used above while the card stock was still damp, so the colors would bleed.


After it thoroughly dried, I added the dragonflies and the floral design. If you want to see more detailed directions on this technique, I provided them here on this post.

Thanks for visiting!

Monday, August 03, 2015

Wild About Flowers Thanks

I really love how user friendly the Wild About Flowers set is! Since the blossoms are separate from the stems and leaves its so easy to stamp all different colors of flowers. Lining them up is super easy since it's a photopolymer set.


I added a little shading to the stamps by first inking them in the lightest color and then using a sponge dauber I added a darker color. So for the flowers, first ink in Calypso Coral and then add Rich Razzleberry. For the leaves I used Wild Wasabi first and then Mossy Meadow.

Thanks for visiting today!

Friday, July 17, 2015

Pretty Pink Peony

I've been busy coloring these beautiful flower from the You've Got This set.


I masked the flower portion of this image before stamping the background in Crumb Cake ink. Since the Crumb Cake ink is fairly light, it blended fine with the Wild Wasabi ink I used to watercolor the stem & leaves. Sponging the Typeset Specialty Paper gives this card more of a vintage feel.

Have a great weekend!

Thursday, November 06, 2014

Color Me With Blooming Kindness

Here's a card I created using the Blooming With Kindness stamp set.


To add interest, the main panel was cut into 1 inch strips after stamping.

The color combo of Blackberry Bliss, Cajun Craze & Crushed Curry comes from the Color Me Autumn Washi Tape pack...which I used on both the inside of the card and on the front along with Blackberry Bliss Stitched Satin Ribbon.

If you have wondered why I have not posted in a while, scroll on down to see some photos of what has been keeping me busy.

Thanks for visiting!

Friday, October 10, 2014

Flippin' Friday: Color Me Autumn Flower

It's been a while since I did a Flippin' Friday post...and today is Friday! I have a flip card...so why not!? I thought a cute flip card was the perfect opportunity to use some of the Color Me Autumn Washi Tape.


I pulled my color combo of Cajun Craze, Crushed Curry & Blackberry Bliss from the pack of Color Me Autumn Washi Tape found in the Holiday Catalog...perfect for a fall Birthday.

The Hardwood Background stamp used on the Crushed Curry panel gives it a rustic look which I think goes right along with the Autumn feel.

Have a fantastic Friday!

Thursday, October 09, 2014

Mossy Cajun World of Dreams

The pretty colors of Autumn are everywhere right now...so it's no surprise I found my color inspiration for todays card by simply looking out my window.

This pretty image from World of Dreams was embossed using the Offset Embossing technique...described in more detail here, and then sponged using:

  •  Lost Lagoon
  • Mossy Meadow
  • Cajun Craze
  • Early Espresso
You may recognize this card as I copied a previous card I made and just added the Cajun Craze for a totally different look.

Monday, September 01, 2014

Autumn World of Dreams

With the start of September I thought an Autumn inspired card would be nice to share today.


The World of Dreams stamp set combined with the Hardwood background stamp makes a nice masculine themed card. I used Cajun Craze & Mossy Meadow ink & card stock as well as Early Espresso & Crumb Cake ink

A touch of Natural Chevron Ribbon adds a nice accent yets still keeps the card masculine looking.

Wednesday, July 16, 2014

Swallowtail in the Spotlight

Today I have a couple cards to share using basically the same supplies & the same technique, but the second one is has a little more detail. I used the Swallowtail stamp and the spotlighting technique.

I stamped both the white panel and the background at the same time using Memento Tuxedo Black Ink. Then I colored the focal image using my Blendabilities. For my second card I followed the same steps as above, but changed up the color and added a few more details for a stepped up version, see...
I used Gorgeous Grunge for the background and also added some sparkle with a layer of Silver Glimmer Paper. I didn't add a sentiment to this one...but can do that when I'm needing a card. 

Have a beautiful day!
 

Wednesday, July 09, 2014

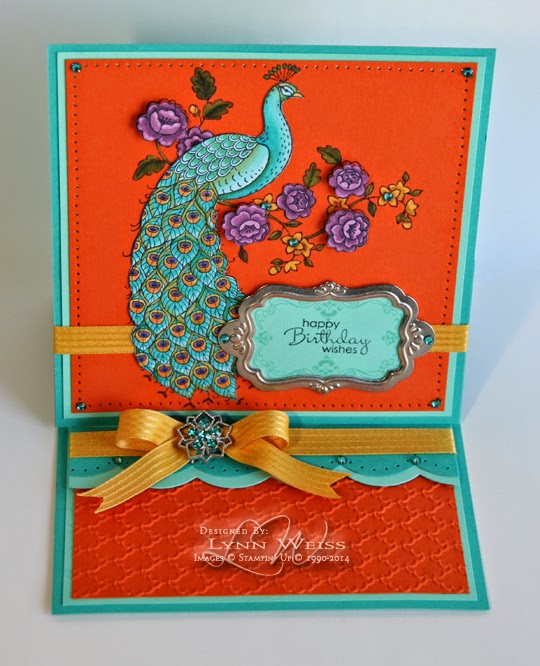
Perfect Peacock Easel Card

Here's an extra special card that I made for my dear Aunt's birthday.


I know she just loves the new Perfect Peacock image, so I decided to give him the extra special treatment. I colored him with my Blendabilities and then fussy cut him out. I stamped him again onto Tangelo Twist card stock so that all the little curls of his feathers would be there without having to cut those. (I don't mind a little fussy cutting but I'm not crazy! )

Then I set to work bleaching the card stock area inside the flowers, leaves and plumage on top of his head so that I could color those as well.
After painting on numerous coats of bleach using my Aqua Painter, I managed to get the color down to a shade of yellow, which would be fine for coloring the Old Olive and Daffodil Delight areas, but not for the Rich Razzleberry flowers. Those I colored on Whisper White and cut out.
I attached the Razzleberry flowers using Stampin' Dimensionals. I colored some Basic Rhinestones using my Coastal Cabana Blendabilities for some bling on the flower centers, and in each corner, etc... I even colored in the rhinestones on one of those gorgeous Frosted Finishes Embellishments I had left from last years Holiday Catalog...just love those! It made a beautiful center to the Hello Honey satin bow.
The silver frame that fits the Decorative Label punch is something else I had in my stash. To complete the base I embossed the Tangelo layer using the Fancy Fan EF...it's design compliments the feathers well. A strip of Coastal Cabana card stock and one in Bermuda Bay were scalloped using the Scallop Edgelit. 
Thanks for visiting today!

Wednesday, June 25, 2014

Mossy World of Dreams

Today I would like to share the second card of a set using World of Dreams. This card would be perfect for any occasion.

I used the Offset Embossing Technique and then sponged over the top of it using Lost Lagoon, Mossy Meadow, Crumb Cake & Early Espresso inks. I describe this technique in a little more detail in my previous post...just scroll down to see the first card in this set of three.

I will share the final card on Friday...so don't forget to check back! Have a GREAT day!