Creations by Lynn Weiss ~ Independent Stampin' Up! Demonstrator

ENJOY ~ INSPIRE ~ CREATE ~ SHARE


Showing posts with label Stamp Set - Everything Eleanor. Show all posts

Wednesday, May 04, 2016

Arrivederci Eleanor!

Another favorite retiring set of mine is Everything Eleanor...especially the beautiful swirl image! I used it several times on this card, stamping both the die cut label and the Mint Macaron layer at the same time.

Lots of retiring favorites were used on this card. The Deco Label Framelits, the Venetian Crochet Trim and the Petite Pairs stamp set are all retiring as well.

Shop my Stampin' Store to get your favorites before they are gone.

Friday, April 22, 2016

Hello Life, Goodbye Eleanor!

My title sounds like an indignant breakup, when actually I'm just featuring some favorite retiring items again today. The "do more of what makes you happy" stamp from Hello Life is awesome! When first seeing this set I had plans to use it on some scrapbook pages, but I still have yet to use it on a page. Need to put that on my "to do" list! Anyways...today I have used it on a card.


I have used our gorgeous set of five retiring In Colors to create my watercolor background. I'm really going to miss these rich colors...especially Blackberry Bliss! If you want to try this watercolor background technique I shared this free tutorial a while back. It's a really fun, easy way to achieve the watercolor look.

I used the same background technique on a small scrap as well. Then stamped a flower from the Everything Eleanor stamp set. This is another set I have really loved...especially the swirled flourish. I used that on the corner where I attached the flower.

When I stamped the "do more of what makes you happy" image I had a little boo boo with the ink smearing around the "p" & "y". I hate when that happens! To make it less noticeable...hopefully you didn't notice it?, I added a little texture using the little honeycomb stamp from Butterfly Basics.

The Tangelo Twist card base is stamped using the textured polka dots from Timeless Textures...love that set!

Have a wonderful weekend..."do more of what makes you happy!"

Wednesday, March 09, 2016

Watercolor Wings Collage Sympathy

I used several stamp sets to create this collage style background for the pretty, die-cut butterfly from Watercolor Wings.


First, before I did any stamping, I created the soft, blended color background using this Watercolor Background Technique. Once my cardstock was thoroughly dry, I used Awesomely Artist, Everything Eleanor & Gorgeous Grunge to create the collage background. The sympathy sentiment is embossed in silver on vellum.

Here's a closer look at the butterfly & background....


I like the way these colors blended together to create a soft background perfect for spring. The colors used are Perfect Plum, Bermuda Bay & So Saffron. Blackberry Bliss was used for the stamping.

I hope wherever you live you are having a beautiful day like we are having here in Michigan...it's almost 70 degrees...which is a record for this time of year. I officially have Spring Fever now!

Wednesday, November 18, 2015

Awesomely Eleanor

Awesomely Artistic...Everything Eleanor...or maybe Butterfly Basics? Oh, what the heck, I have them all out now... may as well use them all! So that's exactly what I did!


To create my watercolor look background I used my largest acrylic block and inked it up with So Saffron, Bermuda Bay and Perfect Plum. Gave it a few spritzes of water and pressed in onto my Thick Whisper White Card stock. I love how these colors blended together! If you want a more detailed description of this fun technique, I shared a tutorial here a while back.

I added some paint splatters using the splatter stamp from Awesomely Artistic while my paper was still damp, but I waited until it was thoroughly dried to stamp the other elements. To finish the card I die cut two butterfly shapes using the Bold Butterflies and Butterfly Framelits. The solid one was cut from White Vellum card stock  and the detailed butterfly was cut from Silver Foil.


For those of you who still have items on your wishlists from the Holiday Catalog, Stampin' Up! has released a list of those items (most of the catalog) that will be retiring. Check it out here and get those items before they are gone!

Recently I have received a few online orders from customers who selected "no contact" on their order. Normally I send out a thank you card for all the online orders I receive, but in this case I don't know who the order is from...so THANK YOU in case it was one of my blog readers. :-)

Have a GREAT day!

Friday, February 13, 2015

Love Canvas

Here's a special little Valentine gift I made for my hubby. I started with an 8x8 canvas, but everything else I used (besides a paint brush) was Stampin' Up!

To color the canvas I used a wash of re-inkers blended into each other. After that dried I sponged some hearts onto the background using the Heart Decorative Mask and a Sponge Dauber. Then I stamped some swirls from Everything Eleanor using the Aquamarine Chalk Ink and "tried" to add some of the tiny honeycomb  designs from the Basic Butterfly set to the background as well. Most of those didn't turn out like I wanted, so I blended them in with a damp sponge as best as I could. The background got a little muddy at bottom due to this, but I didn't want to start over so I went with it.

I wanted to add Pool Party to the color combo and that was easy using the two DSP packs I chose...both Typeset and Stacked With Love DSP have black and white patterns that makes it easy to sponge to fit whatever color scheme you can dream of. See the little Calypso Coral colored banner at the top of the canvas...that was sponged to add a pop of color.


The various sized hearts, cut using the Heart Framelits, the Tea Lace Paper Doily, and paper rose created using the Spiral Flower Die all add a romantic touch which is perfect for Valentines Day. As is the pretty font used for the word "love" in the Hello Life set that I used on the banner to the right of our photo.

I printed the photo in a sepia tone and then added a little Pool Party sponging to the background behind the palm trees and a little Crisp Cantaloupe and Crumb Cake around the edges as well. The photo is popped up with layered dimensionals.

When painting the canvas, I continued the color to the sides as well. The ribbon and Bakers Twine from the banner are continued around sides and secured in the back. I colored the rhinestone in the center of the Something Borrowed Embellishment with my Coastal Cabana Blendabilites Marker to finish off my canvas with a little sparkle. I may also add a few rhinestones as well.

Have a nice weekend and a Happy Valentine's Day!

Thursday, September 25, 2014

Butterfly Bookmark Pocket Card

It's a card! It's a bookmark! It's...a bookmark pocket card! Sorry...not enough coffee yet this morning to come up with a more creative name! Anyways, here it is...

I started with the very versatile set, Work of Art to create the colorful, watercolor look background on the Whisper White bookmark. Then I stamped the butterflies from Papillon Potpourri and filled in the blank space with the swirl from Everything Eleanor. Last, I used a splatter image from Gorgeous Grunge.
Since there is so much color and detail on the bookmark, I opted to go with a solid color (Coastal Cabana) for the main panel of the card and just add some texture using a couple favorite embossing folders...Decorative Dots & Zig Zag. I positioned the butterflies on the base of the card to line up with the bookmark when it was inserted in the pocket. Here's a closer look at the bookmark...
After stamping, I laminated it using my Xyron machine and added the large eyelet and some pretty fibers I had on hand. The colors of the fibers coordinate surprisingly well with the colors of ink I used...which was a happy coincidence because I didn't plan it that way. Here's a look at the back...
The quote used here is from a favorite retired hostess set called The Art of Life.

Thanks for stopping by today...have a good one!

Thursday, September 18, 2014

Grungy Eleanor Thanks

For this card I created my own DSP using the stamp sets Everything Eleanor and Gorgeous Grunge.


I used the color combo of Crisp Cantaloupe, Calypso Coral, Coastal Cabana & Crumb Cake. The "Thank You" sentiment is from Blooming With Kindness and is stamped onto a die cut from the Apothecary Accents Framelits. I popped it up using some Stampin' Dimensionals and added a couple Basic Pearls.

Thanks for visiting today.

Wednesday, August 13, 2014

Pleasant Poppy Easel Card

I colored this beautiful Pleasant Poppy image with my Blendabilities markers.

For the flowers I used both the Pumpkin Pie set and the lightest shade of Cherry Cobbler. The background was done with the lightest of the Coastal Cabana set and then I used the Color Lifter over the top of it. When it dries it leaves a cloudy looking, mottled color which is perfect for a sky. I then added some splatters with the Gorgeous Grunge set and the retired En Francais over the top. Here's a closer look...
When I was already half way through coloring I realized I had made a boo boo...the poppy buds should have been colored green...ooops! I should have remembered that since I have these in my garden. Oh well...I still love the way it turned out.

Thanks for stopping by today.

Tuesday, April 08, 2014

Everything Eleanor Birthday

This card uses the technique emboss resist to achieve a really pretty background. The final result looks kind of like batik or tie dyed fabric.

I started with a piece of watercolor paper and stamped the swirl image from Everything Eleanor in VersaMark and then embossed it in Clear Embossing Powder. Then, spritz the paper with water and proceed to sponge on several different colors. Depending how much water used, the colors will start to softly flow and blend together. I used these four colors:

  • Pear Pizzazz
  • Coastal Cabana
  • Strawberry Slush
  • Calypso Coral
Tip: certain colors do not look good when blended or mixed together. The Pear Pizzazz for instance looks great blended with the Coastal Cabana, but if mixed with the other two colors would appear brownish & muddy. I made sure to sponge the CC next to the PP and not the other colors. 

Continue to sponge on color and spritz on more water to get the desired effect. Keep some paper towels handy to blot up any extra water and to also wipe up extra ink off the embossed areas when finished. After I was finished sponging on my color, and then wiping down the embossed areas,  I heat set it with my Heat Tool to help dry the paper. Then I added a few of the smallest flowers from Everything Eleanor inked in Coastal Cabana. 

I couple pieces of scrap sponged with the same colors, stamped with a couple of the butterflies from Papillon Potpourri and punched out with their coordinating punches finishes off the card. I was inspired by this very pretty card and video by Cindy.  

Have you checked out this weeks Weekly Deals yet? If you don't have the Secret Garden Framelits yet...I highly recommend them! 
Thanks for visiting today!

Monday, June 24, 2013

Easy Watercolor Background Tutorial

I shared a card here on Friday and have since gotten several emails asking exactly how to do the background. It's a really fun technique to play around with and very simple to get beautiful results. I'm not really sure what it's called...so I'm just going to call it the watercolor background technique. I took photos of each step to show you exactly how to do this.

Step 1: Gather supplies. For this project I used:

  • Acrylic Block I
  • Stampin' Write Markers: Calypso Coral, Rich Razzleberry, Melon Mambo, Bermuda Bay, Pear Pizzazz & Old Olive
  • Whisper White card stock cut 5 1/2" x 4
  • Stampin' Spritzer filled with water
Step 2: Swipe markers across acrylic block to create strips of color, blending each color into the next as shown below.
Step 3: Lay the block onto Stampin' Scrub and spritz with water. I found that about 4-5 spritzes across the block was perfect...but this is really where you'll have to experiment to find the look you are going for.

Step 4: Pick up block and tilt slightly if you wish to blend colors further...it will look something like this.
Step 5: "Stamp" your background onto your base, being careful to lay it down straight. I left about a 3/8" border along the top (which will actually be the side of my finished card) Hint: press on the block and allow it to sit for a minute so the paper will absorb all the ink & water.
Allow the panel to dry before going on to the next step. I just kept making more back grounds and when I was done with that the panels were dry...so maybe an hour or so. Or if you are in a hurry use your heat tool to speed up the dry time. Hint: Create a small background, using this same technique & colors, on some scrap for any images you may want to stamp & punch out.

Step 6: Use post it notes to mask the edges of your watercolor background. Hint: if your ink pads are very juicy, you may want to also use some scrap paper over the post it notes so that the ink doesn't bleed through.

Step 7: Stamp your focal images first. I used the Papillon Potpourri stamp set with Tangerine Tango, Rich Razzleberry & Island Indigo ink.
Step 8: Stamp your small scrap background to punch. I used Rich Razzleberry.
Step 9: Fill in with a swirl...I used the pretty flourish from Everything Eleanor inked in Rich Razzleberry, Melon Mambo & Coastal Cabana.
Step 10: Stamp En Francais over entire design. I inked mine in Island Indigo and then stamped it off once so it wasn't so dark. I also pressed in the areas that I wanted it to be a little darker.
Step 11: The best part! Pull off the post it notes to reveal your fabulous work of art! Proceed to embellish as you wish to create your finished card. Here's what mine looks like...
I used the Needlepoint Border to emboss my edges, popped up the punched out butterfly and stamped my sentiment, from Blooming With Kindness, in Coastal Cabana and adhered it to a base of Pool Party card stock.

I hope you'll give this technique a try, if you haven't already. I also hope you like this look because I'll be sharing several more cards I have created using this technique in the next couple weeks.

Friday, April 12, 2013

Eleanor's Secret Garden

Here is a card we did at one of my recent card classes.

The flower from Secret Garden was embossed in Early Espresso EP on Pink Pirouette and then water colored with Aqua Painter and Cherry Cobbler ink.

Stamps:  Everything Eleanor, Secret Garden & Blooming With Kindness
Card stock: Crumb Cake, Cherry Cobbler & Pink Pirouette
Ink: Crumb Cake, Early Espresso, Cherry Cobbler & Pink Pirouette
Accessories: Early Espresso Embossing Powder, Aqua Painter, Secret Garden Framlits, Crumb Cake Seam Binding Ribbon, Basic Pearls

Here's the same card...different color combo.
Baja Breeze, Not Quite Navy & Crumb Cake. With Baja & NQN retiring, I will miss using that color combo so much!

Thanks for visiting today. Have a nice weekend!

Monday, October 15, 2012

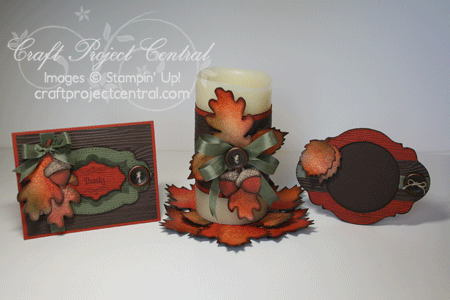
Autumn Accents Candle & Frame Set

I'm really excited to share the project that I created as a guest designer for Craft Project Central this month! I used some of my favorite new fall products from the Holiday Catalog, along with some other old favorites, to make this set. Hope you like it!


Rich colorful leaves with a touch of shimmer make this candle wrap with matching mat and chipboard frame the perfect addition to your autumn home décor. This would also make a lovely hostess gift during the fall season.
Wouldn't the candle wrap look lovely wrapped around a bottle of wine to give as a gift?


The chipboard frame would be easy to make for any holiday or occasion just by changing the colors. Check back to see a Halloween version of this frame tomorrow.

I actually made this set planning to give it as a gift...but I think I'm going to have to make another one, because I just cannot part with it now!

To get the complete instructions for my project just subscribe to October.

Leave me a comment here on this post before Friday afternoon and you could be the lucky recipient of a FREE month subscription to Craft Project Central!

Wednesday, September 19, 2012

Everything Eleanor in Pink & Chocolate

Here is one of the cards we made at my All Occasion Card Class yesterday.

I haven't used one of my fav color combos, pink & brown, in a while and I think it suits this pretty feminine set well. After I stamped the Apothecary Accent die cut, watercolored the flowers & inked the edges, I spritzed it with some Log Cabin Smooch Spritz...unfortunately a blob just had to land right on the sentiment! BOO! But after all the work I didn't want to have to re-do it...other than the little ink blob, I love the way it turned out. I guess that's why I rarely use the Smooch Spritz...it's too hard to control. I really need to make my own using the little Stampin' Spritzer bottles I bought a while back. I hear those work much better.

Stamps: Everything Eleanor & Sincere Salutations
Card stock: Chocolate Chip, Pink Pirouette & Whisper White
Ink: Basic Brown (to ink flowers to watercolor) Chocolate Chip, Pink Pirouette & Primrose Petals
Accessories: Primrose Petals Stitched Satin Ribbon, Apothecary Accents Framelits, Large Scallop Edgelits, Delicate Designs Embossing Folder, Log Cabin Smooch Spritz & Basic Pearls

If you like the pretty Primrose Petals Stitched Satin Ribbon used above...all this month you can get it for free with your $40 order!