Creations by Lynn Weiss ~ Independent Stampin' Up! Demonstrator

ENJOY ~ INSPIRE ~ CREATE ~ SHARE


Showing posts with label Paper Piecing. Show all posts

Friday, January 27, 2017

Up & Away Pretty Kitty

I love being able to combine favorite stamp sets to make something unique...so when I found that the flower pot kitty image from Pretty Kitty would work with the Up & Away Thinlits Dies I was "on cloud nine!" (to quote one of the sentiment stamps from the coordinating Lift Me Up stamp set!)


I stamped the kitty onto Shimmery White Card stock and cut away the flowers. Then I stamped the flower pot onto Falling In Love DSP hoping to make it look more like a basket rather than a flower pot. The pieces were then water colored using my Aqua Painter and the pot was paper pieced onto the Shimmery White layer.  The little banner was cut using the Balloon Framelits Dies. I had hoped to stamp "HELLO" using my Labeler stamp set, but the letters were too big, so I wrote it myself using my Sweet Sugarplum Marker.

For Flashback Friday I used the retired Cloudy Day Embossing Folder for the background. Too bad it's retired because it goes perfectly with the Lift Me Up Bundle!

Have an uplifting weekend!

Friday, June 19, 2015

Flippin' Friday - Sprinkles of Life Birthday Flip

Happy Friday! Here's a flip card using the new Sprinkles of Life stamp set along with the festive Cherry on Top DSP. What a great combo to create adorable birthday cards!

I extended the card by bypassing the end of the die to create an extra panel...
and an excuse to add more of this cute DSP! I used a Bermuda Bay base and let the stamp set, punches and DSP do the rest of the work.

Have a GREAT weekend!

Tuesday, June 16, 2015

Bohemian Peace Within

Today I have a card to share that combines the old with the new. The old is one of my favorite retired sets...Peace Within and the new is basically everything else...

I used a bit of Bohemian DSP to paper piece the pillow on the chair. The Boho Chic Embossing Folder for the Blackberry Bliss background and Tip Top Taupe card stock was used for the base and the ink was used to watercolor the chair. I also used Tip Top Taupe Dotted Lace Trim to finish the card. I really like the lace trim much more than I thought I would! It makes such a lovely finishing touch.

Have a peaceful day!

Friday, June 05, 2015

Birthday Sprinkles

Sprinkles of Life is the perfect set to create fun birthday cards for just about anyone...especially when it's combined with the Cherry On Top DSP.

The candle and the cupcake bottom image were stamped onto a piece of DSP and cut out. The Bermuda Bay square was stamped tone on tone using the candle and sprinkle images to create a festive background. I used a strip of patterned paper in place of ribbon...so altogether I used 4 different patterns from the Cherry On Top paper stack to create this cheerful birthday card.

Colors used: Bermuda Bay, Watermelon Wonder, Cucumber Crush and Crushed Curry.

Have a great weekend!

Friday, April 17, 2015

Cheerful Critters Happy Day

This set is so darn cute...especially the bear! He's fun to water color too!

I used the Balloon Framelits to cut out the cute little banner using scraps of Best Year Ever DSP. The festive little scene fits perfectly inside a frame cut using the On Film Framelits.

I used some of the soon to be retiring In Colors: Coastal Cabana, Pistachio Pudding and Crisp Cantaloupe. The Cheerful Critter set is available in the Occasion Catalog.

Wednesday, April 16, 2014

Simple Monochromatic Birthday

With it's monochromatic color scheme and clean & simple design, this birthday card using Another Great Year is the perfect card for a guy. (at least I hope my son thinks so!)


I stamped the image twice...once onto the Island Indigo layer stamped with the hardwood background and again onto a plain piece of Bermuda Bay card stock. Each time I embossed the image using Pool Party Embossing Powder. I cut out the Bermuda Bay banner and watercolored the letters and the shadowed areas using Island Indigo ink and my Aqua Painter.

I popped up the banners using Stampin' Dimensionals and finished off the card with Candy Dots in each corner from the Brights Collection.

Have a great day!

Wednesday, January 15, 2014

Cheers to Another Great Year!

Today I have a gift set to share with you...a hand painted wine glass with a coordinating card made for a friend.

I tried to match the colors used to paint the wine glass to SU! colors...so a few of the colors (and DSP) used are retired.
I used the fun Birthday Candles Jumbo Wheel to create the back ground on the Pixie Pink layer. I used paper piecing on both the large ribbon banner and the small banner to add detail. Here's a closer look...
The die cut label was stamped with an image from the new SAB set called You're Lovely, embossed in White EP and then die cut with the coordinating Deco Label Framelits.
I painted the candles with some of the same fun designs shown on the Birthday Candle wheel. I wrote, "it's my birthday and I'll drink if I want to!" around the glass. My friend really liked this set!
The large main image in the Another Great Year set made it easy to create a larger card than I normally make. I wanted it bigger because I put a 4x6 photo on the inside. I didn't photograph the inside because the photo of my friend was very unflattering, yet hilarious and she would kill me if I posted it anywhere! lol She laughed so hard when she opened card and read what I wrote that she was in tears. She said this card was definitely going in her special memory box.

Thursday, January 09, 2014

Happy Birthday Chalkboard

Today is my hubby's birthday so I'm here to share the card I made for him using the new stamp set - Another Great Year from the Occasions Catalog.

Isn't this card fun!? I used the new Hardwood Background stamp to created the wood frame...stamped in White Craft onto Coastal Cabana and then cut into strips and sponged the edges in Crumb Cake. For added stability, each strip was glued onto strips of light weight chip board. The added thickness will insure that the legs stand up as well as creates a nice frame for the blackboard. I even created a stick of "chalk" out of tightly rolled Whisper White card stock.

After embossing the birthday banner image in white on Basic Black, I felt it needed some color and extra detail so I stamped it again in Black Stazon onto the fun new Sweet Sorbet DSP...which will be available during Sale-a-Bration, and did some paper piecing. Another one of the prints was used in the little banner created with Pennant Parade and the coordinating Petite Pennant Punch. The Natural Chevron Ribbon also used to create the banner is new as well and available in from the Occasions Catalog.

Thanks for visiting today!

Saturday, July 13, 2013

Make A Wish!

Another one of my favorite images in the new catalog has to be this one with the row of patterned birthday candles...it's so cute & fun! It's actually the Birthday Candle Jumbo Wheel, so it will be versatile for creating scrapbook pages and party decor, as well as fun cards like this one.

I used some Dazzling Details on each flame for a little sparkle. Here's a closer look
This will be one of the cards we will be making at my next All Occasions Card Class on August 13th. Check out my events page for more info on this and other upcoming classes.

Have a wonderful weekend!

Monday, December 31, 2012

Henry Says Happy New Year!

I just couldn't pass up this whimsical elephant stamp set, Henry Says, available in the upcoming Spring Catalog. I love all the accessories included...like the banner which can hang from his outstretched trunk.


I stamped Henry on new Sycamore Street DSP, which is available as a FREE selection during Sale-A-Bration 2013! I love the bright colors and fun patterns in this paper pack. After stamping Henry on the DSP and cutting him out, I added a little shading using my Aqua Painter and some Island Indigo Ink. His little eye got lost in all that pattern of the paper so I colored a small Basic Pearl black using a sharpie marker and gave him a new eye.

Isn't the Pool Party Satin Ribbon pretty? It's part of the Sycamore Street Ribbon & Button Pack, also  available as a FREE selection during Sale-A-Bration! You can get these items starting January 22nd...so contact me to host a party or to attend one of my events! While SAB items aren't available for a few weeks yet, Henry is available starting January 3rd from the Spring Catalog.

Like Henry, I would also like to wish you a very happy, healthy & creative New Year!!! If you are going out tonight to celebrate...be safe!

Monday, July 16, 2012

Framed Peace Within

Here is my other 3D project that I submitted for the Artisan Award Contest.

Here's a closer look...


{Stamps} Peace Within

{Card stock} Very Vanilla, Pool Party & Everyday Enchantment DSP

{Ink} Black Stazon, Crumb Cake, Poppy Parade & various other Classic Inks for water coloring

{Tools & Accessories} Aqua Painter, Blossoms Punch, Blossom Petals Builder Punch, Blossom Bouquet Triple Layer Punch, Pool Party & Pear Pizzazz Seam Binding Ribbon, Lucky Limeade 1/8” Organdy Ribbon, Everyday Enchantment Brads, Sponge Daubers, Sanding Block & Sticky Strip {Non SU! Supplies} 6x6 Frame, Mod Podge, Foam Paint Brush, Cereal Box Board (to punch out flower & leaf shapes)

Thanks for visiting.

Monday, June 11, 2012

Two By Two For Wyatt

This past weekend my niece gave birth to her first child...a boy! He is healthy and just beautiful! Of course I had to make a card for the occasion, so it was the perfect excuse to play with some of my new goodies from the new catalog!


I think Two By Two is one of the cutest stamps in the new catalog, and since I knew my niece was due with a baby boy very soon, I had to get it, right!? I also used a couple other new favorites here...the Apothecary Accents Framelits, Chevron Embossing Folder and the Essentials Paper-Piercing Pack. I love to add detail to my creations with paper piercing, so I was super excited to get my hands on these new templates...and the new larger Stampin' Pierce Mat as well. Check it out...
See how easy it is to add some piercing around the edge of the Apothecary Accent Label? This larger size also enables you to easily go across the card front without having to move the template as you go. This is my favorite new tool!

Stamps: Two By Two & Tiny Tags
Card stock: Baja Breeze, Midnight Muse, Raspberry Ripple & Whisper White
Ink: Black Stazon, Midnight Muse, Raspberry Ripple & various other Classic Ink to watercolor
Accessories: Labels Collection Framelits, Apothecary Accent Framelits, Chevron Embossing Folder and the Essentials Paper-Piercing Pack, Stampin' Pierce Mat, Aqua Painter, Raspberry Ripple Stitched Satin Ribbon, Jewelry Tag Punch & More Mustard Brads

What are your favorite new items from the new catalog?

Edited to add: I've had lots of questions regarding the narrow mat behind the stamped image on this card and others. Here is how I do it: Using the same framelit that I cut the white, stamped layer, I traced around the outside of it with a pencil onto Baja Breeze cardstock and then cut it out by hand. Since the framelits cut on the inside edge, tracing around the outside edge will give you a mat that is approx 1/4" all the way around. After cutting, if it's not perfect in some spots adding a little distressing helps. ;-)

Tuesday, April 17, 2012

I can stamp again!

I'm still putting the finishing touches on my room. I have lots of labeling to do yet and I'm still trying to find space for some items...but it's getting there! Yesterday I had to make a few birthday cards, so it was the first stamping I've done in my new room so far. It's going to take a little while to get used to where everything is, otherwise I LOVE it! When I walk into the room for the first time each day it still surprises me. It's so bright & cheery and so much more open than before. I cannot wait to share it here with you all!

Since I have so much to share, I decided to do a post each Wednesday called Workspace Wednesday that I'll share photos and show what works for me as far as organizing, etc...I hope you'll check back tomorrow to see a little bit of my stampin' space makeover! Until then, let me share the first card I created in my new space, along with some of the goodies I picked up at IKEA last week.


I made this card for my son, so I was going for a masculine looking card. I used one of my favorite sets on the retiring list...Crazy For Cupcakes along with my favorite Hostess set this year...Happiest Birthday Wishes. The DSP is from the Brights Collection Paper Stack.

Have you ever been to an IKEA store? Up until last week I hadn't. I've been wanting to go for a long time because I've seen such great organizing ideas in other peoples craft rooms done with things purchased at IKEA. Plus someone gave me a good tip on checking there to get a desk top rather than using a door like I had planned. As it turned out, any standard sized door was going to be a little too long to use for my desk top, so I headed to IKEA. Here's some of what I bought.

All the goodies are resting on my beautiful new desk top. My favorite purchase, other than the desk top, has got to be the Bygel rails for my punches. (Look for more on that in my Workspace Wednesday posts! ;-) The white things in the back are sets of Kasset boxes...here's what those look like all put together.
I thought these were a really good buy...the largest boxes were on sale for only $6.99, and I think the smaller ones were $4.99. They come as a 2 pack in an assortment of sizes. The large ones are 13x15 and 11 3/4" high. I plan to use them to store 3-D paper items I've created for samples, or maybe scrapbook pages in progress, etc...They are intended for magazines so I may also store older scrapping mags in them.

If you are like me and have never been to IKEA, be prepared! It is HUGE and can be very overwhelming! Make sure to go to their website and make your shopping list ahead of time and that will be a real lifesaver. Don't forget to visit me tomorrow for my first Workspace Wednesday posting.

Thursday, March 24, 2011

Birthday Peace Within

Here's a Birthday card I made for my SIL. She loves cats and it is supposed to be Spring here so I thought this was perfect. Ahh...I long for the days when I can lounge outside and soak up the warmth from the sun like this little kitty cat.

Doesn't the Springtime Vintage pillow look cute? I don't think I've ever passed up the opportunity to paper piece this image when I've used it...that pillow just asks for it!

My Four Frames set showed up here while I was making this, so of course I was excited to ink that up! The Four Frames set is four stamps that coordinate with the Decorative Label Punch. The best part about these images is that, like the name states, they are frames with no greetings...so they can be used for any occasion. I think I'll be using this set quite a bit! Four Frames, along with some gorgeous new papers called Paisley Petals are part of Stampin' Up!'s April promo.

Stamps: Peace Within, Four Frames, Watercolor Trio (greeting)
Card stock: Baja Breeze, Certainly Celery, Very Vanilla & Springtime Vintage papers
Ink: Not Quite Navy and various other Classis Inks to watercolor
Accessories: Framed Tulips EF, Baja Breeze Seam Binding Ribbon, Basic Pearls, Decorative Label Punch

Have a peaceful day!

Monday, January 31, 2011

Relaxing Birthday

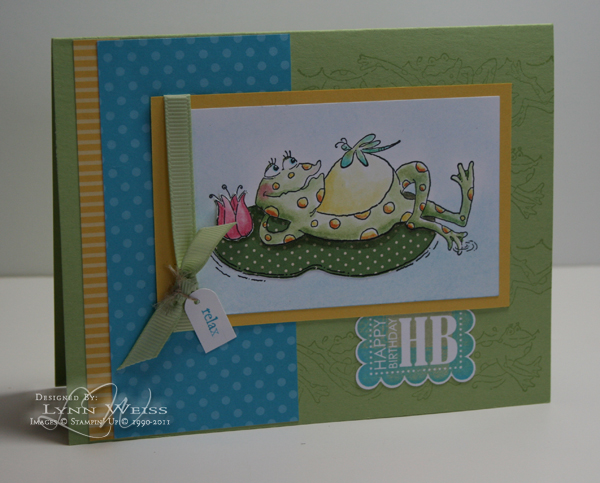
This poor little froggy hasn't been let out of the stamp case to play in quite some time...I think maybe I was longing for a nice relaxing float in the pool. It will be quite some time before I can do that here, but it was fun to color and paper piece this image just the same.

I used the tiny polka dot print from the Woodland Walk papers to paper piece the lilly pad, but the other two prints are from the Brights Print pack in Tempting Turquoise and Daffodil Delight. The scalloped birthday sentiment is from the Sale-A-Bration set Punch Bunch. I watercolored the froggie using my Aqua painter and Classic Inks.

Stamps: Frolicking Frogs, Punch Bunch
Card stock: Certainly Celery, Daffodil Delight & Whisper White
Ink: Black Stazon, Certainly Celery, Tempting Turquoise  & various other Classic Inks for watercoloring
Accessories: Certainly Celery Grosgrain, Linen Thread, Scalloped Square and Word Window Punches

Have a relaxing day!

Photobucket

Thursday, December 03, 2009

Razzleberry Kitty

I've been doing a lot of stamping, I just have not been too good about blogging lately. I've been busy working on Christmas cards, decking the halls and of course Christmas shopping...this is such a busy time of year! I took a break from Christmas cards to make this card for my Aunt who unfortunately lost her kitty cat last week. She was 16 years old, so that is a long life for a kitty. She was well taken care of and very spoiled so she had a good life. My Aunt took it pretty hard, but this card cheered her up a bit.
Stamps: Peace Within, Patterned Pines & Teenie Tiny Wishes
Card stock: Melon Mambo, Rich Razzleberry, Whisper White and Razzleberry Lemonade designer papers
Ink: Black Stazon, Rich Razzleberry and various inks for watercoloring
Accessories: Rich Razzleberry Polka dot grosgrain, Modern Label & Word Window Punches, Aqua painter

Thanks for stopping by...enjoy your day!

Friday, August 28, 2009

More Cow Bell

It's Friday...so that means it's time for another Stamp Something Challenge! This weeks theme is stamp something with an animal theme. Digital Delights by Looby Lou is our sponsor this week so I chose one of her cute images from the new Farmyard Collection.

This is a digital image, so I printed it twice...once on Whisper White and again on a piece of Thoroughly Modern designer paper so I could paper piece his spots and legs. The rest of the image I water colored.

Colors: Rose Red & Soft Suede
Accessories: Soft Suede polka-dot grosgrain ribbon, Vintage brads, Photo Corner, Modern Label & Word Window punches, and a little cowbell I had in my stash.

The whole time I was creating this card I kept thinking about the SNL skit "More Cowbell." It cracks me up so I thought I'd add a link here for your enjoyment. Hope you will play along with us this week at Stamp Something.

Friday, July 31, 2009

Paper Pieced Something

I just love the way paper piecing adds such nice detail to stamped images, so I was delighted to see that our challenge this week at Stamp Something is to use the paper piecing technique. I haven't used my Blooming Beautiful set in a while and I figured the vase would be perfect for some paper piecing.

I used a nice sketch from Mojo Monday and some of my favorite new papers...Thoroughly Modern to create this card. I also used: Rich Razzleberry & Soft Suede card stock, Rich Razzleberry Polka-dot Grosgrain, Nestabilities Scalloped Circle die, Coluzzle & Dew Drops.

I'm heading up North for some fun in the sun with a group of friends for the weekend. Enjoy your weekend...and take some time to join us at Stamp Something.

Friday, July 24, 2009

Come Sail Away on the Catty Cruise - Peace Within

Thanks for dropping anchor to visit my blog today! I hope you are enjoying your tour on the Catty Cruise! In case you washed ashore here unexpectedly, the Catty Cruise is a blog tour featuring 12 talented bloggers sharing projects highlighting their favorite Stampin' Up! products from the newly released Idea Book & Catalog... or Catty for short. If you are taking the full tour, then you sailed in from Linda McClain's blog LMac's Catered Crop. Don't you love the beautiful projects she created with the Cottage Wall papers and the new Butterfly punch?

If you popped in here without knowing about the cruise, I hope you'll join us. Just sail along to the next port with the link provided at the bottom of my post and continue on until you wind up back here...that way you will have visited everyone. If you get lost at sea, then just go on back to our Home Port . Just don't go anywhere until you've see my creations...

I am sharing a few projects I created using one of my favorite new stamp sets called Peace Within. I love to watercolor and I love cats and nature, so I was delighted to see this set in the new catalog. My first project shows how to transform a plain little frame from the Target Dollar Spot into a cute little piece of art, just by using some pretty paper and a few accessories. Kinda like MacGyver...only with stamps and embellishments. hehehe
I love all the patterns in the Razzleberry Lemonade Designer paper pack, but I managed to narrow it down to my favorite two and that's what I used here. I stamped my image onto watercolor paper using Black Stazon and used my aqua painter and classic inks to watercolor. See the pillow that the kitty is napping on? That was stamped onto patterned paper, cut out and then adhered into place. I think the paper piecing technique adds such nice detail to any project.

The finishing touch is the silk daisy from the Pretties Kit. I used my Rich Razzleberry re-inker and my aqua painter to add color to the petals. The center is a White Jumbo Grommet with Razzleberry Lemonade center. Rich Razzleberry Polka-dot grosgrain ribbon was attached to the hangers and it is ready to hang. Here's a closer look...
Here's another way to use this same image and papers but achieve an entirely different look with the spotlighting technique.
I stamped my image onto Whisper White card stock and using the 1-3/4 inch circle punch, I punched out the part of the image I wanted to spotlight. Then I stamped the image a second time onto a piece of Razzleberry Lemonade DP. After water coloring the image on the punched out circle, I carefully adhered it over the top of my full image.

Ink: Black Stazon & various Classic Inks for water coloring
Card stock: Whisper White, Crushed Curry, Pumpkin Pie, Razzleberry Lemonade DP
Accessories: Mat Pack, White Gel pen, Pumpkin Pie Grosgrain ribbon & Dew Drops

My last project uses the other beautiful image from the Peace Within set along with paper from the Thoroughly Modern Designer paper pack.
I stamped my image and water colored the same as described for my first project. I added a sentiment from the Teeny Tiny Wishes set inked in Soft Suede. I matted the image onto Soft Suede card stock and then layered it onto a Top Note cut from the DP. My card base is Kraft card stock which I ran though the Big Shot using the new Perfect Details Texturz Plate. I used the Eyelet Border Punch along the bottom and added some Soft Suede Polka-dot Grosgrain ribbon to finish my card.

PhotobucketI hope you enjoyed your visit...now it's time to sail on to our next port...iSTAMP to see the super talented Nancy Riley's amazing creations using the Level 3 Hostess Set The More the Merrier along with Sunny Days Simply Scrappin' Kit.