Creations by Lynn Weiss ~ Independent Stampin' Up! Demonstrator

ENJOY ~ INSPIRE ~ CREATE ~ SHARE


Showing posts with label Stamp Set - Gorgeous Grunge. Show all posts

Monday, May 22, 2017

Lift Me Up Masculine Birthday

Here's a quick and cheery card using the Lift Me Up Bundle that is perfect for a guy or girl for any occasion. This great stamp set and it's coordinating dies will be available in the upcoming annual catalog, but they will no longer be featured at a cost saving bundle.


I used the retired Sleigh Ride Edgelits to cut the hill and pine tree out of the soon to be retiring Cucumber Crush cardstock. This color wasn't really one of my favorites, but I've been trying to use up my stash and have grown to really like it. For some added interest I stamped it with the line stamp from Gorgeous Grunge...one of my most used sets. How will I resist grabbing it all the time now that it's retiring?

The background is stamped with balloons and some clouds and then sponged. The largest balloon was stamped, diecut and popped up with Stampin' Dimensionals.

Have a beautiful day!

Monday, April 10, 2017

Special Reason Sweet Baby Girl Page

I've been busy doing a little scrapbooking this past week. Why is it that every time I get busy with a project (especially scrapbooking!) it looks like a tornado went through my studio!?


I swear....every flat surface is covered with a pile of supplies. Because I just have to pull out everything that could possibly work on my pages, and then decide nope, don't need that! I even had to drag in an extra table for my DSP!


Look at my messy desk...I end up with just enough space to barely work. Then I spend way too much of my precious stampin' time searching for things that I misplaced. It drives me nuts!  Please tell me I'm not the only one who does this! OK...rant over, and my space has been cleaned, so time to share my page.


I had a  "special reason" in mind when I purchased the Special Reason Bundle...creating some pages featuring our new grand daughter. I decided to use one of my favorite photos I took of her during our first official photo shoot for my first page. She was wearing a little purple headband...so I wanted to use purple on my layout...off to a good start!

I thought so...until I searched through stacks and stacks of beautiful paper (part of the reason for mess!) looking for the perfect print to use with the photo...only to realize I'm seriously lacking in DSP featuring a shade of purple anywhere near close to the headband! How could that be? Purple is one of my favorite colors, and I have enough pretty patterned paper to open a scrapbook store! (Don't tell my husband!) So I decided I needed to make my own Designer Series Paper.


Right now the closest shade that Stampin' Up! carries to the headband is Wisteria Wonder. I like the way it looks with Sahara Sand...which is featured in the lace printed paper from the Falling In Love pack, so I went with those two colors for this page.


In addition to the Special Reason stamp set I used Timeless Textures, Gorgous Grunge and Jar of Love (tiny flower and leaves) to create my own patterned paper. The tiny flower from Jar of Love is a smooth, solid image so I used the kissing technique with the burlap image in Timeless Textures to add some texture so they better coordinated with the flowers in the Special Reason stamp set. I die cut some of the leaves from the Mint Macaron Glimmer Paper that was available during SAB to add a little sparkle. I love that this set has a stamp and framelits to create layered labels, used here to record her name & age.


I used the retired Pennent Punch to create part of the title. I stamped the word "sweet" using the retired Occasions Alphabet set and punched them out with 1/2" Circle Punch. I made the bow using Wisteria Wonder Seam Binding Ribbon. I miss having the seam binding ribbon in the catalog...sure glad I stocked up on that before it retired.

Speaking of retiring...today is the day we find out which items in the current catalog will be retiring. Even after so many years as a SU! demo, I still have a hard time saying goodbye to my favorites. That's why I end up keeping most of my old sets!

Friday, March 24, 2017

Special Reason Pair

Back in the early days SU! carried very little DSP. If you wanted background paper to compliment the main stamped image on your project you had to create it yourself.  So when stamping with my new Special Reason set, I decided to go "old school" and have some fun creating my own DSP.


I love that this set has smaller versions of the flower & leaf, so it really lends itself well to creating a smaller background like I did fr these cards. As you can see, I used two color combos. The first one uses Bermuda Bay & Island Indigo for the flowers and Mint Macaron with Wild Wasabi for the leaves.


The second card features Melon Mambo & Rich Razzleberry flowers. On each of the handstamped background papers I lightly inked over the design using the line image from Gorgeous Grunge inked in Sahara Sand, along with a few ink spotches thrown in for good measure.


For the solid color strip on the left of each card I used the great new Hexagons Dynamic Embossing Folder. I just love the deeply embossed pattern it leaves...don't you? If you don't have this one yet, I highly recommend it! 

Thanks for visiting..have a great weekend!

Wednesday, February 01, 2017

Dragonfly Dreams Thank You

I shared a card very similar to this one a few weeks back. I had created several of the background panels at that time, but I decided to add the beautiful intricate die cut dragonfly to this one.


I used the the stained glass technique by cutting a solid piece from Vellum Cardstock and sponging it with a couple colors used on my background panel before adhering it to the back of the Rich Razzleberry dragonfly.


Using the Wink of Stella Brush I added some beautiful sparkle to the dragonfly.


The inside of the Sahara Sand card base along with the envelope were stamped with the Delicate Details stamp set (FREE during Sale-A-Bration).

I used many different stamp sets and colors to stamp the collage look background panel: Avant Garden (FREE during Sale-A-Bration), Timeless Textures, Gorgeous Grunge & Butterfly Basics.

Colors used: Mint Macaron, Rich Razzleberry, Sweet Sugarplum, Always Artichoke & Sahara Sand. 

Please visit my SU! Store to purchase the products you will need to create many amazing projects with the Dragonfly Dreams Bundle. When you spend $50 you can choose the Avant Garden stamp set, used here for FREE. (There are also many other great products you can choose from as well). I appreciate all orders, and make sure to send a hand stamped card, such as this one, to all who place an order with me.

Enjoy your day! We are finally seeing some sunshine here in Michigan today...it's been far too long!


Monday, January 02, 2017

Avant Garden Dragonfly Dreams

In my last post I stated if I could only purchase one bundle from the upcoming Occasions Catalog it would be the Lift Me Up Bundle...running neck and neck for that top position is the Dragonfly Dreams Bundle! After playing with both, now I can't really say which I would choose if I could only pick one...they are both pretty awesome!


I had some fun using several new products to create this collage look card. The left side of the panel is stamped with one of the beautiful lacey images from the Delicate Details stamp set. This is a FREE set during Sale-a-Bration! It includes 5 border images. The flowers stamped at bottom right are from another Sale-a-Bration set called Avant Garden...so is the pretty leaf stem.

I also used several old collage style favorites to complete this card...Timeless Textures, Gorgeous Grunge and Butterfly Basics. The dragonfly's wings were painted with Wink of Stella for some pretty iridescent shimmer.


While I was at it,  I also stamped a version using Very Vanilla cardstock instead of Whisper White. There are a few other slight differences as well.


I added the birthday sentiment as well as the distressed grid element from Timeless Textures to the background in a few spots.  

Both cards have a Sahara Sand base and used  Rich Razzleberry, Sweet Sugarplum, Mint Macaron, Always Artichoke & Sahara Sand inks.

Which version do you like best?

Thanks for visiting!

Monday, November 21, 2016

Flourishing Autumn Thank You

Here's an Autumn take on a card using the Flourishing Phrases stamp set that I had shared here on my blog previously.


The gorgeous Copper Foil Paper die cut with the beautiful Flourish Thinlits Dies works well with the elegant feel of this stamp set.

I used the rock 'n roll technique to ink my flower and leaves. The flower was inked first in Cajun Craze and then I rolled the edges in Elegant Eggplant. A Sponge Dauber was also used to add Elegant Eggplant ink to the inside of the flower as well. The leaves were first inked in Always Artichoke and then in Cajun Craze.

I had a little boo-boo smearing a bit of ink on my finished floral stamped piece, so I went over the top of the stamped panel with a stamp from Gorgeous Grunge inked in Crumb Cake...and you thought I planned it that way! Sometimes little mistakes turn into opportunities to add more detail or embellishments! In this case I love the the finished card more with the added texture than having it plain. My stampers who made this card at my last All Occasions Class all prefered it this way as well, and added the texture to their cards vs leaving them plain.

Don't forget...today is the first day of the Online Extravaganza Sale!!!

Today starts the sale with discounts on some products for 24 hours only! (the rest will be available for an entire week...or until sold out) Visit my Stampin' Store 24/7.

Friday, July 22, 2016

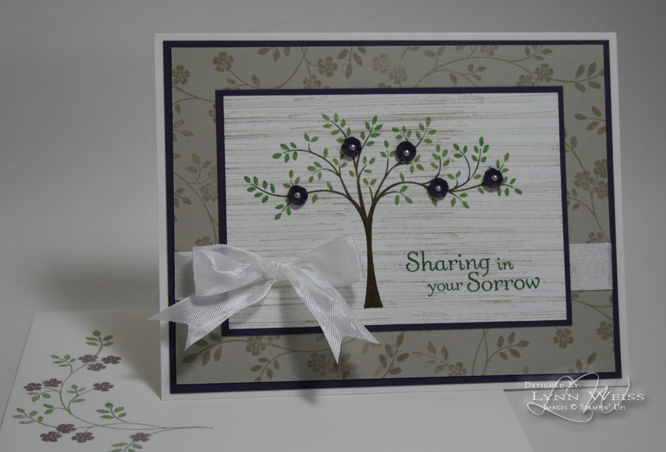
Thoughts and Prayers Flowering Tree

My hubby's two week vacation is winding down. It's been warm and sunny, so lots of time to enjoy our pool and get some projects done around the house. Most evenings I've been too busy or too tired to get downstairs in my stamp room. Unfortunately, I received some sad news earlier this week which forced me to get in there and create a sympathy card.

Without doing much stamping in the past couple weeks, I think I'm a bit rusty and had a hard time coming up with something suitable...sympathy cards are always difficult to create anyways. I ended up pulling out my go to sympathy set - Thoughts and Prayers and created this card.


There's a teeny tiny flower die in the Fiesta Time Framelits that was perfect for creating some flowers for this tree. I cut them from Elegant Eggplant cardstock...which for some reason didn't show up that color in my photo. Too late to try and take a better photo however because the card is now on it's way to the recipient. So just imagine that the flowers and mats are Elegant Eggplant, OK? I really love that color paired with Sahara Sand, which is what the main panel is. The flowering vine stamp creates a pretty background when stamped multiple times.

I used the line, wood grain-like image from Gorgeous Grunge inked in Sahara Sand and then stamped off once. It added some interest to otherwise plain background but was light enough to not over power the tree.

Thanks for visiting...I should be back to posting more regularly soon. Have a nice weekend!

Tuesday, June 28, 2016

Peachy Jar of Love

Flowers, not peaches, fill this little jar...but I did use Peekaboo Peach along with Flirty Flamingo for this cheery color combo.

The new Jar of Love stamp set is so much fun! It has so many little pieces that you can stamp and then easily die cut using the coordinating Everyday Jar Framelits. I love that these two items are available in a bundle at a 10% savings. Trust me...you will want them both!

In addition to the two new In Colors, Peekaboo Peach & Flirty Flamingo, mentioned above, I have also used Pool Party and Pear Pizzazz to round out my color combo. Pool Party is the perfect color if you want to create the look of a vintage Mason jar.

The cute Delicate White Doilies add another vintage touch to this card. They are a little bit smaller, with a little different pattern than the previous Tea Lace Paper Doilies SU! carried. I think they work well with the Lovely Lace Embossing Folder used on the Flirty Flamingo layer.

Peekaboo Peach Ruched Ribbon and a few Basic Pearls adhered to the center of each flower add the finishing touches to the card.

When working with many die cut pieces like on this card, sometimes it is difficult to re-create the original arrangement when you go to adhere each individual piece into place on your card front. I know I've ran into this problem on numerous occasions. Many times, I would take a quick photo to help me re-create the arrangement I had fiddled around with until I was happy, but that didn't always guarantee it would turn out as I had hoped. Recently, I saw a fantastic trick using Glad Press'n Seal Wrap that will change your life! Well, maybe I'm being a bit dramatic, but this is seriously a GREAT tip!

When you are at the point in your project where you love the arrangement you have created and are ready to adhere it into place, tear off enough Press'n Seal Wrap to cover your project. Place the sticky side down on top of your arrangement and lightly rub over the top of it, as shown below. (don't mind my messy work surface!)
After you have applied light pressure to the die cuts you want to adhere (I was only concerned with the jar and the flower/leaf pieces not the background), you can lift up the wrap and all of the pieces should be stuck in place. Flip over the wrap and now you can easily apply your adhesive of choice to the backside of your die cut pieces all at once instead of each individual piece.
Ooops...as you can see, I made use of the other side of my cardstock to re-stamp the jar because I wasn't happy how I lined up the water image the first time! So just pretend that the backside is just plain Pool Party card stock, OK? ;-)

After I applied Tombo Multipurpose Glue to the back, I flipped the wrap over and carefully hovered over my background piece I had ready, lining up from top to bottom and side to side. The wrap makes this so easy! Once you have your arrangement centered, carefully lower onto background and then press die cuts into place. Allow to let set for a moment for the glue to adhere to your background. Then simply lift up gently on the wrap to remove.

One piece of wrap can be used multiple times, I just stick it inside the front of one of my drawers so it's handy until I need it again. Here is the link to the video where I first saw this tip.

Monday, June 20, 2016

Foxy Father's Day

I hope you all had a wonderful Father's Day weekend honoring those Dads in your life. I shared the card I created for my Dad in my last post, and today I'm sharing the card I created for my husband using the same stamp set, colors and technique.


Wilderness Awaits is a great set to create masculine cards, and this fox image is my favorite! He looks especially foxy with the copper embossing doesn't he!? This image also works well with the new Layering Oval Dies. I used the faux patina technique to create the background and love the look with Copper Embossing Powder.

I also used a couple other retired copper products...the Vintage Brads along the top as well as the Brushed Copper Cardstock I used for the mat on the fox image. I'm hoping for some new copper accessories in the Holiday catalog in time for Fall projects.

The "Happy Father's Day" label was created with the Thoughtful Banners stamp set and the Duet Banner Punch. The new 5/8" Burlap Ribbon works great for masculine cards. I really like it's loose weave as it allows the background to show through.

If you like this card, you may be interested in purchasing my Artistic Wilderness Card Set Tutorial. It  is a step by step 17 page tutorial with detailed instructions and lots of photos using the Wilderness Awaits stamp set along with the faux patina technique, lots of great tips on watercoloring and more.

Have a great day!

Saturday, June 18, 2016

Wilderness Awaits Copper Patina

The Wilderness Awaits stamp set is the perfect choice to create masculine cards for nature lovers. Here is the card I created for my Dad for Father's Day.

I used the faux patina technique with Copper Embossing Powder for the background. I had this embossing powder left in my stash from when SU! used to sell several different copper products, so not sure if it's exactly the same as the new Copper EP. I also used some pretty Brushed Copper Cardstock we used to sell as well...I'm hoping they bring that back as well. I'm down to only two sheets!

I watercolored the elk using my Aqua Painter and then I lightly stamped over it using the Gorgeous Grunge stamp set. The "Happy Father's Day" label was created with the Thoughtful Banners stamp set and the Duet Banner Punch. In the below photo the light hits the copper embossing and shows the background clearer than in my first photo.
I really like the new 5/8" Burlap Ribbon. It's loose weave allows the background to show through. It works great for masculine cards.

If you like this card, you may be interested in purchasing my Artistic Wilderness Card Set Tutorial. It  is a step by step 17 page tutorial with detailed instructions and lots of photos using the Wilderness Awaits stamp set along with the faux patina technique, lots of great tips on watercoloring and more.

I hope you all have a wonderful day tomorrow honoring the fathers in your life. My Dad lives out in Las Vegas, so unfortunately I won't get to see him. I do however have a nice dinner planned for my husband and our boys will be here to celebrate the day with him.

Friday, March 04, 2016

Flashback Friday - Roses in Winter

It's Friday...and time for a blast from the past! Today I have a card to share using the gorgeous stamp set Roses In Winter. It is one of the sets I have available for sale on my Retired Stamps Page.

It is a 2 Step Definitely Decorative stamp set...meaning it uses more than one stamp, which are layered to create the finished image. The Definitely Decorative line of stamps are great to use on different surfaces such as painted furniture, walls, fabric...and of course paper.
Colors used are Watermelon Wonder, Mint Macaron, & Bermuda Bay and also the still current Gorgeous Grunge stamp set. The background was embossed using the Spring Flowers Embossing Folder, which is available right now on the Clearance Rack.

Roses in Winter was one of the first sets I purchase as a demo. It retired back in 2007, the same year I started my blog, so even though it was one of my most loved & used sets, most of  of my creations using it were not shared here. However, I did find this card here.
The sentiment on this card uses Sincere Salutations,which is an awesome set as well. I have both of these sets available for sale on my Retired Stamps page. If you would like to purchase the Roses In Winter set, as a bonus I am including the card and matching envelope I shared here today along with three other cards for inspiration...all for $20. Please contact me if you are interested in this or any other sets I have for sale.

For more info regarding these sets and to view all my retired stamps for sale, visit my Retired Stamps page.

Have a wonderful weekend!

Sunday, December 06, 2015

Home For Christmas & Autumn Blessings Pocket Album Tutorial

I'm so excited to finally be able to share these great new albums I've created to hold holiday memories. I have also written a step by step tutorial if yo are interested in creating these albums for yourself.

After making one, I am sure you are going to want to create several of these versatile mini albums! They go together quickly with coin envelope pages that create pockets to hold tags, photos, journaling or memorabilia. The cover is made of chip board wrapped with DSP for a professional, finished look. The hinge style binding allows enough spacing for heavily embellished pages, and also enables the album to close flat. The two albums shown in this tutorial are the adorable Home for Christmas Album and the Bohemian Autumn Blessings Album. By simply changing your papers and embellishments you can create an album for any occasion.


The page sizes are staggered to really show off the the Designer Series papers and embellishments right when you open the cover and make you want to flip from page to page to take in the whole album. Here's a peek inside of the Christmas album. Wouldn't this make a darling Baby's 1st Christmas album.


The Autumn Blessings album uses the Bohemian papers, Vintage Leaves and Feel Goods sets, but you can change it up using the stamps you have to fit any occasion. Here's a peek inside...


Each album has 6 pocket pages...that's a total of 12 pages with front and back, plus 6 tags...front and back. That's a lot of area for photos and journaling! Here's a closer look at a few elements on three different pages inside the album...ready to add photos!


The Home for Christmas album uses Home for Christmas DSP along with the Cozy Christmas stamp set and Sleigh Ride Edgelits. Here's a closer look at a few elements on three different pages inside the album, ready to fill with your Christmas memories.


My 25 page tutorial, packed with quality photos, will take you step by step to create both of these albums. Once you learn how the wrapped chipboard cover and binding goes together you will be able to make albums for any occasion. Recreate the pages exactly as shown, or put your own spin on them using supplies you have on hand. I encourage you to personalize your album the way you would like. I think you will have fun creating this keepsake album!  Don’t be afraid to use some old favorite stamps sets and embellishments that may have retired. I used a few favorite retired sentiment stamps as well as a few embellishments in my albums.

I've had a few questions regarding the coin envelopes I used for this project. Here is a photo of what they look like before I cut them down...

They are No. 7 Coin Envelopes measuring 3- 1/2 x 6- 1/2". the weight is 28 lb Kraft. I've seen them in lots of other colors as well. I have a good sized box of the coin envelopes, so if you need those I am offering that as an option as well. Unfortunately I don't want to deal with variable pricing to mail them outside the United States...sorry. 

The finished size of the album is 4x7"

Coin Envelope Pocket Album Tutorial
The full 25 page, step by step tutorial outlining how to create both the albums shown above, emailed to you for $7.99.
After receiving payment, I will send the PDF file to the email provided with your PayPal payment. I usually check my email a few times daily, but please allow up to 24 hours for delivery to your inbox.

Coin Envelope Pocket Album Tutorial + Envelopes
In addition to the 25 page, step by step PDF tutorial emailed to your inbox as described above, I will mail you 12 coin envelopes which will allow you to create two albums using your additional supplies, for $10.99. (This option is for inside the United States only.)

After receiving payment, I will send the PDF file to the email provided with your PayPal payment. I usually check my email a few times daily, but please allow up to 24 hours for delivery to your inbox. I will do my best to put envelopes in the mail to you the same day, but please allow up to a week for the envelopes to arrive to your home and be sure to include your ship to address.

If you have any questions regarding supplies needed to complete this project, please don't hesitate to contact me.

If you have yet to purchase one of my tutorials, below are a few comments others have said after receiving one of my previous tutorials:

Kathy: "Thank you so much for the wonderful tutorial. Your work is stunning."

Barbara: "I have ‘stumbled’ upon your blog and it is truly amazing!!!! You are an amazingly talented and creative woman. I am grateful for your ideas and inspiration!"

Isobel: "Thank you so much for a speedy delivery of your tutorial. It looks fantastic and very detailed."

Dianna: "These cards are great!! I have bought tutorials from you before & you do beautiful work :) Thanks so much."

Kim: "Lynn, I made the cards with your tutorial and just love them...I enjoyed learning new techniques."

Thank you to all those who have purchased tutorials from me in the past and an extra THANKS! to those who have taken the time to share their feedback...I really do appreciate it! I hope you all love this project as well!