Creations by Lynn Weiss ~ Independent Stampin' Up! Demonstrator

ENJOY ~ INSPIRE ~ CREATE ~ SHARE


Showing posts with label 3D Items. Show all posts

Tuesday, December 11, 2018

Snow is Glistening Advent Calendar

This project was a real labor of love. I had hoped to have it completed by December 1st, but it took me much longer than anticipated. I am really happy with the way it turned out though. The best part was giving it to my sweet granddaughter yesterday! Right now she is still a little young, but I hope it will become one of the holiday traditions she looks forward to each year. Here is the finished piece, along with lots of other photos below.


This is a kit from Kaisercraft that I purchased quite a while ago. I had forgotten I even had it but came across it when cleaning my studio one day this past summer. Wish I had started it then! The kit comes with a balsam wood frame, drawers and numbers made of chipboard, BUT absolutely no instructions! It only has one photo showing what it looks like completed. I thought perhaps my kit was packaged without the instructions by accident, but after searching online I found others complaining of the same thing. Unfortunately before I could get to the fun part of decorating there were several grueling steps that were required to start with. Let me tell you...this first part was absolutely NO FUN at all! I will share how I put this together to hopefully help others.


First, the wood parts came connected which required them to be cut apart. If I had access to a band saw it would have been a piece of cake. Instead, I had to snip each piece using tin snips. Honestly my hand hurt for days afterwards. I saw many others who created this project saying they used a pair of  Tim Holtz scissors which cut through easily...but I didn't have those. I tried my old SU! rubber cutting scissors but those didn't work, so I went with the tin snips. Each little nub had to be sanded afterward in order for it to fit into the slots on the main backing piece.


After the cutting and sanding, there was the task of painting each piece. I used red acrylic paint. I was careful not to paint the nibs or allow paint to drip into the slots. These pieces fit together quite snugly and even the slightest amount of paint would make assembly very difficult. As you can see, I wasn't too concerned about even coverage in the center of the piece because I knew that would be covered. After 2 coats of paint and allowing it to dry overnight I assembled the frame. Despite being careful while painting, several of the small pieces had to have the nibs sanded down to fit into the slots on the frame to create the cubbies for the drawers. After all the pieces were in place, I carefully applied wood glue to the slots from the back where each piece joined the wood backing frame.

Finally I could get to the fun part! I picked several patterned papers for the drawers...mostly retired SU!, but I also used a line from Simple Stories called Oh What Fun! that had adorable little characters like snowmen, reindeer and penguins on it. I cut each strip to cover three sides and a square of each for the back side to cover the seams.

The 3/4" Circle Punch worked perfectly for the notch in the center of each drawer. I used Tombo Multipurpose Adhesive to assemble the little chipboard drawers. As I assembled them I attached a small rubber band on each one to allow the glue to set. I also used the same glue on most of the paper so it would easily slide into place on the chipboard, but on each end I also used Tear & Tape Adhesive as well. This helped add strength to the drawers and really held the paper in place while the rest of the glue dried.

I decorated each drawer using a variety of punched and fussy hand cut pieces. Each one is numbered using die cuts, stickers and the Labeler Alphabet stamp set. Even though the kit came with nice chipboard numbers, I didn't use them because they were quite large and left little room for other embellishments.


After decorating all the little drawers I created a winter scene to fit into the center. I used the Snow Is Glistening stamp set embossed with White Embossing Powder for the trees and the coordinating snowflake dies for both this back ground piece and for many of the little drawers. Here's a closer look at the drawers...


and the bottom drawers...
The center part has some Evergreen Sprigs, Red Polka-dot Ribbon and some charms that were available from SU! during previous Holiday Catalogs.

The 3-D resin Santa figurine was something I found in my stash of craft supplies...not sure where I got it? He's holding one of the snowflake charms that were available last month with the Snowflake Showcase of products.

More detail on each of the little drawers.

The drawers are large enough to hold two little candies each


Next year when Madelyn is a little older, it will be fun to fill it with other little items besides candy. For now, I think she enjoyed looking at all the little drawers and eating the Reeses Peanut Butter cup.


Now that I have this project finished I can concentrate on getting other things done. It's such a busy time of year! Thanks for taking the time to visit me here.

Monday, June 25, 2018

Enjoy the Ride Travel Themed Tray

Today I have a fun project to share that I've been working on a little at a time over the past couple weeks. I'd add a few things here and there and play around until I liked it. I finally decided it was done (for now) and adhered everything into place over the weekend.


This piece was created to hang in our vintage camper. (we are still in the middle of renovating...and that's a whole other story!) Anyways...I found this 7 Gypsies Tray at a garage sale, brand new for around $4 everything else I had in my stash. These trays were super popular maybe 8 or so years ago? I remember that Stampin' Up! sold one in black for a little while...I think it was part of a kit. Not sure if you can still find these for sale anymore...other than garage sales that is! lol

Each compartment inside the tray measures 4x6 so that works out perfect if using photos or in my case beautiful DSP. The top 3 compartments I used a half sheet of gorgeous paper by Webster Pages from the Strawberry Fields line. I love the "always take the scenic route" quote...not in love with the die cut butterfly I added...might be swapping that out for more realistic shape.


The scrabble tiles were also a garage sale find...I think they are the perfect touch for this travel themed tray. I made the flower in the bottom corner using the now retired spiral flower die and added a Vintage Brad to the center...I think maybe those were my all time favorite SU! embellishment. They were a little bulky for cards, but I love them for 3D projects like this.

Thanks for visiting!

Monday, April 11, 2016

Picture Perfect Botanical Canvas

On Friday I posted a little peek at an upcoming project I was working on that uses many of the same products used to create the Picture Perfect Card Set. Instead of a card this is a home decor item perfect for Spring & Summer decorating. I just love the way it turned out! You can mount the finished piece to a canvas as shown here or frame it using a shadowbox frame.


For everyone who has already purchased the Picture Perfect Card Set Tutorial, check your inbox because I'm sending you the Picture Perfect Botanical Tutorial for FREE! You can easily create the above project to coordinate with your decor by following the steps outlined in my 7 page tutorial which includes lots of clear photos.

Note: the opportunity to receive this latest tutorial for FREE ended last night at midnight. I am however offering the PDF available for purchase in two ways...

The Picture Perfect Botanical Tutorial 7 Page PDF can be purchased on it's own for only $3.99 by simply clicking on the Paypal button below.


Purchase both tutorials together and receive a discount :
The Picture Perfect Card Set & Picture Perfect Botanical Tutorials can be purchased together for only $8.99 by simply clicking on the Paypal button below.


The original 20 page PDF tutorial includes detailed step by step instructions along with more than 40 clear photos, lots of tips and color charts to take the guess work out of which colors to use with this multi layered two-step stamp set. All the details can be found in this post.


The Picture Perfect Card Set Tutorial can be purchased on it's own for only $6.99 by simply clicking on the Paypal button below.


If you have any questions regarding supplies needed to complete these projects please contact me. Thanks again for the great response! I hope you enjoy this companion project.

Friday, April 08, 2016

Picture Perfect Textured Botanicals

Response to my Picture Perfect Card Set has been fantastic! I'm so glad to hear that you are really enjoying my tutorial. As a thank you to those who have already purchased my newest tutorial, and to all those who purchase it over the weekend, I'm offering a FREE Bonus Project!

What do you get when you combine a soft water-colored background stamped with elements from the Timeless Textures stamp set and layer it with the beautiful hummingbird from the Picture Perfect stamp set and gorgeous die-cut flowers and foliage using the Botanical Builder Framelits? Toss in a little shimmer & shine and it looks something like this...


I don't want to give away the entire finished project just yet, but I'm sure you will love it! The finished piece can be mounted on a canvas or put into a shadowbox frame. I used my favorite shades of purple for my flowers to work best with my decor, but you could easily substitute your favorite colors for a totally different look.

So, if you have already purchased my Picture Perfect Card Set Tutorial  be on the lookout for this FREE PDF tutorial delivered to your inbox on Monday. To all those who purchase it through this weekend, by midnight on Sunday, April 10th...you will receive it as well!


The Picture Perfect Card Set Tutorial can be purchased for only $6.99 by simply clicking on the Paypal button below. Details for this tutorial can be found in my original post.

After receiving payment, I will send the Picture Perfect Card Set PDF file to the email provided with your PayPal payment. I usually check my email a few times daily, but please allow up to 24 hours for delivery to your inbox. On Monday I will send the Bonus PDF file as my extra thank you.

Have a wonderful weekend!

Sunday, February 14, 2016

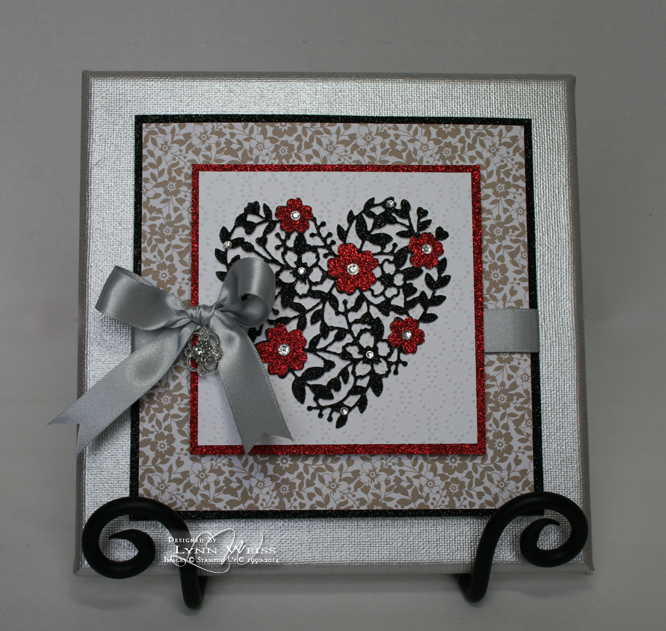
Bloomin' Heart Canvas

Happy Valentines Day! This beautiful canvas went together in no time thanks to the gorgeous Bloomin' Heart Thinlit Dies!


I had all my pieces ready, and had originally intended to use a heart cut from Red Glimmer Paper, until I saw this gorgeous card on Pinterest created by Karen Barber. I thought the heart looked so dramatic & elegant cut from Black Glimmer Paper, so thanks to Karen for the inspiration!

It's funny that I already had my embossed piece ready using the Elegant Dots Embossing Folder even before seeing her card. I think it layers nicely with the intricate heart. Here's a closer look...


Along with layers of Glimmer paper, I used a print from the Love Blossoms DSP Stack. A bow made from Silver Satin Ribbon and some Basic Rhinestones finish off my canvas.

Just a reminder...tomorrow is the last day to choose several items as your freebie during Sale-a-Bration. After February 15th, these items will no longer be available:

  • Sky is the Limit stamp set
  • Hello stamp set
  • Perfectly Artistic DSP
The good news is that three more great products will be taking their place!

Have a lovely day!

Wednesday, November 25, 2015

Thanks to You Pillow Box

Love the size of the boxes created with the Square Pillow Box Thinlits Die!


Perfect for an autumn gift or favor...this one is filled with chocolate. I just stamped some Vintage Leaves randomly over the Cajun Craze die cuts. Embossed the beautiful oak leaves in gold and cut using the Leaflets Framelits and the thank you sentiment is from the Happy Notes set...this is available as a bundle with the Lots of Labels Dies.

This bundle along with the Vintage Leaves Bundle were on my very first new catalog order this year. I highly recommend both of these die sets...I have gotten a LOT of use out of both.

If you have been contemplating getting the Square Pillow Box Framelits...they are on the Holiday Retiring List, which are now available while supply lasts.

Have a wonderful Thanksgiving tomorrow!


Friday, October 30, 2015

Trick or Treat!

It's almost time to have your treats ready to pass out to the little ghosts and goblins! We live out in the country with houses quite far apart, so we don't get any trick or treaters at our house. But, that doesn't stop me from making up some cute little treats...

I used the Square Pillow Box Die and the Witches' Night stamp set to create this Halloween treat box. Happy Haunting Washi Tape is adhered all around the box as well...love the cute little bat print! This box is actually quite a good size, check out how much candy it holds...

We had our annual Halloween party this past weekend...it was our 25th! We had a really good turnout...over 70 people, so during the month of October getting ready for our party has been taking up all my spare time. We go crazy decorating our barn & yard for the event. Here's a pic of hubby & I in our costumes.
I bought black clothing from the thrift store and cut and painted it for my costume. I even had matching shoes...but unfortunately no photos to show my entire costume. My entire costume cost me about $20. The most expensive part was the $8 spiderweb stockings.

I put together some prize baskets to award those with the best costumes. Here's one of them...


The cups were decorated with vinyl that I designed and then cut using my Silhouette machine.


I also made a sign to hang over our bar where we serve up my witches' brew during the party...


I didn't get a photo of it at the party...it looked much cooler in it's "natural habitat" over the cauldron and among all the potion bottles, etc...I have displayed in my witches' kitchen area of our haunted barn. I bought the string of lights inside at the Dollar Tree..on the box it said 5 feet...well that five feet included over 2 foot of cord :-( so it didn't go around the entire frame. Since I bought it last minute didn't have time to go out looking for longer strand of lights...next year!

Here's a few more photos of our decorations...


The entryway to our graveyard...

 and a closer look at our pumpkins...


If you are like me and love to carve unique looking pumpkins, the past few years I've been downloading some faboolous designs from Zombie Pumpkins. Check him out...he's got so many great designs it will be hard to choose!

Hope you have a SPOOKTACULAR Halloween!

Thursday, October 15, 2015

Witches' Night Candles

Most longtime readers of my blog probably know that I just love Halloween! Each year we have a big Halloween Party in our barn which we spend most of October decorating...which is why I have not posted much lately. Each year I try to add several new handcrafted items to my holiday decor, and today I have a pair of candle wraps I have created using the Witches' Night stamp set along with several other items which are available in the Holiday Catalog.


I try to make candle wraps to decorate my battery operated candles for each season. It really dresses up an otherwise plain candle, don't you think? The Spider Web Doilies really look spooky as they glow at night against the light background of the candle. Here's a look at the candles in better light to see all the detail...


The Halloween labels are attached to strips of the sparkly Black Glimmer Paper and wrapped around the candles. Here's a view of the side...


I also used Happy Haunting Washi Tape adhered to a strip of Tangelo Twist card stock. I colored the center of an Iced Rhinestone Embellishment orange for some extra bling...


If you like the idea of creating candle wraps for your candles, you may like my Golden Vintage Leaves Set. Included in this tutorial is an autumn leaf candle wrap. Anyone who purchases my tutorial during the month of October will also receive all the details on how to create this Halloween candle wrap as well.

Monday, May 18, 2015

My Mom, My Friend

I saw the quote, "If I didn't have you as my Mom, I would choose you as my friend," on Pinterest one day and thought it was the perfect quote to use on a scrapbook page of my Mom & I that I was planning to scrap.

I made a couple paper roses using the Spiral Flower Die. The larger one uses both Perfect Plum and Blackberry Bliss. I sponged the Tea Lace Paper Doily lightly with Perfect Plum ink so it blended with the other embellishments. I used only two stamps for this project...both are background stamps. Of course the Hardwood stamp inked in White Craft over the Basic Gray background, then the more subtle Canvas background over the printed quote and again on the Blackberry Bliss mat. Here's a closer look at the embellishments...

I layered Blackberry Bliss Stitched Satin Ribbon over Silver Satin Ribbon. The pretty pearl embellishments are something I've had in my stash for quite some time...glad I was finally able to use them. Here is the page inside the 8x8 shadowbox frame.
I gave this framed page to my Mom on Mother's Day. She loved it! I'm lucky to have her as not only my Mom, but my friend as well. (Even though she likes to tell people we are sisters...and she is the younger sister!)