Creations by Lynn Weiss ~ Independent Stampin' Up! Demonstrator

ENJOY ~ INSPIRE ~ CREATE ~ SHARE


Showing posts with label Big Shot. Show all posts

Tuesday, November 27, 2018

Snow is Glistening in the Woodland

Sparkling silver snowflakes adorn this embossed white birch tree background created using new items from the Snowflake Showcase group of products along with one of my old favorites...the Woodland Embossing Folder.


The Snow Is Glistening stamp set has an image that consists of a little group of snowflakes. This was the perfect size to stamp in between the trees after it was embossed. I started with Whisper White card stock and inked my embossing folder with Pool Party ink before running it through my Big Shot to create this background. The snowflakes were die cut using the Snowfall Thinlits Dies. Basic Rhinestones and Silver Edged Satin Ribbon finish off this card which is perfect to send for any occasion during the winter months. 

There are only a few more days left to order these awesome products...get them while you can! 

There are so many fantastic new embossing folders in the annual catalog...including the Woodland Embossing Folder. Today and tomorrow (until midnight)  you can get 10% off all tools - this means embossing folders, punches, dies and more! PLUS all inks...which includes markers, ink pads etc...from the Annual Catalog!


Visit the SU! Website to learn all the details. Don't forget to select me as your demo and use the Hostess Code: JAG97PFA

Tuesday, January 02, 2018

Peaceful Birch Trees

Today is the final day to purchase from the Holiday Catalog. There are so many awesome products such as the Carols of Christmas stamp set used on this card...so don't miss out!


To create this card, I inked up the Woodland Embossing Folder using my Smokey Slate ink pad and then I used a Sponge Dauber to add just a bit of Dapper Denim ink before carefully placing my Whisper White cardstock into the folder and running it through my Big Shot.

The "PEACE on EARTH" sentiment from Carols of Christmas was embossed with Silver Embossing Powder and the cut with the Stitched Shapes Framelits. I adhered the embossed square  to a slightly larger square of Silver Foil and attached over the Silver Metallic Edged Ribbon using Stampin' Dimensionals. 

Thanks for visiting!

Sunday, December 24, 2017

Merry Christmas!

Wanted to post real quick just to wish you and your family a wonderful Christmas! This is the first year of being a SU! demo that I didn't send out Christmas cards. I feel bad, but time just got away from me while I was busy with so many other things. Rather than make myself crazy, I decided to give myself a break. I did create one Christmas card this year...for my grand-daughter's 1st Christmas.


I used the Card Front Builder Thinlits to die cut the pine trees for my background. The slopes were perfect for this adorable sledding bunny from the retired Merry Crittermas stamp set. The bunny was watercolored and then I added some sparkle with Dazzling Details, Basic Rhinestones and the Metallic Edge Ribbon.

I did a little Christmas photo shoot with my dear grand-daughter last month, and here's one of my favorite shots. I hope to scrapbook this and a few others real soon.

Merry Christmas!!!

Monday, December 11, 2017

Easy Gift Tags

I've been busy wrapping gifts and getting ready for Christmas...as I'm sure most of you also are. Such a busy time of year! I made a bunch of cute, yet easy gift tags for all my packaging. I think they turned out nice and really kicked up my Dollar Tree wrapped gifts up a notch. (why spend a bundle on wrapping when it just gets torn off and thrown away, right?) Take a peek ...


I used punches and dies to cut out Stampin' Up! card stock to coordinate with my wrapping paper. Each die cut shape has a circle punched from the gift wrap.
I attached the tags to the gifts with curling ribbon.
Here's a closer look at a few of the tags.
Some are embellished with Basic Rhinestones and Frosted Sequins.
All are stamped on the back with plenty of room for a greeting and names.
If you have not yet finished your Christmas shopping, and you have paper crafters on your list...GREAT NEWS...

FREE SHIPPING from Stampin' Up! all day today! Get those stampers on your gift list a special gift OR treat yourself to something!

Wednesday, October 18, 2017

Jar of Love Thank You Card

Here's a favorite stamp set that I haven't used in a little while...Jar Of Love. A couple of  this years In Colors were used for a fresh look.


Colors used: Berry Burst, Lemon Lime Twist, Peekaboo Peach & Pool Party.

The jar of flowers was arranged on a Whisper White background that was embossed using the Pinewood Planks Embossing Folder. A pretty bow using Berry Burst Crinkled Seam Binding Ribbon finishes off the card.

Have a beautiful day!

Monday, July 10, 2017

Sugarplum Dragonfly Dreams

When I design the cards featured in my card classes I try to keep the cards fairly simple, yet still have pretty details to make them interesting. This card using the beautiful Dragonfly Dreams stamp set and it's coordinating Detailed Dragonfly Thinlets was one of the four cards created at my last All Occasions Card Class.


I just love the color combo of Sweet Sugarplum, Fresh Fig with a pop of Berry Burst. The detailed layer of the 2-step dragonfly image was stamped in Fresh Fig, and the solid image used to add color to the wings was sponged with color to give a blended look. You cannot tell from my photo, but the wings have beautiful shimmer from the Wink of Stella used over the top of the wings.

The sentiment was stamped in Basic Black and set off with a strand of Black Mini Sequin Trim...isn't this new trim fun? The dragonfly sits on a Whisper White background layer textured with the awesome Hexagon Embossing Folder.

Thanks for visiting today...enjoy your day!

Monday, May 15, 2017

Botanical Bliss Easel Card

I hope you all had a wonderful Mother's Day! I made an easel card for my Mom using a favorite photo from last Mother's Day.


I used some favorite retiring products to create this card...Botanical Builder Framelits for the flowers and Stylish Stems Framelits for the leaves.


The butterflies are from the much used Papillon Potpourri stamp set and coordinating Bitty Butterfly Punch. I stamped in Rich Razzleberry on Whisper White and used Clear Wink of Stella pen to add some shimmer. Blooms & Bliss DSP was embossed with the Hexagons Dynamic Embossing Folder for the base. I'm happy to see that this awesome EF will be available in the upcoming Annual Catalog.


I used the Thoughtful Banners stamp set for the greeting and the Stitched Shapes and Layering Ovals Framelits to cut and layer the greeting. Sweet Sugarplum Ruched Ribbon and lots of Basic Rhinestones were used to embellish.

I shared a 2 page scrapbook layout using some of the same products here. Have a beautiful day!

Wednesday, July 13, 2016

Flourishing Thank You

I haven't been too good about updating my blog recently...hubby has been on vacation and we've been enjoying our all too short Michigan summer while we can! I have been trying to get into my stampin' studio during the evening and have been working on a few projects. Today I have a thank you card that uses the beautiful Flourish Thinlits.

These are hands down my favorite new dies...maybe even ever!? They are so pretty & elegant.The only stamping I did here was the sentiment which is from the Thoughtful Banners set. I die cut my shapes from Mint Macaron cardstock and ran it throught the Big Shot using the Elegant Dots Embossing Folder.

ENJOY your day! Don't forget....
Shop Now to earn your Bonus Days coupons!

Sunday, February 14, 2016

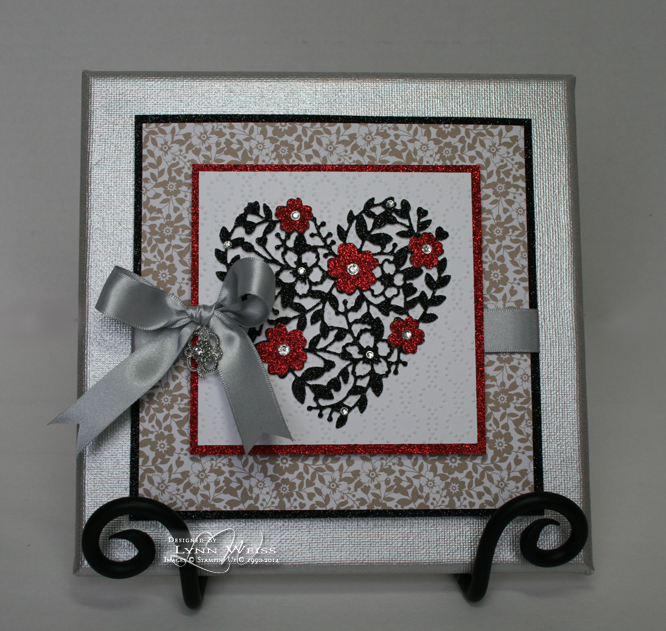
Bloomin' Heart Canvas

Happy Valentines Day! This beautiful canvas went together in no time thanks to the gorgeous Bloomin' Heart Thinlit Dies!


I had all my pieces ready, and had originally intended to use a heart cut from Red Glimmer Paper, until I saw this gorgeous card on Pinterest created by Karen Barber. I thought the heart looked so dramatic & elegant cut from Black Glimmer Paper, so thanks to Karen for the inspiration!

It's funny that I already had my embossed piece ready using the Elegant Dots Embossing Folder even before seeing her card. I think it layers nicely with the intricate heart. Here's a closer look...


Along with layers of Glimmer paper, I used a print from the Love Blossoms DSP Stack. A bow made from Silver Satin Ribbon and some Basic Rhinestones finish off my canvas.

Just a reminder...tomorrow is the last day to choose several items as your freebie during Sale-a-Bration. After February 15th, these items will no longer be available:

  • Sky is the Limit stamp set
  • Hello stamp set
  • Perfectly Artistic DSP
The good news is that three more great products will be taking their place!

Have a lovely day!

Friday, February 12, 2016

Flashback Friday: Bloomin' Love Banner

With Valentines approaching I knew I wanted to make a banner using the beautiful Love Blossoms Suite of products offered in the Occasions Catalog. While those products are new, I also used a few retired items as well, so I'm sharing as this weeks Flashback Friday post. Check it out...


The canvas banner pieces are part of the Build a Banner Simply Created Kit that was previously available in the  2014-15 catalog. I picked up some refill kits on the Clearance Rack a while back...there may still be some available there. If not, there is an updated version with different shaped canvas pieces and stencils on page 155 of the current catalog.

The die cut letters are cut from Blushing Bride Glimmer Paper using one of my favorite retired die sets - the Serif Essentials Bigz Dies which were last available in the 2011-12 Idea Book & Catalog. Each letter is layered onto a circle cut from Love Blossoms DSP...such super cute prints in that stack!


The stamped sentiments are included in the Bloomin' Love stamp set. As are the little flowers. The flowers also have coordinating dies to easily cut them out included in the Bloomin' Heart Thinlit Die set. However, the real showstopper in that set of dies has to be this gorgeous detailed heart...isn't it just beautiful cut from Blushing Bride Glimmer Paper?


Each canvas banner piece is stenciled using Sponge Daubers with Crumb Cake and Blushing Bride inks and Decorative Masks...it's really quite quick & easy!


On the jute twine between each canvas banner, I've attached a rose bud cut from Typeset Specialty Paper using the Spiral Flower Die. Before rolling the flower into shape I sponged with Crumb Cake and Blushing Bride inks and added some sparkle using the Wink of Stella Glitter Brush. Lots of Basic Rhinestones and Blushing Bride Sequin Trim add the finishing touches to this Valentine's Day banner. Here's a look at it hanging over my fireplace.


Have a lovely Valentine's weekend!

Monday, December 21, 2015

Have Yourself a MERRY Little Christmas

What a busy time of year! I figured today I would take a break from my baking and share the Christmas cards I sent this year. I didn't make nearly as many as I normally do because we had all new windows installed in our house and that all happened the first week of December...kind of bad timing! At least it was fairly warm, so that could have made things much worse. Getting everything back in order and painting all the new woodwork around each window (3 coats each!) was a much bigger job than I thought it would be. I've decided painting trim ranks right up there with painting ceilings...not much fun! I would rather have been stamping for sure!

I made a variety of cards using the Delicate Ornament Framelits. These are Blackberry Bliss and Silver. It was such a gloomy day I couldn't capture the true color, they looked so much more elegant in person.


These cards were inspired by a card I previously share here.


The ornaments look so pretty cut from Foil Paper and layered on Shimmer Paper. I didn't have a lot of the Mossy Meadow pattern of DSP left from the Home For Christmas pack, so I went though my huge stack of patterned paper to find an alternate print that would work, and made several that look like this card...


I sure wish I had the new Die Brush Tool that will be available in the upcoming Occasions Catalog when I cut all these ornaments out! I received my pre-order a few days ago and tested out this tool and it works fantastic! It helps remove all the little unwanted bits from intricate die cuts.

Last but not least, I made a half dozen of these little cuties...
I absolutely LOVE that little Bambi look alike! After fussy cutting each one I covered with a layer of Crystal Effects. This one was a little time consuming, so I mainly sent out variations of the Delicate Ornament cards showed above.

This will probably be my last posting until after Christmas, so I want to wish you all a very MERRY Christmas filled with LOVE, family, laughter, wonderful food & PEACE. To those that will be traveling...be safe!

Wednesday, November 25, 2015

Thanks to You Pillow Box

Love the size of the boxes created with the Square Pillow Box Thinlits Die!


Perfect for an autumn gift or favor...this one is filled with chocolate. I just stamped some Vintage Leaves randomly over the Cajun Craze die cuts. Embossed the beautiful oak leaves in gold and cut using the Leaflets Framelits and the thank you sentiment is from the Happy Notes set...this is available as a bundle with the Lots of Labels Dies.

This bundle along with the Vintage Leaves Bundle were on my very first new catalog order this year. I highly recommend both of these die sets...I have gotten a LOT of use out of both.

If you have been contemplating getting the Square Pillow Box Framelits...they are on the Holiday Retiring List, which are now available while supply lasts.

Have a wonderful Thanksgiving tomorrow!


Friday, October 30, 2015

Trick or Treat!

It's almost time to have your treats ready to pass out to the little ghosts and goblins! We live out in the country with houses quite far apart, so we don't get any trick or treaters at our house. But, that doesn't stop me from making up some cute little treats...

I used the Square Pillow Box Die and the Witches' Night stamp set to create this Halloween treat box. Happy Haunting Washi Tape is adhered all around the box as well...love the cute little bat print! This box is actually quite a good size, check out how much candy it holds...

We had our annual Halloween party this past weekend...it was our 25th! We had a really good turnout...over 70 people, so during the month of October getting ready for our party has been taking up all my spare time. We go crazy decorating our barn & yard for the event. Here's a pic of hubby & I in our costumes.
I bought black clothing from the thrift store and cut and painted it for my costume. I even had matching shoes...but unfortunately no photos to show my entire costume. My entire costume cost me about $20. The most expensive part was the $8 spiderweb stockings.

I put together some prize baskets to award those with the best costumes. Here's one of them...


The cups were decorated with vinyl that I designed and then cut using my Silhouette machine.


I also made a sign to hang over our bar where we serve up my witches' brew during the party...


I didn't get a photo of it at the party...it looked much cooler in it's "natural habitat" over the cauldron and among all the potion bottles, etc...I have displayed in my witches' kitchen area of our haunted barn. I bought the string of lights inside at the Dollar Tree..on the box it said 5 feet...well that five feet included over 2 foot of cord :-( so it didn't go around the entire frame. Since I bought it last minute didn't have time to go out looking for longer strand of lights...next year!

Here's a few more photos of our decorations...


The entryway to our graveyard...

 and a closer look at our pumpkins...


If you are like me and love to carve unique looking pumpkins, the past few years I've been downloading some faboolous designs from Zombie Pumpkins. Check him out...he's got so many great designs it will be hard to choose!

Hope you have a SPOOKTACULAR Halloween!