Creations by Lynn Weiss ~ Independent Stampin' Up! Demonstrator

ENJOY ~ INSPIRE ~ CREATE ~ SHARE


Showing posts with label Stamp Set - Jar of Love. Show all posts

Monday, January 21, 2019

Nine Lives

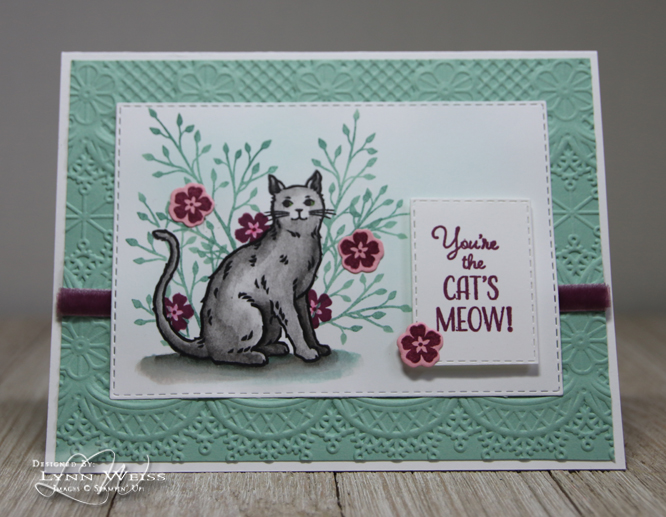
If you are a cat lover like I am, then you will love the new Nine Lives stamp set!


Here I have stamped one of the cat images and watercolored it using my Aqua Painter. I then masked the kitty and stamped some foliage and flowers using images from the Jar of Love set to create a little scene.

The cool thing about this set is that it coordinates with the Cat Punch! Even though I didn't use it here, it will be nice to have a set to go with the punch.

I also used a couple other products from the new Occasions Catalog...the Stitched Rectangle Framelits and the Lace Embossing Folder.

Thanks for visiting today!

Wednesday, October 18, 2017

Jar of Love Thank You Card

Here's a favorite stamp set that I haven't used in a little while...Jar Of Love. A couple of  this years In Colors were used for a fresh look.


Colors used: Berry Burst, Lemon Lime Twist, Peekaboo Peach & Pool Party.

The jar of flowers was arranged on a Whisper White background that was embossed using the Pinewood Planks Embossing Folder. A pretty bow using Berry Burst Crinkled Seam Binding Ribbon finishes off the card.

Have a beautiful day!

Friday, September 08, 2017

Dragonfly Dreams & Butterfly Basics

Here's a card that looks detailed and time consuming but it was actually fairly quick and easy to make.


The ferns from Butterfly Basics were stamped onto Whisper White cardstock and then ran through the Big Shot using the Pinewood Planks Embossing Folder. The dragonfly, from the Dragonfly Dreams stamp set, is a 2 step image so the hand colored look is easily achieved by using the second solid layer over the detailed image. I like to use a sponge dauber to apply a second, darker color to the solid image before stamping.

The "thanks" sentiment is from the Jar of Love stamp set and was die cut using the Stitched Shape Framelits. To finish off the card I ran a piece of 1/4" Copper Trim across bottom and attached the die cut sentiment piece and dragonfly with Stampin' Dimensionals.

I used only two ink pads...Lemon Lime Twist & Tranquil Tide.

Have a great weekend!

Wednesday, July 05, 2017

Colorful Seasons Double Z Fold

Here's a fun Double Z Fold Card using some of my new favorite stamp sets and dies.


Those adorable birds in the Feathery Friends host stamp set make me smile...they are so darn cute! I knew when I first saw them that I wanted to use them with the branch in the Colorful Seasons stamp set. I watercolored the birds using my Aqua Painter and cut them out. The wings are cut out and popped up as well for extra dimension. The new Mini Stampin' Dimensionals are perfect for adhering tiny die cuts such as the wings.


I used several of the new In Colors for this creation...Lemon Lime Twist, Berry Burst & Fresh Fig along with Peekaboo Peach, Pool Party & Old Olive. The flowers on the tree branches are from the Colorful Seasons stamp set. They are stamped using the Rock n Roll Technique along with a sponge dauber to soften/blend the edges where the two colors meet. The branches are die cut using the coordinating Seasonal Layers Thinlits. This bundle really is a must have in my opinion!


The picket fence was created by stamping the Hardwood stamp inked in White Craft Ink onto Crumb Cake cardstock and then cutting apart along the planks. I trimmed the top of each picket and then sponged the edges. The flowers and stems were stamped using the Jar of Love stamp set and die cut with the Everyday Jars Framelits.


I started with a base of Pool Party cardstock measuring 4- 1/4 x 11" scored at 2- 3/4" and again at 5- 1/2" The Whisper White background layer was cut at 10- 3/4 x 4 and sponged with Pool Party ink and masks cut from post-it notes using the cloud dies included in the Up & Away Thinlets.  After sponging my cloudy background I cut 3 panels to fit just inside the scored folds of my card. The photo above shows the card opened flat.


The card folds up, as shown above to fit inside a standard envelope. This card was time consuming, but fun to make. It went to my dear Aunt on her birthday today. She is also a stamper, so I know she will love this card...otherwise I doubt I could part with it! LOL

Hope your day is a happy one!

Wednesday, April 12, 2017

Special Reason Thank You

Have you seen Stampin' Up!s Retiring List yet?  There are so many awesome things leaving *sniff, sniff* to make room for awesome new things. Sadly, one of my newest favorites is retiring...the Special Reason stamp set along with the Stylish Stems Framelits. If you don't already have these items, they are just a couple of the many products that are not only retiring, but retiring with a deep discount. I'd really recommend this set along with the coordinating framelits...especially if you are a scrapbooker.


This card also features DSP and ribbon in my favorite retiring In Color...Mint Macaron. Love, love LOVE the Blooms and Bliss DSP, wish is also retiring along with all the current DSP. So if you have a favorite pack of Designers Series Paper, better scoop it up now while its still available!


Shop Now before they are gone!

Monday, April 10, 2017

Special Reason Sweet Baby Girl Page

I've been busy doing a little scrapbooking this past week. Why is it that every time I get busy with a project (especially scrapbooking!) it looks like a tornado went through my studio!?


I swear....every flat surface is covered with a pile of supplies. Because I just have to pull out everything that could possibly work on my pages, and then decide nope, don't need that! I even had to drag in an extra table for my DSP!


Look at my messy desk...I end up with just enough space to barely work. Then I spend way too much of my precious stampin' time searching for things that I misplaced. It drives me nuts!  Please tell me I'm not the only one who does this! OK...rant over, and my space has been cleaned, so time to share my page.


I had a  "special reason" in mind when I purchased the Special Reason Bundle...creating some pages featuring our new grand daughter. I decided to use one of my favorite photos I took of her during our first official photo shoot for my first page. She was wearing a little purple headband...so I wanted to use purple on my layout...off to a good start!

I thought so...until I searched through stacks and stacks of beautiful paper (part of the reason for mess!) looking for the perfect print to use with the photo...only to realize I'm seriously lacking in DSP featuring a shade of purple anywhere near close to the headband! How could that be? Purple is one of my favorite colors, and I have enough pretty patterned paper to open a scrapbook store! (Don't tell my husband!) So I decided I needed to make my own Designer Series Paper.


Right now the closest shade that Stampin' Up! carries to the headband is Wisteria Wonder. I like the way it looks with Sahara Sand...which is featured in the lace printed paper from the Falling In Love pack, so I went with those two colors for this page.


In addition to the Special Reason stamp set I used Timeless Textures, Gorgous Grunge and Jar of Love (tiny flower and leaves) to create my own patterned paper. The tiny flower from Jar of Love is a smooth, solid image so I used the kissing technique with the burlap image in Timeless Textures to add some texture so they better coordinated with the flowers in the Special Reason stamp set. I die cut some of the leaves from the Mint Macaron Glimmer Paper that was available during SAB to add a little sparkle. I love that this set has a stamp and framelits to create layered labels, used here to record her name & age.


I used the retired Pennent Punch to create part of the title. I stamped the word "sweet" using the retired Occasions Alphabet set and punched them out with 1/2" Circle Punch. I made the bow using Wisteria Wonder Seam Binding Ribbon. I miss having the seam binding ribbon in the catalog...sure glad I stocked up on that before it retired.

Speaking of retiring...today is the day we find out which items in the current catalog will be retiring. Even after so many years as a SU! demo, I still have a hard time saying goodbye to my favorites. That's why I end up keeping most of my old sets!

Wednesday, March 22, 2017

Special Reason Spring Flowers

Hello there! I've been away on vacation and now that I'm back home and back in the swing of things I finally had some time to stamp. Since the calendar says it's Spring (I wish Mother Nature got that memo!) I thought some Spring flowers were in order!


Since it had been a while since I had stamped, I needed a little inspiration. Before I started stamping I looked on Pinterest for a fun card using the Special Reason stamp set and the coordinating Stylish Stems Framelits. I came across this beautiful card created by Kris and loved the layout she used. I chose my colors...and got rolling...


Rock'n Rolling! I inked each image in the lightest color and rocked & rolled the edges in a darker color to give a shaded look. To blend the colors even more, I used a Sponge Dauber. The center of each flower was colored using the darker color. The colors I used are: 

  • Peekaboo Peach & Calypso Coral
  • Melon Mambo & Rich Razzleberry
  • Bermuda Bay & Island Indigo
  • Wild Wasabi & Cucumber Crisp

I love that the Stylish Stems Framelits have both intricate and sold shapes to mix and match. I placed a piece if Cupcakes & Carousels DSP behind the intricate cut flower.


Here's a look at this pair of cheery cards...


Thanks to Kris for the inspiration for these cards! With Pinterest and so many talented stampers out there who take the time to share on their blogs, it's easy to find inspiring ideas for any stamp set. You know what is also easy? Taking a minute to credit your source of inspiration. ;-) So if you find a project online that inspires you enough to re-create it and then share it on your own website, please take a minute to acknowlege the person who inspired you. Leaving them a nice message or linking back to their original creation (or both) is always a nice courtesy which can totally make someones day.

Wednesday, November 02, 2016

Baby Bear Shower

Have you heard about Stampin' Up!'s Stitched From the Heart sale for November? They've release a set of Stitched Shape Dies! Even more great news...Stampin' Up! is also offering some great stamp sets that coordinate well with these dies on sale all this month at 25% off! See them here.

One of the great sets offereed at 25% off is the Baby Bear stamp set. Recently I helped with a baby shower to welcome my soon to be first grandbaby. Here's the card I made to decorate one of her gifts.


Baby Bear is super cute with a flower from the Jar of Love stamp set on here head. But Baby Bear isn't just for baby items...it would also make adorable Christmas cards as well! Here's how the card looked attached to the gift..


I also made some table decorations using Stampin' Up! products. The jars are painted with home made chalk paint and then distressed. (I have instructions for this in a past tutorial) I used 5/8" Burlap Ribbon and Gold Sequin Trim to decorate the jars. They looked really pretty..each one sitting on a doily on the pink tablecloths. Did I tell you it's a GIRL!? ;-)


Some goodies for guests to take home had hand stamped thank you tags.


Here's a closer look at the tags using the retired set called Riveting.


Monday, October 17, 2016

Autumn Jar of Love

YES! I think I am FINALLY back on track after my computer crash! I had an issue re-loading my old Photoshop program on my new computer, and that was how I edited all my photos before uploading them here. After creating a card and photographing it, it needed to be re-sized and my watermark added, so I had to spend some time learning how to do that with my new photo editing software. Now that I have figured it out, it's actually much simpler than before! Go figure! Anyways...hopefully I'm back to posting more regurlarly again.

This card using Jar of Love will brighten someones day for sure. With the Pumpkin Pie flowers and the rustic wood and knitted textures from the Serene Scenery DSP Stack it is perfect for this time of year. The background behind the jar also has some subtle texture from the Ghoulish Grunge stamp set. If you love textures, then you need to add this set to your collection! As you can see, its not just for Halloween.


Thanks for visiting...have a beautiful day!

Wednesday, August 17, 2016

Serene Starfish

I just received the Serene Scenery 6x6 stack of papers in my last order and these are all just so beautiful! By simply stamping this starfish from Picture Perfect and adding some Burlap Ribbon you can create a card in a snap!


If you don't already have the Serene Scenes DSP I highly recommend getting this paper! I also stamped the word "love" from the Jar of Love stamp set in the sand along the bottom. I think this is perfect for this masculine anniversary card.

For the inside of the card I used a couple sentiments from Flourishing Phrases. The sandy sea shell border is from a retired set called Beautiful Beach.

Thanks for visiting today!

Tuesday, June 28, 2016

Peachy Jar of Love

Flowers, not peaches, fill this little jar...but I did use Peekaboo Peach along with Flirty Flamingo for this cheery color combo.

The new Jar of Love stamp set is so much fun! It has so many little pieces that you can stamp and then easily die cut using the coordinating Everyday Jar Framelits. I love that these two items are available in a bundle at a 10% savings. Trust me...you will want them both!

In addition to the two new In Colors, Peekaboo Peach & Flirty Flamingo, mentioned above, I have also used Pool Party and Pear Pizzazz to round out my color combo. Pool Party is the perfect color if you want to create the look of a vintage Mason jar.

The cute Delicate White Doilies add another vintage touch to this card. They are a little bit smaller, with a little different pattern than the previous Tea Lace Paper Doilies SU! carried. I think they work well with the Lovely Lace Embossing Folder used on the Flirty Flamingo layer.

Peekaboo Peach Ruched Ribbon and a few Basic Pearls adhered to the center of each flower add the finishing touches to the card.

When working with many die cut pieces like on this card, sometimes it is difficult to re-create the original arrangement when you go to adhere each individual piece into place on your card front. I know I've ran into this problem on numerous occasions. Many times, I would take a quick photo to help me re-create the arrangement I had fiddled around with until I was happy, but that didn't always guarantee it would turn out as I had hoped. Recently, I saw a fantastic trick using Glad Press'n Seal Wrap that will change your life! Well, maybe I'm being a bit dramatic, but this is seriously a GREAT tip!

When you are at the point in your project where you love the arrangement you have created and are ready to adhere it into place, tear off enough Press'n Seal Wrap to cover your project. Place the sticky side down on top of your arrangement and lightly rub over the top of it, as shown below. (don't mind my messy work surface!)
After you have applied light pressure to the die cuts you want to adhere (I was only concerned with the jar and the flower/leaf pieces not the background), you can lift up the wrap and all of the pieces should be stuck in place. Flip over the wrap and now you can easily apply your adhesive of choice to the backside of your die cut pieces all at once instead of each individual piece.
Ooops...as you can see, I made use of the other side of my cardstock to re-stamp the jar because I wasn't happy how I lined up the water image the first time! So just pretend that the backside is just plain Pool Party card stock, OK? ;-)

After I applied Tombo Multipurpose Glue to the back, I flipped the wrap over and carefully hovered over my background piece I had ready, lining up from top to bottom and side to side. The wrap makes this so easy! Once you have your arrangement centered, carefully lower onto background and then press die cuts into place. Allow to let set for a moment for the glue to adhere to your background. Then simply lift up gently on the wrap to remove.

One piece of wrap can be used multiple times, I just stick it inside the front of one of my drawers so it's handy until I need it again. Here is the link to the video where I first saw this tip.

Tuesday, June 14, 2016

Merry Jar of Love

Yesterday I shared a card using the new Peace This Christmas stamp set. When writing my blog post I thought maybe I'd tag it using the phrase "Merry Monday" and then try and share a new Christmas card here each Monday. Good idea right!? Then I thought, I betcha I'm not the first one who had that idea...and sure enough! after googling the phrase I came upon the Merry Monday Challenge Blog. This week they have a super cute inspiration photo, shown below.


I don't have any tea cup images, but I immediately thought of creating a festive floral arrangement using my brand new Jar of Love & Peace This Christmas stamp sets. So of course I had to play along and this is what I came up with.

I used This Christmas DSP and the new Labeler Alphabet for the word MERRY. I think it turned out pretty cute. Speaking of cute...look what I saw while walking out back this morning. 
Isn't he sweet!? He was all curled up hiding near a pile of brush. I managed to get this photo before he bounded off into the woods.