Creations by Lynn Weiss ~ Independent Stampin' Up! Demonstrator

ENJOY ~ INSPIRE ~ CREATE ~ SHARE


Showing posts with label Blendabilities. Show all posts

Friday, January 09, 2015

Happy Birthday From the Herd

Here's a fun birthday card using many new items from both the occasions and Sale-a-Bration Catalogs.


As you can see this card is much larger to incorporate all the elements I wanted to use. (It's one sheet of Coastal Cabana folded in half for the base.) I used die cut balloons from the Celebrate Today set (the cute little pennant and tassel are from that set as well) The coordinating Balloon Framelits make cutting all those elements super quick and easy!

The strips of DSP on the middle are from the Best Year Ever pack...which is FREE during SAB! I chose my color combo of Coastal Cabana & Crushed Curry from the DSP and threw in Real Red to make it more festive.

Another great FREE selection during SAB is the Big Day stamp set...which is where the "Happy Birthday" sentiment came from. Lots of fun new stuff, right!? Here's a closer look...

These adorable barnyard characters are in the new set From the Herd. They were fun to color using the Blendabilities.

Have a great weekend...I "herd" it is going to remain very cold with more snow on the way! Keep warm!

Monday, December 22, 2014

Wisteria Bloom

I took a welcome break from Christmas cookie baking to stamp a birthday card. Recently it seems everything I have been stamping has been for Christmas as well, so I chose a pretty flower from the Bloom With Hope hostess set to color with my Wisteria Wonder set of Blendies...(with a touch of Rich Razzleberry)

The background was stamped in Crumb Cake using the leafy branch image. I also used the rough line image from Gorgeous Grunge to add a little texture to the "happy birthday" strip. The chevron design is from Work of Art and is stamped in Blackberry Bliss.

Thanks for visiting!

Monday, September 08, 2014

Bearing Gifts

At the end of last week it was my UPS man who was bearing gifts when he delivered my Holiday Catalog order! I always love unpacking a box of Stampin' Up! goodies...it feels just like Christmas! I had a busy weekend, but managed to get in a little play time using some new stuff. Of course I had to try out my absolute  favorites first!

Hands down, my most favorite image in the Holiday catalog is this adorable polar bear with the cute kiddos riding on his back called Bearing Gifts. It's a single stamp with the greeting below the image. For greater flexibility when using this stamp, I cut the sentiment off the bottom and mounted it on the side...so mine is now essentially a two stamp set.

My other new favorites used on this card is my favorite DSP from the Holiday catalog...the beautiful All Is Calm Specialty paper. I couldn't decide on a favorite as far as accessories go, so I used all my favorites!

  • All Is Calm Washi Tape - there are 5 different patterns in this set!
  • All Is Calm Snowflake Embellishments - metal charms to tie onto your projects with a pretty silver finish
  • Lost Lagoon Silky Taffeta Ribbon - just like it's name...very silky and easy to work with.
I had fun using my Blendabilities Markers to color this...but...when I was almost finished, and just about to add just a little more shading with the darkest Coastal Cabana marker, I didn't remember to open my marker away from my artwork. In not doing so, you run the risk of getting splatters of unwanted color on your work if the brush tip hits the side of the cap as you pull it off. Which is what happened to me. Other times when this has happened, I've been lucky and able to use the Color Lifter to remove most of the color to make it virtually unnoticeable, but this time I wasn't so lucky. Can you see where the unwanted Coastal Cabana splatters are?


Hopefully not...because to camouflage them I used dots of Dazzling Details for a sparkly snowfall background. So my mistake turned out to be a good thing.


Check out the new Holiday Catalog...what are your favorites?

Wednesday, August 13, 2014

Pleasant Poppy Easel Card

I colored this beautiful Pleasant Poppy image with my Blendabilities markers.

For the flowers I used both the Pumpkin Pie set and the lightest shade of Cherry Cobbler. The background was done with the lightest of the Coastal Cabana set and then I used the Color Lifter over the top of it. When it dries it leaves a cloudy looking, mottled color which is perfect for a sky. I then added some splatters with the Gorgeous Grunge set and the retired En Francais over the top. Here's a closer look...
When I was already half way through coloring I realized I had made a boo boo...the poppy buds should have been colored green...ooops! I should have remembered that since I have these in my garden. Oh well...I still love the way it turned out.

Thanks for stopping by today.

Friday, July 25, 2014

Flower Shop Blendie Pair

Here are a couple cards I created using the Flower Shop stamp set along with the Blendabilities Markers. This first card is fairly quick & easy to make.

I love being able to color the Basic Pearls with my Blendie pens to match my project! The next card I created used basically the same layout and supplies, but I stepped it up a bit by adding more detail...
For this one I inked up my Honeycomb Embossing Folder with Early Espresso ink before running it through the Big Shot. I also used some Typeset DSP cut into a hexagon shape. To finish the card I used some of the new Early Espresso Seam Binding Ribbon...love having so many new colors of my favorite ribbon!

Have a great weekend!

Wednesday, July 16, 2014

Swallowtail in the Spotlight

Today I have a couple cards to share using basically the same supplies & the same technique, but the second one is has a little more detail. I used the Swallowtail stamp and the spotlighting technique.

I stamped both the white panel and the background at the same time using Memento Tuxedo Black Ink. Then I colored the focal image using my Blendabilities. For my second card I followed the same steps as above, but changed up the color and added a few more details for a stepped up version, see...
I used Gorgeous Grunge for the background and also added some sparkle with a layer of Silver Glimmer Paper. I didn't add a sentiment to this one...but can do that when I'm needing a card. 

Have a beautiful day!
 

Monday, July 14, 2014

Multi-Color Embossed Mixed Bunch

Have you ever wished you could emboss a detailed design using multi colors of embossing powders and be able to designate where each color would go on the design? Check out this multi-color embossed flower using the Mixed Bunch set to see what I mean...


It is super easy to get this embossed multi-color look using White Embossing Powder and your new Blendabilities Markers! All you need to do is emboss your line art design on dark card stock with White Embossing Powder...then just color away using the brush tip of your Blendabilities! How easy is that?!

Using dark card stock, such as Basic Black shown on my sample, hides any accidental "out of the lines" occurrences...so no worries about being super precise. Using line art verses solid images works better because using bolder images may show your brush strokes. Here's my finished card...
To color my flower, I used the medium shade from each color set...Old Olive, Rich Razzleberry, Coastal Cabana & Pumpkin Pie. Because I was coloring over the white gloss of the embossing powder, the colors appear more pastel in tone. I even colored my Basic Rhinestone center using my Pumpkin Pie Blendability...I love being able to add jewels and pearls to match my projects. I first saw this technique shared on Mary Fish's Blog, and was super excited to try it. Hope you like this technique as well!

You are now able to order each of the color sets used on this card, plus Cherry Cobbler, Daffodil Delight & the six color Skin Tone Assortment! If you haven't order these yet...you are missing out on a lot of coloring fun! Check out my Online Store to learn more.

Wednesday, July 09, 2014

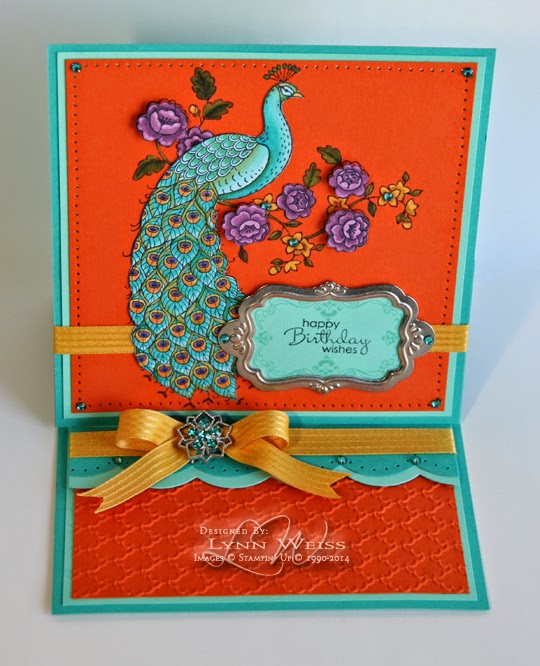
Perfect Peacock Easel Card

Here's an extra special card that I made for my dear Aunt's birthday.


I know she just loves the new Perfect Peacock image, so I decided to give him the extra special treatment. I colored him with my Blendabilities and then fussy cut him out. I stamped him again onto Tangelo Twist card stock so that all the little curls of his feathers would be there without having to cut those. (I don't mind a little fussy cutting but I'm not crazy! )

Then I set to work bleaching the card stock area inside the flowers, leaves and plumage on top of his head so that I could color those as well.
After painting on numerous coats of bleach using my Aqua Painter, I managed to get the color down to a shade of yellow, which would be fine for coloring the Old Olive and Daffodil Delight areas, but not for the Rich Razzleberry flowers. Those I colored on Whisper White and cut out.
I attached the Razzleberry flowers using Stampin' Dimensionals. I colored some Basic Rhinestones using my Coastal Cabana Blendabilities for some bling on the flower centers, and in each corner, etc... I even colored in the rhinestones on one of those gorgeous Frosted Finishes Embellishments I had left from last years Holiday Catalog...just love those! It made a beautiful center to the Hello Honey satin bow.
The silver frame that fits the Decorative Label punch is something else I had in my stash. To complete the base I embossed the Tangelo layer using the Fancy Fan EF...it's design compliments the feathers well. A strip of Coastal Cabana card stock and one in Bermuda Bay were scalloped using the Scallop Edgelit. 
Thanks for visiting today!

Friday, June 13, 2014

Colorful Corner Garden

I'm back today to share another card created with a brand new stamp set from the new catalog! This is a beautiful, background sized stamp called Corner Garden.

Aren't these flowers pretty? It's a lot of fun coloring them with the Blendabilities! After coloring all I did was add a little detail with some score lines created along the opposite corner of the floral design using my Simply Scored Scoring Tool and a butterfly punched out using the Papillion Potpourri set.

Have a great weekend!

Wednesday, June 11, 2014

Perfect Peacock

When I returned from vacation there was a nice surprise waiting for me...my first order from the new catalog! YIPPEE! It wasn't until yesterday that I had enough time to sit and play...and the first stamp I grabbed was this gorgeous, detailed peacock image.

He is so much fun to color using the new Blendabilities! Right now these markers are only available to demonstrators, but the last update from SU! said they should be available sooner than they had originally thought...which at first was in August. I'll be sure to let you know as soon as they are available. Here's a closer look...


I really love the new Satin Stitched Ribbon in the new In Colors...here I used Hello Honey. Other colors used are Coastal Cabana and Bermuda Bay.

Thanks for visiting...have a perfect day!

Friday, May 16, 2014

Rainbow Swallowtail

When I was waiting for my Blendabilities to arrive, I kept thinking how fun it would be to color the large Swallowtail butterfly stamp with them...and it was!


I couldn't decide which color to use...so I ended up using them all and made a rainbow butterfly! I blended the Rich Razzleberry into the Cherry Cobbler and the Cherry into the Pumpkin Pie and the Pumpkin into the Daffodil Delight...I'm sure I'll never see a butterfly like this in nature, but it sure was fun to color!

I had originally planned to make a standard sized card, but I couldn't bring myself to cut any of this beauties wings off...that would have just been cruel, so I went with a 5 1/5" square base using the new Lost Lagoon. I'll just need to create a special envelope...but that will be easy using the Punch Board.

The word "Imagine" is from the Loving Thoughts set...it is on the retiring list and still available in wood mount. (clear mount has already sold out)

Have a great weekend!

Monday, May 12, 2014

Vibrant Peaceful Petals for Mom

I hope you had a wonderful Mothers Day! The weather here was absolutely beautiful and I was happy to spend it with my Mom & my sons...perfect day!

Have you seen the NEW batch of In Colors for 2014-16 yet? I think they are just gorgeous, rich & vibrant colors! Here is my first creation using them...along with the Blendabilities.


I stamped the flowers from the Peaceful Petals set in Tuxedo Black Memento Ink while masking the largest flower with an image cut from a post it note. Then I had lots of fun coloring in the flowers with my new Blendies! I really like working with them! It's nice to even be able to color pearls & rhinestones to match! As you can see here, I've colored Basic Pearl Jewels in Razzleberry & Daffodil. Here's a closer look...
The rich colors achieved using the Blendies work really well with the new In Color card stock...I used Blackberry Bliss, Hello Honey and Tangelo Twist and threw in some Cherry Cobbler for good measure. So, basically fruit with a bit of honey...and who doesn't like that!?

Isn't the new 3/8" Stitched Satin Ribbon luscious? It will be available in the five new In Colors...I used Blackberry Bliss.
I used each of the Blendability Color Sets shown above:

  • Rich Razzleberry
  • Pumpkin Pie
  • Cherry Cobbler
  • Daffodil Delight
  • Old Olive
The label was created using the Creative Elements set along with the Apothecary Accents Framelits. I cut just the edge off...I shared how to do this on this post. 

Enjoy your day! We have a thunderstorm going on here right now...it's pouring down rain. Guess I'll be "forced" to stay indoors and stamp instead of working outside cleaning up the flower bed today. 

Saturday, May 10, 2014

Recycled Blendability Caddy

Whenever we add new supplies to our crafting space we are faced with finding a good storage solution to help keep things organized. I not only  want to be organized, but it is also important for me to have my supplies easily accessible. If the storage solution is attractive that's a bonus...if it is also low cost even a bigger bonus! This caddy I created for my new Blendabilities meets all the above criteria.


It's cute AND functional, and the best part it was basically FREE! A few years ago my Aunt had given me a few Crystal Lite containers that I had stashed away thinking I could alter them somehow. When I was searching for a way to store my new markers I found that these containers were a perfect fit. Since they are flat on the sides they are easily stacked. Lucky for me she had several more of these stashed away (thanks Aunt Roberta!) so I decided 6 was a good number to start with. Each cubby can comfortably hold 10 Blendies...so I should be good for a while!

All I did was adhere some washi tape around each edge...I used a pattern from Epic Day and one from Season of Style (this is actually on the Clearance Rack right now). Then I adhered them together using Wafer Thin Velcro Fasteners. This way if I decide to change the configuration later or swap out the washi tape design it will be easy to do so. Here's how my new caddy looks sitting on my desk.


I keep my other markers in these acrylic containers* along with my ink pads, and I like that the recycled Crystal Lite containers are clear so they all kind of match. I work so much better when my work space is uncluttered and I know where things are. Hopefully this idea will inspire you to reuse/recycle something you have laying around and turn it into something functional.

 Check out my other Stampin' Space posts if you would like to see other low cost organizing ideas.

HAPPY Mother's Day to all you Moms! Have a wonderful weekend!!!


*Every time I post photos of my work space I get a LOT of questions regarding my ink storage containers. I purchased these on line quite a while back from a company called Dzyntec. Unfortunately, they have since gone out of business.

Friday, May 09, 2014

Peaceful Blendabilities

Guess what showed up at my house on Wednesday??? Here's a hint...


I cannot even begin to tell you how excited I've been to try the new Blendabilities!!! and to see the NEW IN COLORS and the NEW CATALOG in real life!!! I can happily say I sure wasn't disappointed in any of the above! Actually...they all exceeded my expectations! The new catalog is one of the best since I've become a demo (has it really been over 9 years now!?) and the new In Colors are just luscious...but the new Blendies were the first thing I had to try!

Let me start by saying that I have never used Copic markers, but I love to watercolor.  So that being said, I cannot compare one to the other.

When coloring, I usually use the aqua painter and our inks and had nice results. However, if I wanted a deep, vibrant look to my watercoloring, this method would sometimes take a while to build up the color to be as deep as I wanted. With the Blendabilities it was so much quicker & easier to get beautiful, vibrant color. Here is a look at my first attempt at trying out these markers...

They are laid out in the order of how I tried them...I think, with each flower I colored, I improved a little bit on the blending. I could still go back and blend a little more if I wanted to.  I stamped each image on Whisper White card stock using the Black Memento Ink pad. On the top right you can see a color swatch of each of the 3 markers. Here's a closer look at each one...


Now I need to get busy and make some cards using these colored images...but I just couldn't wait to share my first experience using the new Blendies with you.