Creations by Lynn Weiss ~ Independent Stampin' Up! Demonstrator

ENJOY ~ INSPIRE ~ CREATE ~ SHARE


Showing posts with label Home Decor. Show all posts

Monday, April 11, 2016

Picture Perfect Botanical Canvas

On Friday I posted a little peek at an upcoming project I was working on that uses many of the same products used to create the Picture Perfect Card Set. Instead of a card this is a home decor item perfect for Spring & Summer decorating. I just love the way it turned out! You can mount the finished piece to a canvas as shown here or frame it using a shadowbox frame.


For everyone who has already purchased the Picture Perfect Card Set Tutorial, check your inbox because I'm sending you the Picture Perfect Botanical Tutorial for FREE! You can easily create the above project to coordinate with your decor by following the steps outlined in my 7 page tutorial which includes lots of clear photos.

Note: the opportunity to receive this latest tutorial for FREE ended last night at midnight. I am however offering the PDF available for purchase in two ways...

The Picture Perfect Botanical Tutorial 7 Page PDF can be purchased on it's own for only $3.99 by simply clicking on the Paypal button below.


Purchase both tutorials together and receive a discount :
The Picture Perfect Card Set & Picture Perfect Botanical Tutorials can be purchased together for only $8.99 by simply clicking on the Paypal button below.


The original 20 page PDF tutorial includes detailed step by step instructions along with more than 40 clear photos, lots of tips and color charts to take the guess work out of which colors to use with this multi layered two-step stamp set. All the details can be found in this post.


The Picture Perfect Card Set Tutorial can be purchased on it's own for only $6.99 by simply clicking on the Paypal button below.


If you have any questions regarding supplies needed to complete these projects please contact me. Thanks again for the great response! I hope you enjoy this companion project.

Friday, April 08, 2016

Picture Perfect Textured Botanicals

Response to my Picture Perfect Card Set has been fantastic! I'm so glad to hear that you are really enjoying my tutorial. As a thank you to those who have already purchased my newest tutorial, and to all those who purchase it over the weekend, I'm offering a FREE Bonus Project!

What do you get when you combine a soft water-colored background stamped with elements from the Timeless Textures stamp set and layer it with the beautiful hummingbird from the Picture Perfect stamp set and gorgeous die-cut flowers and foliage using the Botanical Builder Framelits? Toss in a little shimmer & shine and it looks something like this...


I don't want to give away the entire finished project just yet, but I'm sure you will love it! The finished piece can be mounted on a canvas or put into a shadowbox frame. I used my favorite shades of purple for my flowers to work best with my decor, but you could easily substitute your favorite colors for a totally different look.

So, if you have already purchased my Picture Perfect Card Set Tutorial  be on the lookout for this FREE PDF tutorial delivered to your inbox on Monday. To all those who purchase it through this weekend, by midnight on Sunday, April 10th...you will receive it as well!


The Picture Perfect Card Set Tutorial can be purchased for only $6.99 by simply clicking on the Paypal button below. Details for this tutorial can be found in my original post.

After receiving payment, I will send the Picture Perfect Card Set PDF file to the email provided with your PayPal payment. I usually check my email a few times daily, but please allow up to 24 hours for delivery to your inbox. On Monday I will send the Bonus PDF file as my extra thank you.

Have a wonderful weekend!

Sunday, February 14, 2016

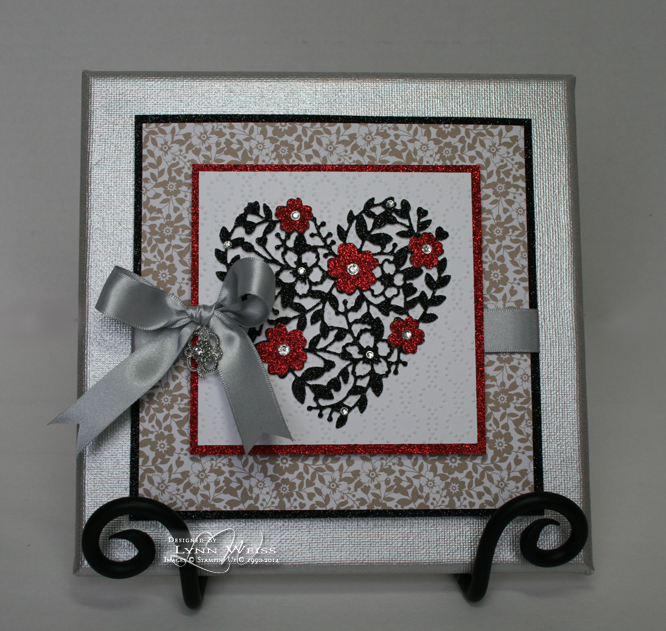
Bloomin' Heart Canvas

Happy Valentines Day! This beautiful canvas went together in no time thanks to the gorgeous Bloomin' Heart Thinlit Dies!


I had all my pieces ready, and had originally intended to use a heart cut from Red Glimmer Paper, until I saw this gorgeous card on Pinterest created by Karen Barber. I thought the heart looked so dramatic & elegant cut from Black Glimmer Paper, so thanks to Karen for the inspiration!

It's funny that I already had my embossed piece ready using the Elegant Dots Embossing Folder even before seeing her card. I think it layers nicely with the intricate heart. Here's a closer look...


Along with layers of Glimmer paper, I used a print from the Love Blossoms DSP Stack. A bow made from Silver Satin Ribbon and some Basic Rhinestones finish off my canvas.

Just a reminder...tomorrow is the last day to choose several items as your freebie during Sale-a-Bration. After February 15th, these items will no longer be available:

  • Sky is the Limit stamp set
  • Hello stamp set
  • Perfectly Artistic DSP
The good news is that three more great products will be taking their place!

Have a lovely day!

Friday, February 12, 2016

Flashback Friday: Bloomin' Love Banner

With Valentines approaching I knew I wanted to make a banner using the beautiful Love Blossoms Suite of products offered in the Occasions Catalog. While those products are new, I also used a few retired items as well, so I'm sharing as this weeks Flashback Friday post. Check it out...


The canvas banner pieces are part of the Build a Banner Simply Created Kit that was previously available in the  2014-15 catalog. I picked up some refill kits on the Clearance Rack a while back...there may still be some available there. If not, there is an updated version with different shaped canvas pieces and stencils on page 155 of the current catalog.

The die cut letters are cut from Blushing Bride Glimmer Paper using one of my favorite retired die sets - the Serif Essentials Bigz Dies which were last available in the 2011-12 Idea Book & Catalog. Each letter is layered onto a circle cut from Love Blossoms DSP...such super cute prints in that stack!


The stamped sentiments are included in the Bloomin' Love stamp set. As are the little flowers. The flowers also have coordinating dies to easily cut them out included in the Bloomin' Heart Thinlit Die set. However, the real showstopper in that set of dies has to be this gorgeous detailed heart...isn't it just beautiful cut from Blushing Bride Glimmer Paper?


Each canvas banner piece is stenciled using Sponge Daubers with Crumb Cake and Blushing Bride inks and Decorative Masks...it's really quite quick & easy!


On the jute twine between each canvas banner, I've attached a rose bud cut from Typeset Specialty Paper using the Spiral Flower Die. Before rolling the flower into shape I sponged with Crumb Cake and Blushing Bride inks and added some sparkle using the Wink of Stella Glitter Brush. Lots of Basic Rhinestones and Blushing Bride Sequin Trim add the finishing touches to this Valentine's Day banner. Here's a look at it hanging over my fireplace.


Have a lovely Valentine's weekend!

Friday, February 05, 2016

Flashback Friday - Medallion to the Rescue

Sorry that I've been MIA all week. :-( I wish I could tell you that I was up to something fun, but truth is I had a migraine that lasted a few days, so no fun for sure! Today's share is something kind of different, but shows you how you can incorporate stamping into your decor.

Before the migraine took over, I had been giving my home office a little makeover. My Mom came over to help me hang some scarf valances on the window. I used two different colored scarves and it was kind of a pain to get it to look just right. When we finally got it looking pretty good, it still needed something at the center. My Mom said, "why couldn't you just use one of your stamps and card stock to make something to match?" I have to admit, at first I didn't like the idea, but then, I remembered my old favorite background stamp...Medallion. At that point I thought..."hmmm...she might actually be on to something!"


The window wall in the room is painted a shade similar to Stampin' Up!'s retired color Not Quite Navy. So I embossed the Medallion image in Silver on the Not Quite Navy cardstock. I did this twice and cut out with two different sized circle framelits. I also cut some chipboard the same size. I adhered the embossed circles onto the chipboard to give it more stability.


This is the best close-up photo I could get...it really isn't so shiny looking in real life, and actually matches the rod pretty well. The Antique Brad in the center and some Stampin' Dimensionals help give it some depth. I just attached it to the center of the scarf with a clip on the back.

Here's another view...


It looks like my furry friend Stevie, approves!  Have you used your stamps for any unusual projects? I'd love to hear...just leave me a comment. ENJOY your weekend!

Friday, October 30, 2015

Trick or Treat!

It's almost time to have your treats ready to pass out to the little ghosts and goblins! We live out in the country with houses quite far apart, so we don't get any trick or treaters at our house. But, that doesn't stop me from making up some cute little treats...

I used the Square Pillow Box Die and the Witches' Night stamp set to create this Halloween treat box. Happy Haunting Washi Tape is adhered all around the box as well...love the cute little bat print! This box is actually quite a good size, check out how much candy it holds...

We had our annual Halloween party this past weekend...it was our 25th! We had a really good turnout...over 70 people, so during the month of October getting ready for our party has been taking up all my spare time. We go crazy decorating our barn & yard for the event. Here's a pic of hubby & I in our costumes.
I bought black clothing from the thrift store and cut and painted it for my costume. I even had matching shoes...but unfortunately no photos to show my entire costume. My entire costume cost me about $20. The most expensive part was the $8 spiderweb stockings.

I put together some prize baskets to award those with the best costumes. Here's one of them...


The cups were decorated with vinyl that I designed and then cut using my Silhouette machine.


I also made a sign to hang over our bar where we serve up my witches' brew during the party...


I didn't get a photo of it at the party...it looked much cooler in it's "natural habitat" over the cauldron and among all the potion bottles, etc...I have displayed in my witches' kitchen area of our haunted barn. I bought the string of lights inside at the Dollar Tree..on the box it said 5 feet...well that five feet included over 2 foot of cord :-( so it didn't go around the entire frame. Since I bought it last minute didn't have time to go out looking for longer strand of lights...next year!

Here's a few more photos of our decorations...


The entryway to our graveyard...

 and a closer look at our pumpkins...


If you are like me and love to carve unique looking pumpkins, the past few years I've been downloading some faboolous designs from Zombie Pumpkins. Check him out...he's got so many great designs it will be hard to choose!

Hope you have a SPOOKTACULAR Halloween!

Wednesday, September 09, 2015

Golden Vintage Leaves Set

I really cannot believe that we are already more than a week into September! School is back in session and soon fall will be here. During this past month, even though the weather has been warm, it has already seemed like fall in my studio. That's because I've been busy creating a home decor set which is just perfect for the upcoming season. I'm so excited to finally be able to share it with you!


My autumn themed coordinating set combines elegant metallic gold with the rustic textures of wood and burlap. Add in a mixture of lifelike autumn leaves created using the Vintage Leaves stamp set and Leaflets Framelits and you have a stunning set perfect for fall decorating.

Thanksgiving is coming up and these pieces work well together or can be used as individual gifts…especially the wine bottle tag. The other pieces in this set include a decorated mason jar painted with chalk paint; perfect to hold the realistic looking oak branch. An 8 x 8 canvas ready to display your favorite autumn photo and a candle wrap with coordinating mat to dress up your battery operated candle.

Golden Vintage Leaves PDF Tutorial
This includes the full 16 page, step by step tutorial. Emailed to you for $6.99. After receiving payment, I will send the PDF file to the email provided with your PayPal payment. I usually check my email a few times daily, but please allow up to 24 hours for delivery to your inbox.
Please note: To complete the set as shown above, you will need the Vintage Leaves Bundle (Vintage Leaves stamp set and Leaflets Framelits), the Hardwood background stamp, ink pads, heat tool, pint sized Mason jar, battery operated candle along with adhesive (a glue gun is helpful, but not necessary.) and other basic stamping tools. Sorry... but wine also not included. ;-)

Friday, May 08, 2015

No Bow? No Problem!

Have you ever been in a time crunch...got your gift wrapped, only to find that you have no bow to finish it off? I have a whole big box filled with gift wrapping supplies, but this seems always seems to happen to me. That's when my Big Shot comes to the rescue!


It only took me a few minutes to die cut two butterflies in colors to match my gift wrap using the Butterfly Thinlits Die and add some Basic Rhinestone Jewels. Then the butterflies were layered over some embossed Wild Wasabi card stock with some Black Chevron Ribbon. It looks better than using a regular old bow and I didn't have to run back out to the store! Win/win!


Here is what is all wrapped up inside...

My Mom is a quilter so when I saw this graphic offered in the Silhouette Store I knew I had to get it so I could make her something with it. I cut out some blackboard vinyl I had back from when SU! used to sell the Decor Elements. After cutting the design with my Silhouette I applied it to a piece of Basic Grey paper from the Stella Ruby pack. I has a distressed sewing pattern in the background. These colors match my Mom's sewing room, so I know she will love it! But you know what the best part of this shadow box is?
The vintage sewing notions I used are from my Grandmother's sewing basket. A few of them still have the price tags from the dime store she purchased them from, probably when my Mom was just a little girl. How cool is that!? I don't sew...except for an occasion button, so I'm glad I was finally able to put these notions to good use! I'm sure my Grandma would be tickled to know how these items she purchased so long ago are going to be displayed and my Mom is going to LOVE it!

Have a GREAT weekend and a WONDERFUL Mother's Day!

Wednesday, October 22, 2014

Wicked Wednesday: Toil & Trouble Potion Bottles

Eye of newt. Toe of frog. Wool of bat...

Do you have a hard time keeping all your essential witches brew ingredients neat & organized? Now that I have created these stylish, yet functional potion bottles I can keep all my ingredients fresh and at my warty fingertips! ***insert witches cackle here***


I picked up these bottles at a yard sale a while back (only .75 cents for all three...what a deal!) with the intention of making them into potion bottles for Halloween and I finally got around to doing it.  I was pleased to find that this Shakespeare quote stamp from the Toil & Trouble set fit almost perfectly on the bottles. I used some retired DSP scraps from three different packs... Cast-a-spell,  Pick Your Poison & Witches Brew. The Witches Brew paper is still available right now on the Clearance Rack...so snatch yourself up a pack! I also used some Witches Brew Washi Tape and some Raven Black Lace Trim around the neck of each bottle. The Raven Trim is still available on the Clearance Rack as well.

We're getting ready for our annual party so I've been busy making all sorts of spooky projects. Take a look at these melting black candles I made. I'll have these set out on our food table and not have to worry about anyone setting their costume or wigs on fire.


Can you guess what they are made from? The cardboard rolls from plastic wrap & foil packaging, a glue gun & hot glue sticks, black spray paint and those battery operated votive candles. Pretty awesome way to recycle and a super cool, yet inexpensive prop for our party. I cannot take credit for thinking this up though...I saw it on a Halloween site a few years ago and thought it was a great idea.

Thanks for stopping by...have a wicked good day!

Wednesday, April 02, 2014

Purple Rose Candle Wraps

I love the way my Think Spring Rose Candle Wrap turned out so much that I had to make a couple more. This time I used some pretty purple roses...all created with the Spiral Flower Bigz Die. Many of you who visit my blog regularly may have guessed that purple is among my favorite colors...and you would be correct! I have a shade of deep plum color as an accent in my living room, so I made these to go in there.

These roses were created using Wisteria Wonder card stock for the small roses and a combination of Elegant Eggplant and Perfect Plum for the large roses. (layered Plum on top of Eggplant and rolled up together)
As you can see, I used the Hardwood Background stamp to stamp the band...which is a strip of Sahara Sand card stock with coordinating ink. I use small dots of extra thin velcro to attach them to the candle. This way I can easily change them out seasonally.

I'm really happy with the way these came together...the combination of feminine & masculine accents were just what I had in mind. The rustic wood mixed with the bold pattern and texture of the Natural Chevron Ribbon combined with the dainty Tea Lace Paper Doily and the Crochet Ribbon...all come together to make the perfect backdrop to showcase these pretty roses. Here's a closer look...

Here is how they look in their "natural habitat" sitting happily on candle stands in my living room.
I'm looking forward to seeing what the new batch of In Colors are this year...I'm really hoping that there is a nice shade of purple in the group! 

Thanks for visiting today.


Product List
Stamp
Ink
Card Stock
Punch
Ribbon & Trim
Accessory
Big Shot

Friday, March 21, 2014

Think Spring: Sweet Sorbet Banner

Are you ready for Spring yet? This Think Spring banner will certainly make you think of Spring!


The colors of Pool Party, Crisp Cantaloupe & Pistachio Pudding were chosen from the Sweet Sorbet DSP. Don't tell me you haven't got a pack of this beautiful paper yet?! It's FREE during Sale-a-Bration!

I cut each letter out of chipboard using the Typeset Bigz Dies. Each pennant has lots of little details...like the adorable stamped & punched flowers using the Banner Blast set & Itty Bitty Punches. Here's a closer look...

With just a little inspiration from the beautiful colors in the Sweet Sorbet DSP and my new Spiral Flower Die I created this entire Spring-themed set to decorate my antique side board just in time for Spring. If you don't have this great new Spiral Flower Die yet...I highly recommend it!

Here's a little closer look...
Pssst...Mother Nature, I'm all ready for Spring!

Have a GREAT weekend!
Product List