Creations by Lynn Weiss ~ Independent Stampin' Up! Demonstrator

ENJOY ~ INSPIRE ~ CREATE ~ SHARE


Showing posts with label 2016 Occasions Catalog. Show all posts

Monday, May 09, 2016

Picture Perfect Mother's Day Easel Card

I hope you had a wonderful Mother's Day yesterday! It was a picture perfect Spring day here in Michigan! I was blessed to have both my boys here along with my beautiful Mom. My wonderful husband made us dinner and and the boys cleaned up...couldn't ask for a more memorable day! Here's the card I made for my Mom...


I used the color combo of Mint Macaron, Perfect Plum, Rich Razzleberry & Blackberry Bliss. I just love the way Picture Perfect and the Timeless Textures stamp sets work together. I put out a couple tutorials recently featuring projects using both of these sets. You can see them here.

I used a retired set, Blessed Mother for the sentiment and the Botanical Blooms stamps and framelits to create the flowers on the base of the card. Here's a closer look...
Clear Wink of Stella was used on the flowers and the hummingbird for some shimmer. I also made an alternate, easy to pop in the mail, version of this card.
Thank you for visiting.

Monday, April 25, 2016

So Long Little Letters & Numbers

So many awesome dies and punches are retiring this time around! Today I have a birthday card to share that uses the Little Letters & Numbers Framelits. These little dies are the perfect size to use on both cards and scrapbook pages.

I used papers from the It's My Party Stack and some from the Cherry On Top 6x6 Stack to pull in the more "manly" colors of Cucumber Crush and Bermuda Bay. I created a fun balloon bouquet using what else...the Balloon Bouquet Punch!

For embellishments I used Bakers Twine Combo PackBermuda Bay 1/8" Stitched Ribbon and some assorted sequins scattered among the confetti background. Yes, a lot going on here...but a fun card I think.

Check back again soon for more projects featuring my favorite retiring products. If you would like to add them to your collection...better do so before they are gone!

Thursday, April 21, 2016

So Long World of Dreams

Over the next couple of weeks I will be highlighting some of my favorite products that will soon be retiring. (I actually thought this card posted the other day...guess I forgot to hit "publish"? DOH!) Anyways...this springlike card features the beautiful set World of Dreams. I remember getting this set on my first new catalog order when it was first available. I fell in love with the images...especially this bird nest one. It's a great set for techniques.


I used the leafy image stamped randomly all over the Mint Macaron background then I stamped the Hardwood background stamp (I'm glad that one is sticking around!) inked in White Craft ink over the top of it. Wink of Stella Glitter Pen added some sparkle to the bird nest image and the die cut flower. Here's a closer look...

Don't you LOVE the gorgeous papers in the Birthday Bouquet pack of DSP? I used one of my favorite prints here for a slightly different version. I used the Bird Builder Punch to create the leaves...that's one of the many punches that is retiring.


What are you sad to see on the retiring list?

Monday, April 11, 2016

Picture Perfect Botanical Canvas

On Friday I posted a little peek at an upcoming project I was working on that uses many of the same products used to create the Picture Perfect Card Set. Instead of a card this is a home decor item perfect for Spring & Summer decorating. I just love the way it turned out! You can mount the finished piece to a canvas as shown here or frame it using a shadowbox frame.


For everyone who has already purchased the Picture Perfect Card Set Tutorial, check your inbox because I'm sending you the Picture Perfect Botanical Tutorial for FREE! You can easily create the above project to coordinate with your decor by following the steps outlined in my 7 page tutorial which includes lots of clear photos.

Note: the opportunity to receive this latest tutorial for FREE ended last night at midnight. I am however offering the PDF available for purchase in two ways...

The Picture Perfect Botanical Tutorial 7 Page PDF can be purchased on it's own for only $3.99 by simply clicking on the Paypal button below.


Purchase both tutorials together and receive a discount :
The Picture Perfect Card Set & Picture Perfect Botanical Tutorials can be purchased together for only $8.99 by simply clicking on the Paypal button below.


The original 20 page PDF tutorial includes detailed step by step instructions along with more than 40 clear photos, lots of tips and color charts to take the guess work out of which colors to use with this multi layered two-step stamp set. All the details can be found in this post.


The Picture Perfect Card Set Tutorial can be purchased on it's own for only $6.99 by simply clicking on the Paypal button below.


If you have any questions regarding supplies needed to complete these projects please contact me. Thanks again for the great response! I hope you enjoy this companion project.

Monday, April 04, 2016

Picture Perfect Card Set Tutorial

Two of my very favorite stamp sets from the Occasions Catalog are Picture Perfect and Timeless Textures. I've been having so much fun stamping the realistic looking hummingbirds and roses! If you love these sets as well, then you are going to love my newest tutorial which combines these two great stamp sets to create a beautiful set of eleven cards!


In the beginning, the thought of layering four separate stamped images to create the hummingbird felt a little intimidating. What colors would I use? Would I be able to line up up each image nicely to create a great looking final image? Since the set is photopolymer, with a little practice, lining up each layer is actually easier than you would think. I admit to being a perfectionist, and I didn't even need my stamp-a-ma-jig! With the aid of my color charts and tips that are included in this tutorial, I will help to take the guess work out of it for you.

These cards are designed using the same measurements and similar layouts for ease of completing the set. Yet you will see how by simply changing the colors and the embellishments, each card looks quite different. A few of the cards are really stepped up to make the finished card even more special. The final card is a fancy fold card that I am calling the Double Gate Flip Up Card...it is a real WOW card.

My 20 page PDF tutorial includes detailed step by step instructions along with more than 40 clear photos, lots of tips and color charts to take the guess work out of which colors to use with this multi layered two-step stamp set.

The Picture Perfect Card Set Tutorial can be purchased for only $6.99 by simply clicking on the Paypal button below.


After receiving payment, I will send the PDF file to the email provided with your PayPal payment. I usually check my email a few times daily, but please allow up to 24 hours for delivery to your inbox.

Friday, March 25, 2016

Honeycomb Happiness Easter Chick

I've been super busy the past couple weeks with home improvement projects...mainly painting the baseboard trim & door frames throughout our house. Wish I could say I was finished...sadly maybe about 2/3 of the way done. I did finish painting all the window trim though! It does look really good, but it is a killer on the knees & back! In the evening, by the time I finished cleaning up after dinner, I've been too tired to get busy in my studio...so that's why I haven't posted in a while.

However...I did take most of this week off of painting. Woo Hoo!  I had a class here on Wednesday, and some spare time yesterday, so I have some new creations to share with you! Today, I have a card using the adorable little chick from the Honeycomb Happiness stamp set.


I just love this little guy...or gal? When first seeing him, I envisioned him popping out of an egg for a cute Easter card. I figured I would use one of my oval framelits to die cut an egg shape. Then, I would have to freehand draw a jagged edge and cut off the top. Then I spotted this super cute card on Pinterest using the chevron border from the Work of Art stamp set, and it made my plan so much easier! Thanks for the inspiration Lisa!

I stamped the chevron 3 times...in Mint Macaron, Watermelon Wonder and Bermuda Bay onto scrap of Whisper White. Then I diecut using an oval framelit, and easily cut off top followed the line created by the cheveron edge. To complete the egg I used a black Project Life Journaling Pen to outline along the outer edge, so that it better matched the line art of the chick.


He was stamped in Black Stazon and watercolored using an Aquapainter. The little flower is from the Bloomin' Love stamp set. You cannot tell from the photo, but I used the Clear Wink of Stella Brush over the flower for a littler glimmer. The Basic Pearls are on sale this week as part of the weekly deals...for only $3.75.

If you don't already have the Honeycomb Happiness stamp set...time is running out! Less than one week left to pick out a FREE Sale-A-Bration item with every $50 ordered! Visit my online store to order yours today! Sale-A-Bration ends on March 31st.

Have a wonderful Easter weekend!

Friday, February 26, 2016

Hawaiian Botanical Blooms

This has been a busy week with not much spare time to stamp or post. I did however work a little here and there to complete a two page layout using all the awesome products included in my favorite bundle from the Occasions Catalog. Here's a look at the left page...


I was so excited when I saw this bundle offered because I have a TON of vacation photos to scrap. I've been having lots of fun layering the different die cut pieces using the Botanical Builder Framelits to create a variety of different flowers. Don't you just love the look of the leaf edgelit included in the set of framelits? I used it to cut a border along the bottom of both my pages. Then I layered on my diecut flowers.The leaves were stamped first using the Botanical Blooms stamp set.


The Botanical Gardens DSP has a real tropical feel to it. I chose my color scheme from the colors used in the papers...Cajun Craze, Hello Honey, Mossy Meadow & Old Olive. I also used some Cherry Cobbler to pull in the red from my photos and substituted the Mint Macaron in favor of Pool Party because I thought Pool Party coordinated better with my photos.


Each Friday I've been sharing a flashback post featuring a retired product. This weeks Flashback Friday is kind of subtle. You probably did not pay much attention to the background pages of my layout, but I used an old favorite wheel to add a textured pattern to my otherwise solid 12x12 cardstock. I had several sheets of 12x12 So Saffron, but I didn't have any 12x12 in Hello Honey (which is what I really needed) so I just used Hello Honey Ink along with the Rough Around the Edges wheel to add texture and darken the lighter cardstock.


The strip of So Saffron card stock to the left of the wheel shows how it looked if I just wheeled over it once. However, for my background I went over it several times to get the look I wanted. Wheels with random, textured patterns are great for this technique, and it is super quick & easy...even without an ink cartridge! Here's a look at both pages of my layout...


I love the way the items in this bundle work together to easily get great results when creating a variety of different projects. This bundle includes the Botanical Blooms stamp set,  Botanical Builder Framelits and the coordinating Botanical Gardens DSP.  All of these products can be found in my Online Store.

The weather may be part of the reason I've been enjoying working on these tropical scrapbook pages so much. This is what it looks like outside my window here in Michigan today...


Here I am with Spring on my mind, and we just got blasted with around 10 inches of snow! Looking at a beautiful tropical sunset and flowers was a nice little escape!

Have a GREAT weekend!

Friday, February 19, 2016

Flashback Friday - Bloomin' Love & Laughter

It's Friday already!? This week flew by! A dear friend got engaged on Valentine's Day and this is the card I created for her and her husband to be.


I used the retired set Love & Laughter for the sentiment and one of my favorite wheels...Wedding Words to create the background. Does anyone else miss wheels? I especially love them for scrapbooking, and need to remember to use them more.


Of course, the beautiful heart was cut using the Bloomin' Heart Thinlit Die. Isn't it  simply gorgeous cut from the sparkling Black Glimmer Paper?  The little flowers, were first stamped in Crumb Cake using the Bloomin' Love stamp set and then die cut with the Bloomin' Heart Thinlit Dies as well. The larger flowers were cut from Red Glimmer Paper. The Bloomin' Heart Thinlits and the coordinating Bloomin' Love stamp set are still available in the current Occasions Catalog.

Have a bloomin' wonderful weekend!

Wednesday, February 17, 2016

Timeless Flower Shop Textures

I hadn't used the Flower Shop stamp set in a while. It's one of my favorite stamp sets with a coordinating punch. The flower I chose has a burlap type texture that works perfectly with the new Timeless Textures stamp set.


Isn't the Watermelon Wonder 1" Stitched Satin Ribbon luscious? It is so silky and pretty! The "Thank You Kindly" sentiment is from the Sale-A-Bration set Perfect Pairings. It's a great set which I highly recommend if you don't have it yet. I also made this card, and stepped it up a bit by adding a few more details.


As you can see, I used a different sentiment...the big "Hello" from the aptly named Hello stamp set. This set is a limited time stamp set available during Sale-a-Bration. I also added more ribbon by layering the thinner Bermuda Bay 1/8" Stitched Ribbon on top of the Watermelon Wonder Ribbon. I also did some piercing around the circle and along bottom edge. Here's a closer look...


I used the Botanical Builder Framelits to cut the center piece for the flowers on both cards.

Thanks for visiting...have a GREAT day!

Sunday, February 14, 2016

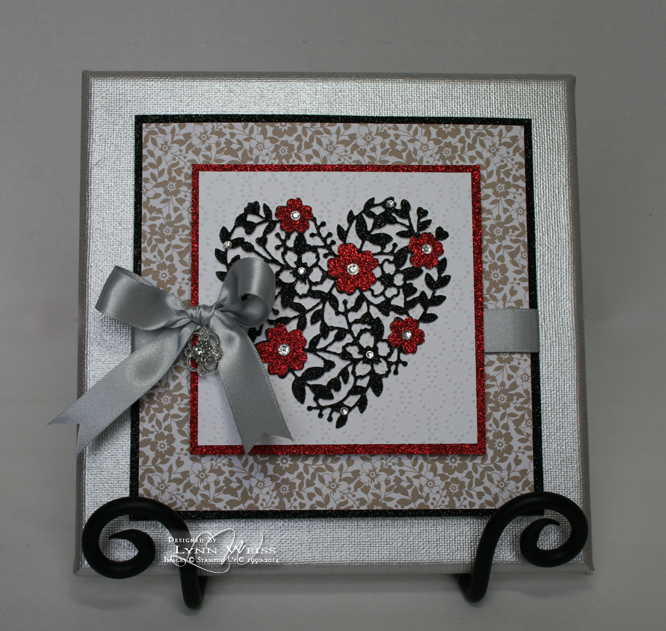
Bloomin' Heart Canvas

Happy Valentines Day! This beautiful canvas went together in no time thanks to the gorgeous Bloomin' Heart Thinlit Dies!


I had all my pieces ready, and had originally intended to use a heart cut from Red Glimmer Paper, until I saw this gorgeous card on Pinterest created by Karen Barber. I thought the heart looked so dramatic & elegant cut from Black Glimmer Paper, so thanks to Karen for the inspiration!

It's funny that I already had my embossed piece ready using the Elegant Dots Embossing Folder even before seeing her card. I think it layers nicely with the intricate heart. Here's a closer look...


Along with layers of Glimmer paper, I used a print from the Love Blossoms DSP Stack. A bow made from Silver Satin Ribbon and some Basic Rhinestones finish off my canvas.

Just a reminder...tomorrow is the last day to choose several items as your freebie during Sale-a-Bration. After February 15th, these items will no longer be available:

  • Sky is the Limit stamp set
  • Hello stamp set
  • Perfectly Artistic DSP
The good news is that three more great products will be taking their place!

Have a lovely day!

Friday, February 12, 2016

Flashback Friday: Bloomin' Love Banner

With Valentines approaching I knew I wanted to make a banner using the beautiful Love Blossoms Suite of products offered in the Occasions Catalog. While those products are new, I also used a few retired items as well, so I'm sharing as this weeks Flashback Friday post. Check it out...


The canvas banner pieces are part of the Build a Banner Simply Created Kit that was previously available in the  2014-15 catalog. I picked up some refill kits on the Clearance Rack a while back...there may still be some available there. If not, there is an updated version with different shaped canvas pieces and stencils on page 155 of the current catalog.

The die cut letters are cut from Blushing Bride Glimmer Paper using one of my favorite retired die sets - the Serif Essentials Bigz Dies which were last available in the 2011-12 Idea Book & Catalog. Each letter is layered onto a circle cut from Love Blossoms DSP...such super cute prints in that stack!


The stamped sentiments are included in the Bloomin' Love stamp set. As are the little flowers. The flowers also have coordinating dies to easily cut them out included in the Bloomin' Heart Thinlit Die set. However, the real showstopper in that set of dies has to be this gorgeous detailed heart...isn't it just beautiful cut from Blushing Bride Glimmer Paper?


Each canvas banner piece is stenciled using Sponge Daubers with Crumb Cake and Blushing Bride inks and Decorative Masks...it's really quite quick & easy!


On the jute twine between each canvas banner, I've attached a rose bud cut from Typeset Specialty Paper using the Spiral Flower Die. Before rolling the flower into shape I sponged with Crumb Cake and Blushing Bride inks and added some sparkle using the Wink of Stella Glitter Brush. Lots of Basic Rhinestones and Blushing Bride Sequin Trim add the finishing touches to this Valentine's Day banner. Here's a look at it hanging over my fireplace.


Have a lovely Valentine's weekend!

Thursday, February 11, 2016

Honeycomb Happiness Party Chick

Every now and then a "great" stamping idea pops into my head when I'm doing something totally unrelated to stamping. Many times I ether forget to try the idea or it ends up not working out as good as it did in my head. I hate that! LOL In this case, not only did I remember to try my idea, it actually worked out as I had envisioned! So, now you are probably wondering what my idea was??? I wondered if the ice cream cone in the Honeycomb Happiness set could also work as a party hat for the adorable little chick?


I think she looks so cute all decked out and ready to party! I don't know if I'm the first to come up with this idea...but I hadn't seen it done yet, so I was pretty happy my idea worked out as planned. Here's a closer look at the little chick ...


I used the Clear Wink of Stella glitter brush to add a little shimmer to the balloon, hat and sentiment piece. Isn't the Watermelon Striped Satin Ribbon gorgeous? I just love that stuff! I also really love the Birthday Bouquet DSP! I used the confetti piece along with a striped piece of It's My Party DSP. The little poof on the top of the hat was made using one of the framelits from the Botanical Builders Dies. (one of the little flower centers) I just smushed it up and glittered it with the Wink of Stella to match.


It's so cold here this morning! Keep warm and ENJOY your day!

Wednesday, February 10, 2016

Bloomin' Love Fancy Fold Valentine

Here is a special Valentine card that uses many items in the Love Blossoms Suite of products available from Stampin' Up!'s Occasions Catalog.


 The Love Blossoms DSP stack has so many darling prints...I used three different prints here. The Bloomin' Love stamp set is also used along with the coordinating Bloomin' Heart Thinlit Dies. I hand cut the two large stamped hearts and the mats....too bad there was not a framelit for those.


The mats for the hearts are cut from Blushing Bride Glimmer Paper...it is so pretty & sparkly! The Clear Wink of Stella Brush also added some beautiful shimmer to the die cut flowers popped up on the hearts.


The card folds up flat to fit inside a standard sized envelope.