Creations by Lynn Weiss ~ Independent Stampin' Up! Demonstrator

ENJOY ~ INSPIRE ~ CREATE ~ SHARE


Showing posts with label Step it Up. Show all posts

Monday, July 24, 2017

Stepped Up Masculine Colorful Seasons

Hope you had a great weekend! Today I have a couple cards to share using the Colorful Season Bundle.


The card on the left is a little more simple to create and the other has a few more details.


Both cards use Thick Very Vanilla cardstock for the base, Old Olive for the main panel and a die cut square using the Stitched Shapes Framelits. The intricate leaf cut from Copper Foil using the Seasonal Layers Thinlits shines beautifully. 


The stepped up version has added texture to the Old Olive background piece created using the Pinewood Planks Embossing Folder. The die cut sentiment piece also has a subtle texture created using one of the stamps from the Timeless Textures stamp set inked in Crumb Cake


1/4" Copper Trim layered over Burlap Ribbon along with a bow tied in Linen Thread finish off the card. Stepped up or clean and simple, both cards are sure to be well received by whoever you are to send them to. 

Wednesday, July 12, 2017

Stepped Up Feathery Friends

Today I have two versions of the same card to share with you. The first version, shown below is a card we made at my recent All Occasions Card Class. It is very cute, but more basic because the attendees were making 8 cards within a short time, so I kept the design more simple.


The background pieces were stamped with images in the Feathery Friends stamp set. The adorable little bird and fussy cut flower were watercolored using an Aqua Painter. A piece of Berry Burst Crinkled Seam Binding Ribbon separate the Tranquil Tide layer from the Lemon Lime Twist layer. The adorable little bird just looks like she's singing, "oh, happy day!" So I chose that sentiment from the Thoughtful Banners set.

It's a cute card, right? I know the ladies at my class love it, but I wanted to show you how adding a couple small touches can make a basic card even more special.


I added a couple embellishments die cut using the Flourish Thinlits to pull the Tranquil Tide color down onto the Lemon Lime Twist layer. The center of the fussy cut flower also received a little Glitter Enamel Dot.

I hope you liked seeing the comparison of these two cards. Have a happy day!

Wednesday, March 01, 2017

Stepped Up Lift Me Up

My last blog posting a shared a cute, fairly simple card using the Lift Me Up stamp set. Todays card is a stepped up version.


This time I used Rich Razzleberry for the main panel and embossed it using the Festive Embossing Folder. I matted my image and also added some popped up, die cut clouds as well as a couple more balloons. I finished off the card with some Bakers Twine and a die cut flower and Basic Rhinestone. Here's a look at the two cards together.


Everyone who places a Sale-A-Bration order of $50 with me during the month of March and uses the Hostess Code will recieve a card kit to make these two cards + one more...which will remain a surprise! It will contain complete instructions as well as envelopes. I will ship out all the kits at the end of the month. Visit my stampin' store to order the supplies today.

Monday, May 02, 2016

Sayonara Serene Silhouettes

Serene Silhouettes...another favorite that is soon to be retired. We used it at my Retiring Favorites Class last week to create this card along with the beautiful retiring In Colors.

Swipe each of the five In Color Markers across a clear block and mist with water to create the background. Then just stamp your image with Black Stazon after it's dried. I shared this free tutorial a while back if you want more info.

The sentiment is from Petite Pairs...I use that set a lot, but it is retiring as well. A pretty bow tied with White Seam Binding Ribbon finishes off the card. I'm sad to see all the Seam Binding Ribbon retiring...it is so soft and easy to work with. The stamped Whisper White layer is adhered to a Blackberry Bliss base...which is my absolute favorite retiring In Color.

For this next card, I swapped the Seam Binding Ribbon for Gold Sequin Trim and stepped up the card a bit with a few extra details...
Dazzling Details in Gold Glitz to be exact! I used it on the flowers and the added butterfly from Papillon Potpourri. 

The third card uses retired Blackberry Bliss Striped Satin Ribbon and some Basic Rhinestone Jewels.
The "HELLO" sentiment is from the Crazy About You stamp set...that one will be sticking around for a while longer. Here's a look at all three of the cards...
Which one do you like best?

Wednesday, February 17, 2016

Timeless Flower Shop Textures

I hadn't used the Flower Shop stamp set in a while. It's one of my favorite stamp sets with a coordinating punch. The flower I chose has a burlap type texture that works perfectly with the new Timeless Textures stamp set.


Isn't the Watermelon Wonder 1" Stitched Satin Ribbon luscious? It is so silky and pretty! The "Thank You Kindly" sentiment is from the Sale-A-Bration set Perfect Pairings. It's a great set which I highly recommend if you don't have it yet. I also made this card, and stepped it up a bit by adding a few more details.


As you can see, I used a different sentiment...the big "Hello" from the aptly named Hello stamp set. This set is a limited time stamp set available during Sale-a-Bration. I also added more ribbon by layering the thinner Bermuda Bay 1/8" Stitched Ribbon on top of the Watermelon Wonder Ribbon. I also did some piercing around the circle and along bottom edge. Here's a closer look...


I used the Botanical Builder Framelits to cut the center piece for the flowers on both cards.

Thanks for visiting...have a GREAT day!

Friday, July 25, 2014

Flower Shop Blendie Pair

Here are a couple cards I created using the Flower Shop stamp set along with the Blendabilities Markers. This first card is fairly quick & easy to make.

I love being able to color the Basic Pearls with my Blendie pens to match my project! The next card I created used basically the same layout and supplies, but I stepped it up a bit by adding more detail...
For this one I inked up my Honeycomb Embossing Folder with Early Espresso ink before running it through the Big Shot. I also used some Typeset DSP cut into a hexagon shape. To finish the card I used some of the new Early Espresso Seam Binding Ribbon...love having so many new colors of my favorite ribbon!

Have a great weekend!

Wednesday, July 16, 2014

Swallowtail in the Spotlight

Today I have a couple cards to share using basically the same supplies & the same technique, but the second one is has a little more detail. I used the Swallowtail stamp and the spotlighting technique.

I stamped both the white panel and the background at the same time using Memento Tuxedo Black Ink. Then I colored the focal image using my Blendabilities. For my second card I followed the same steps as above, but changed up the color and added a few more details for a stepped up version, see...
I used Gorgeous Grunge for the background and also added some sparkle with a layer of Silver Glimmer Paper. I didn't add a sentiment to this one...but can do that when I'm needing a card. 

Have a beautiful day!
 

Wednesday, July 02, 2014

Big News Birthday

Woo Hoo!...it's you birthday! Well, maybe not yours exactly, but I'm sure maybe someone, somewhere, reading this is having a birthday today. Anyways...here's a quick & easy card to make using the Big News set.

The little candle and woo hoo! banner stamps included in this set make this card a lot of fun! With a few extra minutes and a few more accessories, you can create a stepped up version like this one...
I used the same color combo of Coastal Cabana, Pear Pizzazz, Crisp Cantaloupe, Strawberry Slush with a pop of Basic Black on both cards, but changed up the background panel by swapping colors and embossing folders. I just love that new Zig Zag Embossing Folder! Since I added ribbon to this one I embossed the Crisp Cantaloupe layer instead of stamping it with the cute candle stamp.

Using the fine tipped Project Life Journaling Pen, I added a little doodle border around the main image to sorta match the hand drawn look of the banner, and finished it off with a Basic Rhinestone in each corner.

With the start of the new month, Stampin Up! has a great new special! When you buy three packs of Designer Series paper...you'll get the third one FREE! (Specialty paper & stacks are not included in this offer)

Also...don't forget to check out this weeks new Weekly Deals for more great discounted items! Thanks for visiting today!

Friday, June 06, 2014

Stippled Blackberry Birthday Blossoms

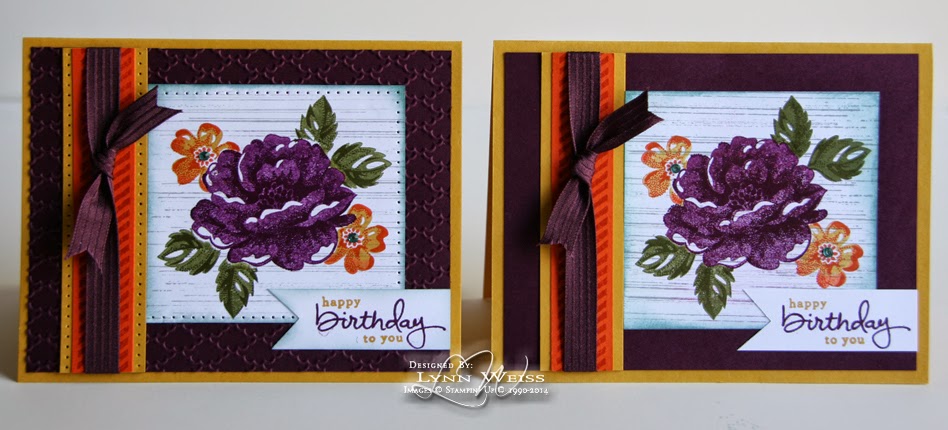
I cannot get enough of the gorgeous new In Colors! Here's a make & take card that my local customers got to create at my recent catalog pick up event. It uses each and every one of the five new colors.

The biggest blossom was stamped in Blackberry Bliss (stamped off the first time and full strength for the detailed image) the smaller flowers in Hello Honey and Tangelo Twist, the leaves in Mossy Meadow and then the edges were sponged with Lost Lagoon. The make & take card was pretty and detailed just as shown above, but if you want to make it even more special you could step it up with some added details like this...
Embossing the Blackberry Bliss layer with the Fancy Fan EF and adding some piercing along the edges adds more detail with not a whole lot more effort. I made this card for a dear "old" friend who turned the big 5-0 on Monday. So I used the Endless Birthday setto stamp a background of dots and words to describe the excitement of turning 50. ;-) Yes...I'm being a little sarcastic here...I can share my friends "enthusiasm" & "excitement" over turning 50...because today is my 50th. I still cannot believe we're 50...we are way too young too be that "old"!

Here's a look at both cards...
To celebrate my milestone birthday, my hubby and I took a road trip. We are with family in NC now, but on way down from Michigan we stopped at whatever caught our (my) ;-) interest. Here's a photo of us on top of Natural Bridge in Kentucky.

As you can see, the view was amazing! Here's to the next 50...

Wednesday, April 17, 2013

Step It Up Swallowtail

This first card is a quick & easy card that I featured at a workshop a while back.

The Swallowtail image is so pretty and detailed that even a quick card like this looks like it was more complicated than it is. While this first card is perfect just like it is, if you wanted to spend a little more time you can easily create something like this step it up version.
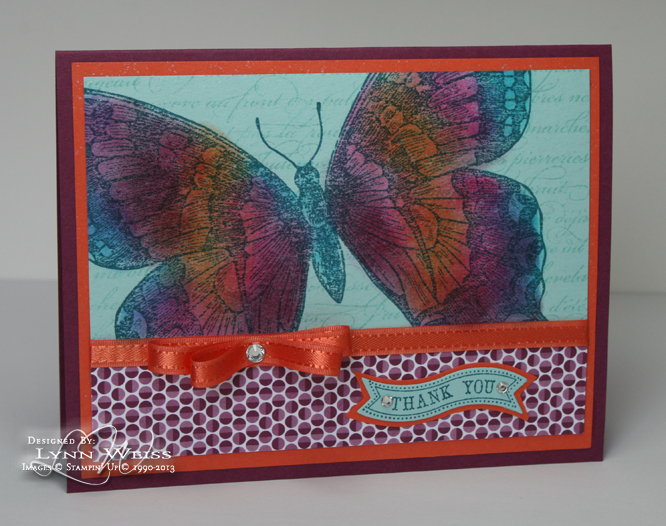
All I did here was mask the image and sponge on some color. I also changed the color of ribbon and added a bow. Now this butterfly really makes an impact, don't you think? You cannot really tell from the photo but both of the butterfly panels are spritzed with homemade shimmer spray. Here's a closer look.
Here's a side by side comparison.
Thanks for visiting today!

Sunday, June 20, 2010

Masculine Tree for Father

Here is the third card we did at my last card class. Since the group makes 3 of each card and there is only a short time to complete them, I try to keep the designs fairly simple. For this one we used one of my very favorite stamp sets...Lovely As A Tree to create a masculine card for Father's Day or any occasion.

See the Chocolate Chip "brads" at the bottom of the card? Those were created by punching out Chocolate Chip card stock with the 1/4" Circle Punch and then covering them with Crystal Effects. This is a great alternative if you don't have brads in the color you want.

If you have a little more time to be creative, you can take the same basic card shown above and step it up. Here is another version of the same card.

I used the same colors and stamps but added some detail and texture. The added strip of Artichoke card stock under the ribbon is lightly distressed and then paper pierced. The bottom of the card has a little texture from the wood grain Texturz Plate. This time I used Vintage Brads in place of the faux brads.


Stamps: Lovely As A Tree
Ink: Always Artichoke, Mellow Moss & Chocolate Chip
Card stock: Always Artichoke, Mellow Moss & Crumb Cake (AKA Kraft)
Accessories: Soft Suede Polka dot Grosgrain & Vintage Brads
Hope you have a wonderful day with Dad!

Photobucket