Creations by Lynn Weiss ~ Independent Stampin' Up! Demonstrator

ENJOY ~ INSPIRE ~ CREATE ~ SHARE


Monday, June 30, 2014

Work of Art Peacock

I was looking for a quick way to color the beautiful Perfect Peacock image for my All Occasion Card Class last week. Since we make 3 of each design, taking the time to color each one wouldn't work well for this class, so instead we used the Work of Art set to add color to this detailed image.


After adding swipes of color over the peacock image with the Work of Art set I also added some splotches using the Gorgeous Grunge set. The next step was to spritz the piece of card stock with some water to blend the color a bit. (so make sure you stamp your image using Black Stazon) Once the piece has dried, the color softens quite a bit.You can go back at this time and add more color to the peacock body and flowers using your Aqua Painter, if you wish. On this one, I did add a little more color to the main body and a bit on the leaves, otherwise I liked it so I left it as is. Each and every one you do using this technique will turn out unique. Here's another example...
As you can see, I stepped this card up a bit by adding some embossing at the side and some Basic Rhinestones to some of the flowers. I also spent a bit more time adding more color to the peacock with my Aqua Painter, as the color wasn't quite as bright as my first example.

Thanks for visiting today!

Friday, June 27, 2014

World of Dreams Trio

In my previous two postings this week I shared cards using the same set...World of Dreams and the same technique, but with different color combos. This is the third and final card to the set, and I think perhaps it's also my favorite.

This one uses the beautiful new in color Blackberry Bliss. Check out another version using Wisteria Wonder Seam Binding Ribbon...

For this one I also added some Basic Rhinestones colored with my Medium Rich Razzleberry Blendabilities Marker. Here's the entire set of three cards.
Earlier this week we made this set at my first All Occasions Card Class using new sets. If you live local be sure to check out my calendar of events so that next time you don't miss out!

Now that you've seen all three cards in the set, which one is your favorite?


Wednesday, June 25, 2014

Mossy World of Dreams

Today I would like to share the second card of a set using World of Dreams. This card would be perfect for any occasion.

I used the Offset Embossing Technique and then sponged over the top of it using Lost Lagoon, Mossy Meadow, Crumb Cake & Early Espresso inks. I describe this technique in a little more detail in my previous post...just scroll down to see the first card in this set of three.

I will share the final card on Friday...so don't forget to check back! Have a GREAT day!

Monday, June 23, 2014

World of Dreams

When first looking through the new catalog, one of the first stamp sets to catch my eye was the beautiful silhouette style set World of Dreams. It reminds me of a couple old favorites...Just Believe (retired) and Summer Silhouettes.  This is the first card I created using this pretty new set.

The sweet bird nest image was stamped twice onto the new Typeset Specialty Paper. The first time in Early Espresso and the second time it was stamped offset (using the Stamp-a-ma-jig) in VersaMark ink and then embossed in white. Offsetting the two images creates a shadow that really makes the image pop. Then I sponged Lost Lagoon, Crumb Cake & Early Espresso inks over the top of the image. The Typeset Specialty Paper is Very Vanilla with Basic Black print so you can color it any way you wish. (or leave as is).

I created my own DSP on the Crumb Cake layer by stamping the leafy image from the set all over using Crumb Cake ink. The thank you sentiment is from the Big News set. I finished off the card with a pretty bow using Lost Lagoon Stitched Satin Ribbon.

This is the first card in a set of three that I created using this set...check back to see the other two.

Thursday, June 19, 2014

Work of Art Thank You Cards

I think that the Work of Art stamp set is so versatile that I'm going to be using it a LOT for a variety of different cards. Here are the first few that I've created with this great new set.


Love that swoosh stamp! I inked it in Pool Party, Coastal Cabana & Wild Wasabi to create the background. Then I added some Bermuda Bay splatters with the Gorgeous Grunge set. The flower from the Flower Shop set was inked using the Rock 'n Roll Technique...inked first in Pool Party and then roll the edges in Bermuda Bay. Here's another version using a Calypso Coral flower.

My favorite ribbon of all time has got to be the Seam Binding Ribbon...I am so very happy to see it offered in a variety of new colors in this catalog! For these two cards I've used Calypso Coral & Wild Wasabi. I'm also loving the look of this new Zig Zag Embossing Folder. Here's a look at both cards...

I had fun playing with new stuff and making these fun & easy cards! Thanks for stopping by to see them. :-)

Monday, June 16, 2014

Big News Grad

My son graduated from college, with honors, over the weekend. So proud of him! This is the card I made for him...

I used the new set Big News along with Blue Ribbon and embossed with White Embossing Powder onto the Basic Black Card Stock. Then I sponged some White Craft Ink around the edges to look like chalk residue. The wood frame was easily created using the Hardwood stamp inked in Crumb Cake and stamped onto Crumb Cake Card Stock.

To add a little detail, I matted the grad circle onto a circle of Silver Glimmer Paper and made a stick of chalk by tightly rolling a piece of Whisper White Card Stock.

Friday, June 13, 2014

Colorful Corner Garden

I'm back today to share another card created with a brand new stamp set from the new catalog! This is a beautiful, background sized stamp called Corner Garden.

Aren't these flowers pretty? It's a lot of fun coloring them with the Blendabilities! After coloring all I did was add a little detail with some score lines created along the opposite corner of the floral design using my Simply Scored Scoring Tool and a butterfly punched out using the Papillion Potpourri set.

Have a great weekend!

Wednesday, June 11, 2014

Perfect Peacock

When I returned from vacation there was a nice surprise waiting for me...my first order from the new catalog! YIPPEE! It wasn't until yesterday that I had enough time to sit and play...and the first stamp I grabbed was this gorgeous, detailed peacock image.

He is so much fun to color using the new Blendabilities! Right now these markers are only available to demonstrators, but the last update from SU! said they should be available sooner than they had originally thought...which at first was in August. I'll be sure to let you know as soon as they are available. Here's a closer look...


I really love the new Satin Stitched Ribbon in the new In Colors...here I used Hello Honey. Other colors used are Coastal Cabana and Bermuda Bay.

Thanks for visiting...have a perfect day!

Friday, June 06, 2014

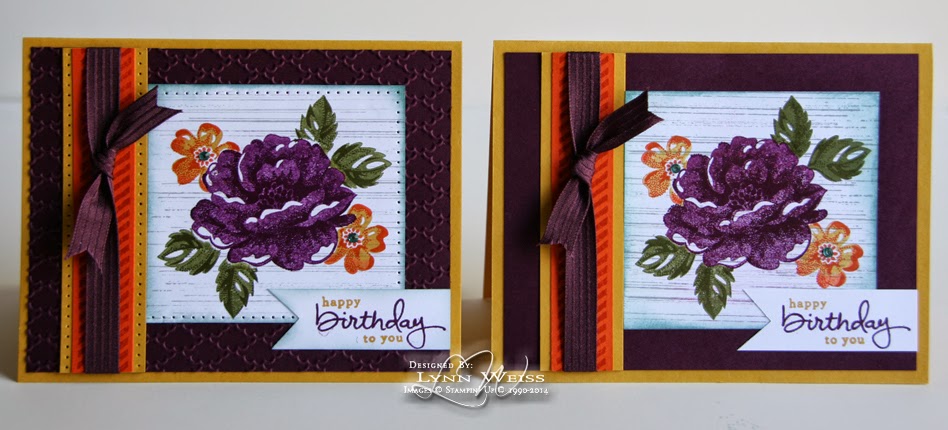
Stippled Blackberry Birthday Blossoms

I cannot get enough of the gorgeous new In Colors! Here's a make & take card that my local customers got to create at my recent catalog pick up event. It uses each and every one of the five new colors.

The biggest blossom was stamped in Blackberry Bliss (stamped off the first time and full strength for the detailed image) the smaller flowers in Hello Honey and Tangelo Twist, the leaves in Mossy Meadow and then the edges were sponged with Lost Lagoon. The make & take card was pretty and detailed just as shown above, but if you want to make it even more special you could step it up with some added details like this...
Embossing the Blackberry Bliss layer with the Fancy Fan EF and adding some piercing along the edges adds more detail with not a whole lot more effort. I made this card for a dear "old" friend who turned the big 5-0 on Monday. So I used the Endless Birthday setto stamp a background of dots and words to describe the excitement of turning 50. ;-) Yes...I'm being a little sarcastic here...I can share my friends "enthusiasm" & "excitement" over turning 50...because today is my 50th. I still cannot believe we're 50...we are way too young too be that "old"!

Here's a look at both cards...
To celebrate my milestone birthday, my hubby and I took a road trip. We are with family in NC now, but on way down from Michigan we stopped at whatever caught our (my) ;-) interest. Here's a photo of us on top of Natural Bridge in Kentucky.

As you can see, the view was amazing! Here's to the next 50...

Wednesday, June 04, 2014

Thanks Traveler

One of my favorite new catalog sets is Traveler. I love all the vintage style images perfect for masculine cards or vacation scrapbook pages. Here's a masculine card that my local customers had the opportunity to create when they picked up their new catalogs last week. It is suitable for any occasion.

The World Map background stamp seems to go hand in hand with the images in this set. It's shown here stamped in Basic Gray onto it's coordinating card stock. The polaroid frame from the On Film Framelits frames this image well. The Epic Day Washi Tape makes the perfect embellishment. The embossed stripes of the frame along with the stripes on the washi tape remind me of railroad tracks, so I really like the way this turned out.

Thanks for visiting today!

Monday, June 02, 2014

Happy New Catalog Day!

YES! Today is the first day we can finally order from the new Stampin' Up! catalog!

My local customers had the opportunity to stop by and pick up their new catalog and do a couple make & takes using new items. Along with their new catalogs I included a few goodies including these magnetic bookmarks made using the beautiful new In Colors.

I stamped the striped image from Gorgeous Grunge using each of the new In Colors onto Whisper White card stock. Then punched out one of the cute flowers from Petite Petals stamped in the coordinating card stock. This was matted onto one of my favorite new colors...Lost Lagoon. There's a small magnetic strip glued inside each of the folded book marks to hold a favorite page in the new catalog. (I like to keep mine on the first page of the color families.)

I'll be sharing the make & take projects in my next posts. Gotta go now so I can work on my first catalog order!