Creations by Lynn Weiss ~ Independent Stampin' Up! Demonstrator

ENJOY ~ INSPIRE ~ CREATE ~ SHARE


Monday, April 28, 2014

Afternoon Daydreams at Epcot

Here I am on a dark and dreary Monday afternoon daydreaming about one of my favorite places to be...Disney World. What a coincidence...one of the items on sale as part of the Weekly Deals is a really nice kit for My Digital Studio called Afternoon Daydream. Here is a quick page I created using this fun kit and a favorite photo of my Mom & I at Epcot.

Have you ever visited Disney World at Christmas time? It really is even more magical and more spectacular than it normally is. Each park is decked out as only Disney can do it...if you have never been this time of year, I highly recommend it!

The only thing I added to this page (besides text) are the Antique Brads...all the other elements are included in this kit. At only $5.97, it's a real deal! But hurry...today is the last day to download it at this reduced price.

Check out the rest of the Weekly Deals.

Thanks for visiting today!

Friday, April 25, 2014

Saying Goodbye: Secret Garden Bundle

Saying goodbye to a favorite stamp set is even harder when it also has coordinating framelits...which is the case with the Secret Garden set. Today I have a card to share that uses the Secret Garden Bundle and a really cool technique created using the Square Lattice Embossing Folder.

Adhere your punched or die cut pieces onto a cardstock base and then run through your Big Shot using an embossing folder with an all over tight pattern. Once it is embossed, the die cut pieces are embedded into the background, giving it the name Inlaid Embossing. I think it kind of has the look of a woven textile. The Square Lattice Embossing Folder is perfect for this technique. Here's a closer look...

The largest flower was embossed with Pool Party Embossing Powder and then watercolored using the Aqua Painter. Can you spot all the retiring items used to make this card? Check out this photo for some clues...

In addition to the Secret Garden stamp set and framelits, I also used:

  • Express Yourself (Hostess set)
  • Large Pearls (part of this weeks weekly deal!)
  • Square Lattice Embossing Folder
  • Needlepoint Border Embossing Folder
  • Pool Party Core'dinations Cardstock
Today is the last day to take advantage of  FREE SHIPPING so if you don't already have the great products used to create this card, now is the time to get them!


Have a GREAT weekend!

Thursday, April 24, 2014

Saying Goodbye: Pennant Parade Trio

Today is day four of my farewells...let me wipe away my tears so I can type up my blog posting. Yesterday said that Creative Elements may be "one of the most versatile sets on the retiring list"...then I played with Pennant Parade and I must say...Creative Elements has some stiff competition in that category! I'm thinking that Pennant Parade may just win the title of "Most Versatile Set"! Seriously...I sat down to make "a card" and when I was done I had three...a feminine one that could be any occasion, a masculine birthday card, and even a Christmas card. Sounds pretty versatile to me, don't you think?

Lets start with the feminine card that is good for any occasion...


Along with Pennant Parade, I also used the Petite Petals stamp set. (the little pot and "hello" stamp are from Pennant Parade.) I also used several other retiring products...can you spot them all? Maybe this photo will help...

  • Gumball Green Core'dinations Cardstock & Ink
  • Petals-a-Plenty & Designer Frames Embossing Folders
  • Itty Bitty Shapes Punch Pack - flower punch
  • Pool Party Seam Binding Ribbon*

*I almost died when I saw Pool Party Seam Binding Ribbon on the list! I was afraid that ALL the seam binding ribbon was going bye-bye. Thank goodness it was only one color...even though Pool Party is one that I use a lot, I'm looking forward to hopefully seeing more colors in the new catalog!

Now...on to the manly birthday card...

In addition to Pennant Parade, this one uses a few different retired items than the last card...can you spot them all?


  • You're Amazing stamp set
  • Timber Wheel & handle
  • 2012-14 In Color Markers 
  • Raspberry Ripple Cardstock
  • Midnight Muse Cardstock
  • Itty Bitty Shapes Punch Pack - 1/4" circle punch

I'm really glad that the Petite Pennant Punch is not retiring! That means we can still create cute banners like the one above for cards and on scrapbook pages, using DSP.

The last card I have to share is the Christmas version of the top card....
The retiring supplies that are different from the top card are:
  • Raspberry Ripple Cardstock & ink
  • Raspberry Ripple Stitched Satin Ribbon
  • Silver Glimmer Paper 
Do you agree that Pennant parade is super versatile? Do you have it in your collection? If not...get it while you can! What is your favorite/most versatile set that is retiring? 

Check back tomorrow to see more of mine.

Wednesday, April 23, 2014

Saying Goodbye: Creative Elements

I think one of the most versatile stamp sets on the retiring list has to be Creative Elements. I grab this set a lot for the beautiful swirl to create pretty, yet subtle backgrounds, the label image to make a nice framed focal point for a sentiment, and the border stamp for what else...creative borders! Add in the butterfly and pretty flower along with the word "create" and this makes for a must have set. Here's today's creation, made with several favorite retiring products.

Can you spot all the different retiring products I used here...besides the Creative Elements stamp set? The Pool Party background as well as the Primrose Petals embossed strip are Core'dinations Cardstock. I love that this cardstock has a nice texture to it and comes in 12x12 so it's perfect to use for my scrapbooks. The added benefit is the cool look you get when you use the embossing folders and then sand it. Here's a look at some of the other retiring products I used here...
I just love that embossed oval included in the Designer Frames Embossing Folders set...and of course the stitched border from the Needlepoint Border Embossing Folders set is another one I use a lot. All the Stitched Satin Ribbons in the retiring In Colors will be missed as well. Here I used it in Primrose Petals.

I decided while I am working with all my retiring favorites this week, I will make smaller cards sized to fit inside my antique printer tray hanging in my stampin' space.
You cannot tell from this photo, but there is actually a lot of dimension on this...the little banner, flower & butterfly are all popped up.

I hope you will stop back by tomorrow to see more of my retiring favorites.

Tuesday, April 22, 2014

Saying Goodbye: Vintage Primrose Papaya Parade

With the Retirement List being announced yesterday, I decided to share projects using some of my favorite retiring stamps and accessories all this week.

Today I am featuring the set 
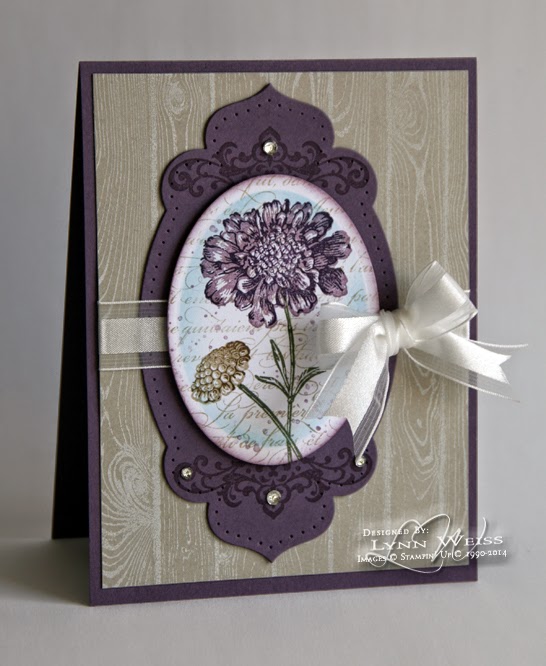
Papaya Collage. Even though this beautiful set has been around for quite some time, I only recently added it to my collection. (yes...go ahead and blame me for it's retirement! ;-)  Unfortunately for me,  it hasn't seen a whole lot of ink...yet.

I used quite a few retiring products on this card...can you spot them all? One of the items used here is also part of this weeks Weekly Deals. This photo should help you to spot what I've used...

Favorite Retiring Stamps: Papaya Collage & Pennant Parade
Favorite Retiring In Color: Primrose Petals (here I used ink & Core'dinations Cardstock)
Favorite Retiring Paper: Core'dinations 12x12 Cardstock
Favorite Retiring Wheel: Very Vintage...bummed that ALL the wheels are history...waahhhh!
Favorite Retiring Ribbon: Victoria Crochet Trim (on sale as part of this weeks Weekly Deal)
Favorite Retiring Embossing Folders: Framed Tulips & Needlepoint Border
Favorite Retiring Tools: Sponge Daubers & Sanding Block (oops...forgot to put in photo)

As you can see I've used many favorite retiring products here. I've gotten a lot of use out of the Very Vintage Jumbo Wheel...I think it makes a lovely background that can be layered upon as I've done here. The Framed Tulips Embossing Folder makes such a beautiful frame for your stamped creations or photos on a scrapbook page...I sure hope that we see other frame style embossing folders! I've used the Needlepoint Border Embossing Folder often to add extra detail and to use as a layer under my ribbon. Here I've just used the dashed line that looks like stitching...doesn't it look like ribbon?

If you don't already have these items...I highly recommend adding them to your collection today!

Hope you will stop by tomorrow to help me say goodbye to some more of my favorites.

Weekly Deals + Free Shipping = Even Sweeter Deal!

It's Tuesday...and that means it's time for new Weekly Deals! With FREE SHIPPING until Friday, the 25th that makes for an even sweeter deal...don't you think?!

All these items (with exception of the Afternoon Daydream Digital Download Kit) are on the just released Retirement List...so you better get them while you still can! Check my online store for pricing and other details.  

I'll be back later to share a creation made with some of my favorite retiring items. See you then!

Monday, April 21, 2014

Saying Goodbye to Some Old Favorites

Have you seen Stampin' Up!'s retirement list yet? I look forward to seeing this list each year with mixed emotions of dread and excitement. It's always sad to have to say goodbye to some of my most loved stamps and accessories each year...but it is also exciting as I start to anticipate the upcoming release of the new catalog; wondering what will be replacing the items that are leaving.

This year, a few of the sets I will really miss are Field FlowersEn Francais and Happy Day. Unbeknownst to me, I must have been channeling the upcoming retiring list when I created this card the other day.


I had a feeling that perhaps Field Flowers would be on the list, but the other two were kind of surprising to me. I love the swirl image from Happy Day and have used it so many times as a pretty accent on my cards and scrapbook pages.

Do you have any favorites on the list? If so...get them early while they are still available, and get FREE SHIPPING besides!

Thursday, April 17, 2014

Bandstand Birthday Pages

Today I have a few scrapbook pages to share that I created in My Digital Studio using the Bandstand Digital Download Kit. Yesterday was my oldest son's 26th birthday, so I whipped him up a quick page yesterday morning so I could post a birthday wish to him on his Facebook page. I used an adorable photo of him enjoying birthday cake back in 1991.

It turned out cute, but there were a few things I wanted to change...but I was in a hurry yesterday. This morning I took a little more time and decided to make another page to go with this one using a photo that I took yesterday. I also tweaked the first page.
As you can see I changed the title and added a label with the date. I also added a border strip to the top & bottom of the chevron border to help define it a bit more. These are all elements included in this fun kit.

You may have noticed that on my first layout I had the chevron border all the way to the bottom of the page...I decided I didn't like it that way so I raised it up to have a border of Pool Party below. Many times when I finish a scrapbook page there are little things that I'd like to change. With traditional scrapbooking sometimes it is difficult or impossible to change something once it is all adhered into place. That's what is so nice about creating in MDS...with a few clicks of the mouse it is easy to make almost any change you would like.

Heres a look at the right page of the layout showing my son all grown up...with real facial hair instead of the one made of chocolate frosting like in the first photo. He's holding up a 6 pack of beer that my youngest son bought him for his birthday. He picked it out based on the funny name.
Here is how the two pages go together...
Hope you like these pages!

Wednesday, April 16, 2014

Simple Monochromatic Birthday

With it's monochromatic color scheme and clean & simple design, this birthday card using Another Great Year is the perfect card for a guy. (at least I hope my son thinks so!)


I stamped the image twice...once onto the Island Indigo layer stamped with the hardwood background and again onto a plain piece of Bermuda Bay card stock. Each time I embossed the image using Pool Party Embossing Powder. I cut out the Bermuda Bay banner and watercolored the letters and the shadowed areas using Island Indigo ink and my Aqua Painter.

I popped up the banners using Stampin' Dimensionals and finished off the card with Candy Dots in each corner from the Brights Collection.

Have a great day!

Tuesday, April 15, 2014

New Weekly Deals!

Wow...some really good deals this week! Two of my favorite accessories are on sale right now...the Needle Point Embossing Folders...use them all the time! and the Natural Chevron Ribbon...love that stuff! It's a good ribbon to use on masculine cards. Check out all the good deals offered this week.


Monday, April 14, 2014

Marina Mist Field Flowers

Sometimes I get so caught up playing with my new things that I forget all about some of my old favorites...like Field Flowers.


These two step flowers really have some pretty detail to them. I stamped the first, more solid flower in Marina Mist and stamped the more detailed flower (lined up with the aid of my Stamp-a-ma-jig) on top of the first image inked in Basic Gray. The seed head was done in Crumb Cake, followed by Soft Suede.

I left the oval framelit in place after cutting and used it as a mask while I lightly sponged Marina Mist along the inside edge. After removing the framelit, I used the En Francais background stamp inked in Crumb Cake. A few splatters from the Gorgeous Grunge a little more sponging along outside edge of the oval and I was finished...with that part anyways.

Next, I again used the En Francais background stamp inked in Crumb Cake and stamped the Marina Mist panel. Before I ran it through the Big Shot, I also inked the Beautifully Baroque Embossing Folder with Crumb Cake ink. I love the depth and antique feel this gives to the embossing.

Thanks for visiting today!

Friday, April 11, 2014

Flippin' Friday: Creative Elements Double Flip

Happy Friday! I'm here today to share a different kind of flip card...a double flip! The double flip is new to me...but I guess maybe I might be living under a rock, because another creative stamper shared this back around Christmas time. Anyways...when I saw it the other day on Pinterest, I knew I had to try one!


Isn't this a fun alternative? I love seeing new ways to use my dies...it makes them that much more versatile!

To create the double flip,  first, you must start with a piece of card stock that measures 4 7/8 x 7-1/2" and run it through the Big Shot stopping just after it cuts through the label portion. Back it out of the machine, and then flip the card stock to do the opposite end. Clear as mud? Here is a link to a great video that shows you exactly what I'm trying to say.

Then just decorate it as you like...I used my favorite new background stamp...Hardwood to stamp the Coastal Cabana base. The Hardwood background is available in the Occasions catalog. I hope to see more great background stamps in the new catalog out in June.
The Creative Elements set was used for the rest of the stamping here. I love using the border stamp to decorate the edges of cards and scrapbook pages. I think this is a really versatile set. The pretty swirl was stamped onto each of the Whisper White label pieces in Pool Party ink. The butterfly was then stamped right on top of it using Strawberry Slush ink. I stamped the butterfly again onto scrap, this time inked in Calypso Coral to coordinate with the strips along the edges. I punched out the center of the butterfly using the Bitty Butterfly Punch.

The back side of each of the label flips are perfect to stamp a greeting on one and write a message on the other.

Have a GREAT weekend!

Tuesday, April 08, 2014

Everything Eleanor Birthday

This card uses the technique emboss resist to achieve a really pretty background. The final result looks kind of like batik or tie dyed fabric.

I started with a piece of watercolor paper and stamped the swirl image from Everything Eleanor in VersaMark and then embossed it in Clear Embossing Powder. Then, spritz the paper with water and proceed to sponge on several different colors. Depending how much water used, the colors will start to softly flow and blend together. I used these four colors:

  • Pear Pizzazz
  • Coastal Cabana
  • Strawberry Slush
  • Calypso Coral
Tip: certain colors do not look good when blended or mixed together. The Pear Pizzazz for instance looks great blended with the Coastal Cabana, but if mixed with the other two colors would appear brownish & muddy. I made sure to sponge the CC next to the PP and not the other colors. 

Continue to sponge on color and spritz on more water to get the desired effect. Keep some paper towels handy to blot up any extra water and to also wipe up extra ink off the embossed areas when finished. After I was finished sponging on my color, and then wiping down the embossed areas,  I heat set it with my Heat Tool to help dry the paper. Then I added a few of the smallest flowers from Everything Eleanor inked in Coastal Cabana. 

I couple pieces of scrap sponged with the same colors, stamped with a couple of the butterflies from Papillon Potpourri and punched out with their coordinating punches finishes off the card. I was inspired by this very pretty card and video by Cindy.  

Have you checked out this weeks Weekly Deals yet? If you don't have the Secret Garden Framelits yet...I highly recommend them! 
Thanks for visiting today!

Friday, April 04, 2014

Flippin' Friday: Purple Peaceful Petals

Happy Friday! It's been a while since I did a Flippin' Friday post...so here's one for you that's pretty & purple!


This ruffley looking dahlia is fun to watercolor! First, I stamped the image in Black Stazon onto Whisper White card stock. As usual, I used my Aqua Painter and inks pooled in the lids of my ink pads. These are the colors I used:

  • Wisteria Wonder
  • Rich Razzleberry
  • Elegant Eggplant
  • Crushed Curry

Then I punched out the flower using a 2-1/2" Circle Punch which fits perfectly onto the Thinlet Flip Card base.

I used the Needlepoint Border Embossing Folder to decorate the edges and the Beautifully Baroque EF to give a nice pattern to the base of the card.

Many times when I'm watercoloring, I will stamp numerous images and color all at the same time. That's exactly what I did this time...one of each flower in the Peaceful Petals set. I've already shared the other two cards in the past week. Here is a look at the Peaceful Petals Trio.

This would make a nice set of cards to give as a gift...make a pretty box that coordinates and include matching envelopes.

Have a wonderful weekend!

Wednesday, April 02, 2014

Purple Rose Candle Wraps

I love the way my Think Spring Rose Candle Wrap turned out so much that I had to make a couple more. This time I used some pretty purple roses...all created with the Spiral Flower Bigz Die. Many of you who visit my blog regularly may have guessed that purple is among my favorite colors...and you would be correct! I have a shade of deep plum color as an accent in my living room, so I made these to go in there.

These roses were created using Wisteria Wonder card stock for the small roses and a combination of Elegant Eggplant and Perfect Plum for the large roses. (layered Plum on top of Eggplant and rolled up together)
As you can see, I used the Hardwood Background stamp to stamp the band...which is a strip of Sahara Sand card stock with coordinating ink. I use small dots of extra thin velcro to attach them to the candle. This way I can easily change them out seasonally.

I'm really happy with the way these came together...the combination of feminine & masculine accents were just what I had in mind. The rustic wood mixed with the bold pattern and texture of the Natural Chevron Ribbon combined with the dainty Tea Lace Paper Doily and the Crochet Ribbon...all come together to make the perfect backdrop to showcase these pretty roses. Here's a closer look...

Here is how they look in their "natural habitat" sitting happily on candle stands in my living room.
I'm looking forward to seeing what the new batch of In Colors are this year...I'm really hoping that there is a nice shade of purple in the group! 

Thanks for visiting today.


Product List
Stamp
Ink
Card Stock
Punch
Ribbon & Trim
Accessory
Big Shot