Creations by Lynn Weiss ~ Independent Stampin' Up! Demonstrator

ENJOY ~ INSPIRE ~ CREATE ~ SHARE


Wednesday, January 30, 2008

Blue Bayou Birthday Birdie

Today I thought I would share the card I made for my Dad's birthday. I used the cute little bird image from my new Spring Song set. He's stamped on water color paper and then water colored using my SU! classic inks.

For the background, I had to resist the urge to grab my Weathered stamp, since the last couple cards I sent my Dad used that stamp I figured I better use something different. I hadn't used my Paisley background in a while so I grabbed that along with the Flannel Plaid to create this "manly" background. Both the Blue Bayou and Kraft layers are stamped with Blue Bayou ink. I separated the two with a strip of twill tape and some black vintage brads.

The sentiment from It's Your birthday was embossed with Black Detail EP. When I showed this card to my hubby he asked what the HB was for? When I replied Happy Birthday he said, "oh, I thought it stood for Hey Bob." (my dad's name) *rolls eyes* Hopefully my dad will figure it out!
Have a good one!

Tuesday, January 29, 2008

Great Tip Award


This was certainly a nice way to start my day! I logged in this morning to see that my Valentine's Day Stamp Camp projects have been featured on Laurie's Tip Junkie blog. How fun! If you've never visited her blog before, you'll have to check it out...tons of great tips and projects featured there. It's always nice to know that I have possibly inspired someone to be creative. Now I get to pass on the award to three other bloggers that I find inspiring. There are so many creative bloggers I like to visit, so it was pretty difficult to choose only three:

Maren

Claire

Natasha

Have a great day!

Monday, January 28, 2008

Happy Heart Day Hugs

The images in the Happy Heart Day set are just so cute...I've been having a lot of fun with this set! Here I combined it with the new Berry Bliss paper, Boho Backgrounds and So Many Scallops sets.

Just a reminder...this week is the last chance you will have to purchase the Valentine's Day Bundle which includes the Happy Heart Day stamp set. Contact me today if you would like to take advantage of this special.

As long as we're talking about Valentines Day...I wanted to let you know that I still have some kits available for my Valentine Stamp Camp. You can either attend my February 10th class here at my home or take it by mail and I'll send you pre-cut supplies and instructions to complete the projects at home in time for Valentine's Day. If you are thinking of doing this...don't hesitate as I only have a few of the mailboxes left at this point.

Have a creative day!

Sunday, January 27, 2008

A Carte Postale Quilt

My Mom is a quilter so I made this framed "quilt" for her to hang in her sewing room. Since I don't sew...this is the closest I'll ever get to quilting! The bold, square shape of this medallion stamp in the Carte Postale set, lends itself well to this quilt making project. All I did was stamp it several times in More Mustard & Purely Pomegranate and then punch it with my square and circle punches and layered it onto a square Artichoke mat. I then cut strips of Le Jardin paper for the border of the quilt. After that, came the hard part...


Getting the design measured and laid out properly to fit inside the frame opening. I strayed ever so slightly from my original sketch so this became a bit of a problem. I had to change it a little to finally make it work. Then began the stitching... I used the paper piecing template that came in my mat pack to easily space my punched holes. Then I connected all the dots with my Chocolate Chip marker. I also used the marker to write the quote inside. This was a fun project to do and my Mom really liked it.


I lucked out today...a get to spend a lazy Sunday at home with nothing to do...so I'll be down in my stamp room for most of it! Hope you enjoy your day too!

Friday, January 25, 2008

Spring Song

When I first looked through the new catalog this was the set that really jumped out at me...well, actually everything on page 103 screamed, "buy me!" The others will have to wait, but this set was definitely on my first order. I've been so busy with Valentine's Day, SAB and Stamp Club projects that I didn't get a chance to do anything with this set until a few days ago when I needed to make a card for my MIL. She loves birds, so I knew she would like this image as much as I do...so I finally got to play with my favorite new set...yeah!!!

I just love the color combo they used on the cover of the new catalog, so that's where I got my inspiration for the colors used here- Ruby Red, Groovy Guava & Mellow Moss (I used this in place of River Rock because I had matching eyelets.) I hadn't used one of my favorite backgrounds in a while - Floral, so I grabbed that thinking it would be perfect with the hummingbird image. I inked both the Guava & Ruby layers with Ruby Red ink. Instead of using ribbon down the center I used Trimtastic to divide the two layers.

The hummingbird is stamped onto watercolor paper using black Stazon ink and water colored using SU! classic inks and my aqua painter. I matted the main image on Ruby and then adhered it to the Mellow Moss mat using pop dots for some added dimension. Hope you like my first creation using one of my favorite new sets...I'm sure you'll be seeing more of them!

Have a nice weekend!


Tuesday, January 22, 2008

From the Garden


This large magnolia image is called From the Garden and it is a new Level 1 hostess set. Isn't it gorgeous!? This stamp is HUGE! It is the size of one of SU! background stamps. I had to make a larger sized card to fit the whole image. If you like to water color like I do, then this is a must have stamp to add to your collection!

I stamped the image onto water color paper and then used many different colors of SU! ink to color this with my aqua painter. I know, yellow really isn't the proper color for a magnolia, but I figured I had creative licence since I was the one painting it...and my Mom likes these colors and since this card was for her, I had to use colors she would like. So, I say paint whatever colors you like, not necessarily what is considered "correct." If you accidentally paint a leaf the color of your flower petal...go with it! I think that's what I did on this one...oops! It's hard to tell because the petals and the leaves are drawn so much alike. Regardless, I still really like the way this turned out.


Stamps: From the Garden, It's Your Birthday
Card Stock: Purely Pomegranate, So Saffron Designer Prints, Water color paper
Ink: Black Stazon, Purely Pomegranate & various to water color


A friend sent me an email with this link well worth checking out. I thought I would post it here to maybe help even more.


The band, Five for Fighting, is generously donating $0.49 to Autism Speaks for each time this video is viewed. The funding goes toward research studies to help find a cure for autism. When you have a moment, please visit the link below to watch the video and pass it along to your loved ones. They are aiming for 10,000 hits, but hopefully we can help them to surpass this goal. This is very moving and a great way to contribute!


Monday, January 21, 2008

Valentine's Day Projects at Hostess Club

Friday night was the start of another round of my hostess club. Since we won't be meeting in February until after Valentines Day, I designed this months projects with a Valentine theme. The first project was a masculine Valentine using the Always stamp set. A slight variation to the Joseph's Coat technique was used to create this card. If you've never tried this technique you should give it a try:


  1. Using a spectrum pad* brayer a piece of glossy white card stock with color. *This is where I deviated a bit from the technique - I randomly sponged on the colors I wanted instead of using a spectrum pad and brayer. Allow card stock to dry.
  2. Rub the Embossing Buddy over the glossy card stock, then randomly stamp your images with Versamark ink. (In this case I just stamped the one heart image.)
  3. Emboss with Clear Embossing Powder and allow to cool.
  4. Brayer over the top of the entire glossy card stock with Basic Black ink until evenly coated.
  5. Wipe excess ink from stamped images using a paper towel.
I really love the new Always stamp set. The heart looks so pretty embossed! The sentiments included with this set are great too, as well as the little background pieces. However, it is the bird in the set that really caught my eye...he is stamped on the inside of this card. I look forward to making more projects using this set with the bird front and center!

The other project I had the group do was an acetate card using the Happy Heart Day set. The acetate was stamped on the front panel with White Stazon ink. Then each layer is matted and adhered to a different panel of the acetate by applying double stick tape behind the previous smaller mat. This way all the adhesive is hidden by another layer and when the card is closed you see each layer of matting except the inside where your greeting is written. For example, my mouse image along with the Bashful Blue mat was adhered to the front (outside) of the card. I then opened the card, directly behind my blue mat I applied my double stick tape to the acetate, then I centered my Rose Red mat behind that, and proceeded to work my way back until each layer was properly centered and adhered to the acetate. I just love the look of these acetate cards ~ I'm glad I finally found the time to make one!I always give the hostess of the month a hand stamped gift. For this round of stamp club I decided to try something a bit different. I ordered the 12x12 craft keepers and everyone got to personalize one using white stazon & ribbon. 
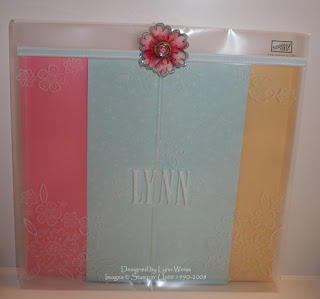
To finish off this project, a fun embellishment was added to the flap of the craft keeper. The large flower from Time Well Spent was water colored on whisper white card stock and then embossed with several coats of Glassy Glaze enamel. This created a hard acrylic coating over the flower image. Then using a Build a Brad for the center it was attached to the flap. Here's a close up look:

When completed, this project is not only cute it is also useful!

January is a big birthday month in our family. I've been busy creating birthday cards. Tomorrow I will share some of those projects. I hope wherever you are you are staying warm...it is soooo cold here right now!

Friday, January 18, 2008

Valentine Stamp Camp


Aren't these altered mailboxes adorable? I used the new Berry Bliss Double-sided Designer papers, which are just gorgeous, along with the new Always stamp set for the mailbox on the right. The mailbox on the left uses the Cutie Pie Double-sided Designer papers and the Happy Heart Day stamp set. I'm not sure which one I like better?!

Those attending my Valentine Stamp Camp will be making their choice of one of the mail boxes & the M&M box shown here, plus 3 matching love notes with envelopes (they fit inside the mailbox perfectly) and another project that isn't pictured. (but trust me...you will LOVE it!)

I am offering this class on two dates: Tuesday, January 29th or Sunday, February 10th.

Wish you could attend my stamp camp and make these projects? Contact me for info on taking this class by mail. I will send you everything you need to complete these projects at home.

Tuesday, January 15, 2008

Pick A Petal Meets So Many Scallops

If you are thinking this card looks familiar...you are right. It is almost an exact copy of the SU! personalized postcards. I've always loved that card and wanted to make one, so when I was sitting at my desk wondering if So Many Scallops would work out as the center of a Pick A Petal flower, I figured it was time to try it.

I made a few changes due to the colors of embellishments I had on hand. I used Ruby Red & Mellow Moss where they had used Pomegranate and River Rock. Since I still had my Canvas background sitting out, I also added that to the large Soft Sky circle I had cut with my coluzzle. The crowning touch was the cute scallop flower I punched out and added to the center. (I just love this set!)

So now I know that So Many Scallops works out perfect for the center of a Pick A Petal flower! I just wish I could take credit for such an adorable layout using this set.

Guess who is going to be stopping by later on this afternoon? My UPS guy...with my first new catalog order! Woo hoo! Can't wait!!! It seems like it took forever to ship after I ordered, due to SU! having to process so many orders with the retiring list ending, SAB pre-orders, the new catalog, not to mention the NEW year. Luckily they are all caught up, and shipping is back to normal at this point, and I'll have new stampin' goodies later! Hopefully I'll have something new to share with you tomorrow. Have a good day!

Monday, January 14, 2008

Bold Bright Whimsical Balloons

I can't believe that I forgot to tell you some very exciting news regarding the new SAB sets when I made my post on Saturday! The SAB stamp sets are all die cut!!! It was a nice surprise to me when I opened my package. I had recently read an announcement that all future mini catalog sets will continue to be die cut like they were in the Holiday Mini, but it didn't occur to me that the SAB sets were included in that. I just loved how bright and cheery the first two cards I made with this set turned out so I decided to make a few more using the same color scheme. I also added a punched design from the new So Many Scallops set. I know I'll be using that set a lot! I cut out each balloon, but before I adhered them into place I lightly penciled in the curved lines of the string. Then I paper pierced along the lines, erased my pencil lines and connected the dots with my white gel pen. This mimicked the swirled motif of the stamp and turned out pretty darn cute...if I do say so myself!


Since it's always so much easier for me to make girly cards than manly cards, I challenged myself to also make a more masculine version of each of the birthday cards I make using this set.

For this one I used the It's Your Birthday set for the main image and framed it with the balloons. Since guys like hardware I added the brads in each corner for a manly touch. The orange balloon it mounted with pop dots. I also tied a bit of thread onto the balloons to finish it off. Both cards use card stock and inks from the Bold Brights color family, plus the Canvas background stamp inked with White Craft ink.

Saturday, January 12, 2008

Bold Bright Birthday Whimsy

I pre-ordered two of the new Sale-A-Bration sets so I could make some samples. They showed up here yesterday! I must say I totally love both sets! I whipped up four really cute cards in no time at all...and only stopped stamping because we had a movie to watch last night, which turned out to be disappointing and my hubby just ended up snoring next to me while I watched. I should have stayed downstairs and stamped my night away because it was a good session. You know the kind...where things are flowing and the ideas in your head actually turn out as planned when inked.These are the first two cards I made with this set. I wanted to keep them simple and show the same design in two different color schemes...one for girls and one for guys. I couldn't help but sneak in a bit of ribbon on the girly card. I used the paper piercing template on both cards, but connected the dots with my white gel pen on the girly card to create some faux stitching.

I stamped each color gift twice. Then I cut them out and mounted them with pop dots for some extra dimension. These cards show my favorite thing about using SU! products...color coordination! It's so nice to have the ink, paper and embellishments all match without having to think about it.

Hopefully I'll have some more time to play with my new stamps today! I have even been cleaning up after myself when I'm done to keep my space organized. ;-) Have a great weekend!

Thursday, January 10, 2008

Dream Catcher

Thanks for all the nice comments on my stampin' space. You are welcome to come over any time to stamp! Since I got my area all clean...I figured it was about time to have some fun messing it up! So, I picked one of my favorite retired sets to play with because I needed a nice masculine card for my hubby's birthday yesterday. In between baking a cake, making a nice dinner- including homemade applesauce to go with the roasted pork loin, I managed to finish this card in time. Yeah, just call me Martha! Unfortunately, I spent most of my day in the kitchen...hopefully today I will spend more time stampin' than cooking! Here's the card I made.


It seems like I always pull out my Weathered background when I go to make a masculine card. I think it works really well with the beautifully detailed images in the Dream Catcher set. The beads I used on this were taken from some old necklaces in my stash, probably picked up at a garage sale. The silver beads are almost the same finish as the brads I used from the pewter Hodge Podge kit. I just tied a piece of linen thread around the brad and strung the beads on, then poked a feather through the hole in the beads.

Stamps: Dream Catcher, Weathered background, It's Your Birthday (inside)
Card stock: Really Rust, Chocolate Chip & Kraft
Ink: Chocolate Chip, Black Stazon & various to water color
Accessories: Aqua Painter, Tearing Edge, Linen thread, Pewter Hodge Podge Hardware
Now, I'm going downstairs to do a little stamping...Hope you find some time to be creative today also!

Monday, January 07, 2008

My Clean Rubber Room

Thanks for all the encouragement and suggestions to help me organize my stampin' space. I spent the better part of my weekend down there and it's just about done now...it sure feels good! I thought I'd share my progress with you today. Look!...I can actually sit and work at my desk now! My desk is not that attractive...mostly because the previous owner decided to do a faux wood grain technique over most of the nice oak finish. Some day I plan to strip it back to it's original glory. It might not be attractive, but it certainly serves it purpose...it's heavy-duty oak with lots of storage and slide outs. To the right of where I sit there is a nice slide out surface perfect for my stampin' scrub. I removed the black hanging pocket bag that was under my pegboard, which had accumulated mostly odds and ends I didn't know what to do with. Anything I wanted to save from there either went onto the pegboard or into the metal buckets which I hung from hooks along the bottom.Sitting directly behind my desk is a solid oak filing cabinet which I found at a yard sale for only $5! I keep mostly my faux finishing and other painting supplies stored in there. On top of this cabinet I have two smaller cabinets with drawers. The old oak one on the left used to belong to my Grandfather. He also worked as a painter and guess what he did in his spare time as a hobby and to make a little extra cash? He made rubber stamps! The ones he made were all business oriented stamps- return address and things like that. He would have been amazed to see how rubber stamps have evolved! When my Grandma gave me the tool box she said that he used it in his painting, but being that the drawers are all so shallow, I suspect he used it to store his dies for his rubber stamps. Anyways...I use it to store my colored pencils, markers, etc...from my pre- SU! days. The close up photo here shows how I store most of my embellishments. This little storage unit started it's life as a jewelry box...which I picked up at a garage sale for a buck!

As you can see, I like to be organized, but I don't necessarily want to spend a bunch of money doing it. (I'd rather save those $$$ for my craft supplies!) The way I store my patterned paper is one of my most creative recycled storage units. This glass shelved unit which is on wheels started out as a stereo cabinet. I simply removed the middle shelves, and replaced them with a wire cube with 10 slots to store patterned paper according to color. (wire cubes can be purchased at Target, and I used zip ties to add shelves inside the cube) Below that, I have a couple Iris 12x12 containers that I store my SU! patterned papers, and above the wire cube I have my 12x12 craft keepers with layouts in progress. (note to self: start using the patterned paper instead of hoarding it!)


Next to the glass cabinet is a DVD storage unit (also a garage sale find) that I store most of my backgrounds, alphabets and greetings. The rest of my collection is stored in the same manner on a couple more larger DVD shelving units in my closet.
On the other side of the room I did a little bit or re-arranging. I have a wire rack used to store my SU! card stock ~ 12x12 on the left and 8-1/2 x 11 on the right. I keep a few different colors on each shelf - each color family gets 3 slots. My drafting table is cleaned off also and ready for when I start working on some scrapbooking pages (I like to spread out when I work!) You can also see how I store my paper scraps...which is what always gets out of control first.
Many of you gave me some great suggestions on how to keep track of my scraps. Funny thing is I already have a system...I just get lazy on actually using it! Here is a close up of how I store my scraps. Each Color Family, In Colors & Neutrals has an expanding file folder with tabs. Each pocket stores 2 colors. Then I have a small bin which I throw small scraps into that are easy to grab when I want to use my punches. See the stacked empty bins in the back of the photo? Most of those were filled with scraps that had to be sorted and filed.
The good news is I got my things put back into place and made room to be able to sit and stamp at my desk. The bad news is...when I sit down and look ahead, this is what I saw:
To be continued....

Saturday, January 05, 2008

Getting my stampin' space organized for the New Year!

I don't know about you, but "getting more organized" is always at the top of my list of goals each and every New Year. Over the years I've really gotten better at staying organized, but my stampin'/crafting space is always the first area to get overly cluttered. I think the main reason I have a harder time staying organized with my supplies is that I have two areas set up as stampin' spaces. Both are located in the lower level of our home. My first space is an extra bedroom with a good sized closet. The other area is my classroom area which is set up in the 2nd kitchen area.


I'm constantly going back & forth between the two areas to get things, and pretty soon both areas end up in a big mess! I think my paper scraps are the worst! Right now my desk is covered in piles of paper that need to get organized. My two classroom tables are also both covered...one in gift wrapping supplies still out from Christmas and the other with my stamping stuff.


When I was doing some blog hopping last night visiting my Sisterhood Bloggers I noticed many of them were posting their new years resolutions along with challenges to themselves. It got me thinking...If I took photos of my messy stamping area and posted them here on my blog where you could all see what a slob I am...then it might help to get my butt in gear and clean it up! So here goes!
This is my messy desk piled in packs of paper and all kinds of scraps. Below is one of my paper storage areas, along with my drafting table piled with more stuff.This is my class room area with two 8 foot tables covered with things that need to be put away.
Trust me...there is way more! For now, these are my target areas. I'm going downstairs now, and I'll update later with after photos to show the progress I make. If I do good...I might even have a little time (and space!) to do some stampin'!

Thursday, January 03, 2008

Winter Wonderland

We started the New Year off with lots of snow...at least 12 or more inches. I made sure to take the time and go out for a walk to take some photos while it still looked so gorgeous yesterday afternoon. The sky was so blue and the sun was out so it sure was a nice walk despite the cold.


This is our veiw looking out the back door and into the woods behind our house. I took a bunch of shots, but these are my favorites.

I was hoping to spot a cardinal in one of the trees, but didn't see any. However, these berries add a nice splash of color to this photo.

I love how each branch on these apple trees are covered with glistening snow...they look so pretty and lacey.
Hope you enjoyed the "walk" through my back yard.

Wednesday, January 02, 2008

Happy New Year!


OK...technically I'm a day late, but I, along with George, would like to wish everyone a very happy, healthy and creative New Year!

Here's a card I created using the Big Bold Birthday set along with the Holidays & Wishes set. I used my markers to add the curled ribbon steamers and triangular confetti. I think this turned out nice and festive!

Ink: Purely Pomegranate, Pumpkin Pie, Certainly Celery, Tempting Turquoise & Black Stazon
Card stock: Tempting Turquoise, Basic Black & Whisper White
Accessories: Small Oval Punch, Pomegranate Double stitched ribbon, Celery, Pumpkin & Turquoise Grosgrain & brads

You've already seen the magnetic calendars I made with the coasters shown here, but I thought I would share how I wrapped them to give away on New Years Eve. I just stamped a large cello bag with White Stazon added a little bit on iridescent shreds, tied with some curling ribbon and a Happy New Year tag. They really liked them.
We got a LOT of snow here to start out the new year! I'm hoping to get out there and take some photos at some point today. Probably in between putting away Chrsitmas decorations. Whatever you end up doing today...enjoy!