Creations by Lynn Weiss ~ Independent Stampin' Up! Demonstrator

ENJOY ~ INSPIRE ~ CREATE ~ SHARE


Showing posts with label Fancy Fold. Show all posts

Wednesday, July 05, 2017

Colorful Seasons Double Z Fold

Here's a fun Double Z Fold Card using some of my new favorite stamp sets and dies.


Those adorable birds in the Feathery Friends host stamp set make me smile...they are so darn cute! I knew when I first saw them that I wanted to use them with the branch in the Colorful Seasons stamp set. I watercolored the birds using my Aqua Painter and cut them out. The wings are cut out and popped up as well for extra dimension. The new Mini Stampin' Dimensionals are perfect for adhering tiny die cuts such as the wings.


I used several of the new In Colors for this creation...Lemon Lime Twist, Berry Burst & Fresh Fig along with Peekaboo Peach, Pool Party & Old Olive. The flowers on the tree branches are from the Colorful Seasons stamp set. They are stamped using the Rock n Roll Technique along with a sponge dauber to soften/blend the edges where the two colors meet. The branches are die cut using the coordinating Seasonal Layers Thinlits. This bundle really is a must have in my opinion!


The picket fence was created by stamping the Hardwood stamp inked in White Craft Ink onto Crumb Cake cardstock and then cutting apart along the planks. I trimmed the top of each picket and then sponged the edges. The flowers and stems were stamped using the Jar of Love stamp set and die cut with the Everyday Jars Framelits.


I started with a base of Pool Party cardstock measuring 4- 1/4 x 11" scored at 2- 3/4" and again at 5- 1/2" The Whisper White background layer was cut at 10- 3/4 x 4 and sponged with Pool Party ink and masks cut from post-it notes using the cloud dies included in the Up & Away Thinlets.  After sponging my cloudy background I cut 3 panels to fit just inside the scored folds of my card. The photo above shows the card opened flat.


The card folds up, as shown above to fit inside a standard envelope. This card was time consuming, but fun to make. It went to my dear Aunt on her birthday today. She is also a stamper, so I know she will love this card...otherwise I doubt I could part with it! LOL

Hope your day is a happy one!

Wednesday, January 11, 2017

Lift Me Up Z Fold Birthday

Recently when showing my husband some of my creations using items from the new Occasions Catalog, he remarked on a card using the Lift me Up Bundle, saying he hoped I made him a card using the hot air balloons for his upcoming birthday. His birthday was on Monday, so I came up with an extra special card for him.


Above is how it looks coming out of the envelope...but when it unfolds it looks pretty special.


The base of the card is Pacific Point cut to 4-1/4 x 1" and scored at: 2-3/4" & 5-1/2" The Whisper White layer measures 4 x 10- 3/4" It is sponged to create the cloudy sky background. I used cloud shapes die cut from post-it notes using the Up & Away Framelits. These are used as masks before I started to sponge on various shades of blue ink. I also sponged some Old Olive along the bottom to create a hillside.


The die cut hillside was created using 10-3/4 x 2-1/4" Old Olive cardstock and a retired set of dies called Sleighride Edgelits. I then stamped it with the nice cross hatch background stamp included in the You've Got This stamp set. It is then scored at 5-1/4" & 8".

Here's another look at the card from another angle.


As you can see, I cut down the sponged background layer so that it just fit inside each scored section of the card so that it will fold open and closed easily.

We celebrated his birthday a day early, on Sunday, when our family could be here. Besides the birthday boy, we had another guest of honor who stole the spotlight the entire evening...


our 5 day old granddaughter! Isn't she adorable all dressed up in her party dress for her very first party? As you can see, Grandpa didn't mind a bit sharing the spotlight! Our little sweetheart made his special day all the sweeter.

Thanks for visiting today!

Friday, October 21, 2016

Spooky Fun Double Z Card

I've been seeing lots of double z fold cards on Pinterest recently and there was one in particular using the Santa's Sleigh stamp set and thinlits that blew me away. I don't have the Santa's Sleigh set, but after seeing that card I was inspired to use my Spooky Fun stamps and Halloween Scenes Edgelits to create a Halloween double z card.


I started off by sponging a spooky sunset skyline onto Whisper White cardstock using Elegant Eggplant, Rich Razzleberry, Night of Navy, and Pumpkin Pie inks. I knew I wanted a full moon as a focal point, so before I began sponging I punched out a 1-1/4 circle from a post it note to use as a mask. After I was done with my background, I removed the circle and replaced it with the square post it note with the circle punched out, carefully lining the circles up. Then I sponged the inside of the circle with Crushed Curry.


It folds up nicely to fit inside a standard sized envelope which is nice.


Here's another look at the card opened up. The trio of ghosts are embossed in White Embossing Power.


All the supplies I used to create this card can be found in the Holiday Catalog, including:

  • Spooky Fun stamp set (142236)*
  • Halloween Scenes Edgelits (141842)* 
  • Halloween Night Baker's Twine (142027)
  • Halloween Night Enamel Dots (142025)

*Both the stamp set and edgelits can be purchased as a bundle (144337) to save 10%.


If you would like to see the Santa's Sleigh z fold card that inspired this card, you can see it here. Thank you for the inspiration Chloe!

Thanks for visiting today...have a wicked good weekend!

Monday, May 09, 2016

Picture Perfect Mother's Day Easel Card

I hope you had a wonderful Mother's Day yesterday! It was a picture perfect Spring day here in Michigan! I was blessed to have both my boys here along with my beautiful Mom. My wonderful husband made us dinner and and the boys cleaned up...couldn't ask for a more memorable day! Here's the card I made for my Mom...


I used the color combo of Mint Macaron, Perfect Plum, Rich Razzleberry & Blackberry Bliss. I just love the way Picture Perfect and the Timeless Textures stamp sets work together. I put out a couple tutorials recently featuring projects using both of these sets. You can see them here.

I used a retired set, Blessed Mother for the sentiment and the Botanical Blooms stamps and framelits to create the flowers on the base of the card. Here's a closer look...
Clear Wink of Stella was used on the flowers and the hummingbird for some shimmer. I also made an alternate, easy to pop in the mail, version of this card.
Thank you for visiting.

Wednesday, February 10, 2016

Bloomin' Love Fancy Fold Valentine

Here is a special Valentine card that uses many items in the Love Blossoms Suite of products available from Stampin' Up!'s Occasions Catalog.


 The Love Blossoms DSP stack has so many darling prints...I used three different prints here. The Bloomin' Love stamp set is also used along with the coordinating Bloomin' Heart Thinlit Dies. I hand cut the two large stamped hearts and the mats....too bad there was not a framelit for those.


The mats for the hearts are cut from Blushing Bride Glimmer Paper...it is so pretty & sparkly! The Clear Wink of Stella Brush also added some beautiful shimmer to the die cut flowers popped up on the hearts.


The card folds up flat to fit inside a standard sized envelope.

Wednesday, July 09, 2014

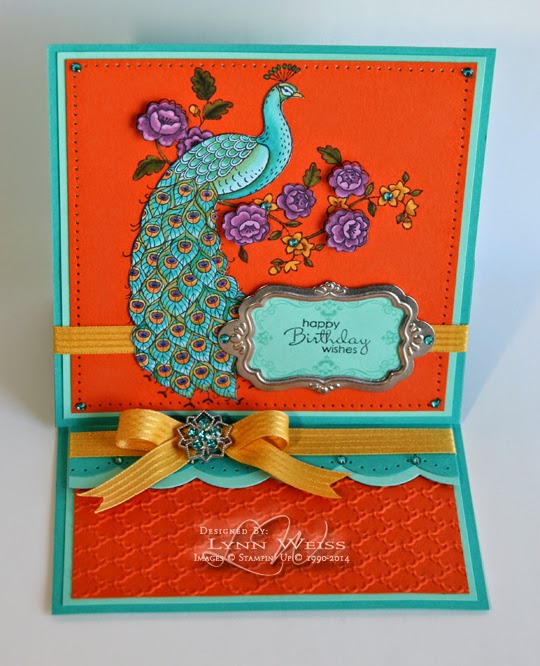
Perfect Peacock Easel Card

Here's an extra special card that I made for my dear Aunt's birthday.


I know she just loves the new Perfect Peacock image, so I decided to give him the extra special treatment. I colored him with my Blendabilities and then fussy cut him out. I stamped him again onto Tangelo Twist card stock so that all the little curls of his feathers would be there without having to cut those. (I don't mind a little fussy cutting but I'm not crazy! )

Then I set to work bleaching the card stock area inside the flowers, leaves and plumage on top of his head so that I could color those as well.
After painting on numerous coats of bleach using my Aqua Painter, I managed to get the color down to a shade of yellow, which would be fine for coloring the Old Olive and Daffodil Delight areas, but not for the Rich Razzleberry flowers. Those I colored on Whisper White and cut out.
I attached the Razzleberry flowers using Stampin' Dimensionals. I colored some Basic Rhinestones using my Coastal Cabana Blendabilities for some bling on the flower centers, and in each corner, etc... I even colored in the rhinestones on one of those gorgeous Frosted Finishes Embellishments I had left from last years Holiday Catalog...just love those! It made a beautiful center to the Hello Honey satin bow.
The silver frame that fits the Decorative Label punch is something else I had in my stash. To complete the base I embossed the Tangelo layer using the Fancy Fan EF...it's design compliments the feathers well. A strip of Coastal Cabana card stock and one in Bermuda Bay were scalloped using the Scallop Edgelit. 
Thanks for visiting today!

Thursday, December 20, 2012

Snow Much Fun Luminary Easel Card

While browsing the SCS gallery one day I came across this beautiful card and thought it was such a fantastic idea to create a luminary from an easel card...so of course I had to try one!


I love the sparkly snowflake cut from Silver Glimmer Paper using the Snow Flurry Bigz Die! I colored a Basic Rhinestone with a sharpie marker to coordinate with the Gumball Green Stitched Satin Ribbon. I got my color combo of Baja Breeze, Gumball Green, Cherry Cobbler & Primrose Petals from the cute Snow Festival DSP. I used those color markers to color the cute snowman image which is embossed using Silver EP on Cardstock Vellum. The snowflakes from Snow Swirled were stamped using White Craft Ink. The "Warm Winter Wishes" sentiment is from my retired Snowflakes set. Here's a look at what they look like lit with a flameless candle.


Thanks for stopping by today!

Friday, December 10, 2010

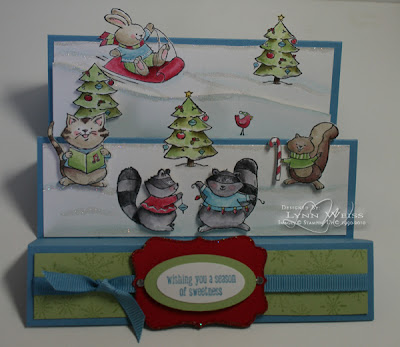
Merry Crittermas!

I decided this is going to be my Christmas card this year...I just need to hurry and make 49 more of these!


I'm totally kidding! It was fun to make one, but with all the cutting involved I'd end up in a real rubber room if I attempted to make 50. (but I bet you were impressed for a minute! ;-) Here's a closer view of the cute little critters.

They were all stamped in Black Stazon on Whisper White cardstock and then I watercolored them using my aqua painter and classic inks. I used a combination of Iridescent Ice EP and Frost White Shimmer paint to create the snowy background. The trees are also highlighted with sparkling snow...but it doesn't show up in my photo.

Stamps: Merry Crittermas, Serene Snowflakes
Card stock: Whisper White, Marina Mist, Certainly Celery & Real Red
Ink: Black Stazon, Marina Mist and various other classic inks
Accessories: Aqua Painter, Marina Mist grosgrain, Iridescent Ice EP, Frost White Shimmer paint, Decorative label, Large & Small Oval punches, Rhinestone Jewels

Have a GREAT weekend!
Photobucket

Sunday, July 12, 2009

Beautiful Bundle of Joy

A very sweet friend just gave birth to her first child...a beautiful baby girl, so I made this card for her.

I thought a stair step card would be fun for this special occasion. To create the stair step base, I started with a piece of Pretty in Pink card stock measuring 5 1/2" x 11". I scored along the 5 1/2" side at: 1-1/4", 2-1/2", 4-1/4", 6" and 8-1/2". I picked out my designer papers - one polka dot design came from the Tea Party pack the other is a retired Pretty in Pink Designer Print. I cut those 1/4" smaller than the measurement of each "stair front". After adhering those in place I started to add my embellishments.
I started with the main images...the bear & giraffe from Bundle of Joy. They were stamped on watercolor paper, colored and then cut out. The flowers were made using the Birds & Blooms Sizzlets and the Boho Blossoms punch. The sentiment came from the Congrats stamp set that was available this past SAB. The sentiment was layered using the new Modern Label punch with one of the Lots of Labels Sizzlets.
Looks like another beautiful day here...the last day of my hubby's vacation. It is also the last day of the music festival we've been attending all week. Tonight we'll be seeing 3 Doors Down & Jet. With him off and us running to a different show all week long it hasn't left much time for stamping or visiting any of my favorite blogs...but things should be settling down again after today. Thanks for visiting me today!

Friday, February 13, 2009

Hoppy Valentine's Day!

I was inspired to create a "love scene" after seeing this adorable creation on my friend Vicki's blog. "Stamp Something for your Valentine" was also the challenge on the Stamp Something blog...so I got busy and created this Valentine "love scene" for my hubby. Too bad I didn't get it posted here in time to enter the challenge, but I'm happy to see that Vicki ended up being the winner!I've never made a stair step card before...but I'm sure I'll make more now that I've tried one. I didn't find instructions anywhere, so I made it up as I went along. I knew I wanted the card to fit in a 5 1/2" square envelope, so I started with a piece of Basic Gray card stock measuring 5 1/4" x 11". I scored along the 5 1/4" side at: 1-1/4", 2-1/2", 4-1/4", 6" and 8-1/2"

Then I was ready to decorate. As you can see, I used a variety of different stamps! I started by embossing hearts from the SAB set Polka Dot Punches and the Always set, on Real Read, Rose Red and Elegant Eggplant card stock with White EP. I also used sentiment stamps from Wonderful Words, Make it Count and Holidays and Wishes. My favorite part of this card is the adorable froggie perched on top of the heart! He's from Whimsy Stamps. Doesn't he look like he's twitterpated? (those who have seen the movie Bambi a million times like I have will know what that means!;-) I think it's his eyes that make him so sweet and irresistible.

The little hearts coming up behind him are just punched card stock attached to coiled silver wire with some glue dots. Then I attached them to my love scene using some sticky strip, and covered the back with more hearts. I had fun making this card and I can't wait to give it to my Valentine!