Creations by Lynn Weiss ~ Independent Stampin' Up! Demonstrator

ENJOY ~ INSPIRE ~ CREATE ~ SHARE


Monday, December 28, 2009

Serene Snowflake Box

I hope you all had a wonderful Christmas! I sure did! As always it's so nice to spend time with family and friends...only sad thing is that it goes by way too quickly! We spend so much time shopping for the perfect gifts, wrapping them, baking, etc...and it seems to be over in an instant, doesn't it? Today I want to share a cute little box with dividers and a clear lid that I made and filled with tags and embellishments for some of my stamping friends.

The complete tutorial on how to make the box can be found at Split Coast Stampers. For my project, I used Ruby Red card stock stamped with the Serene Snowflake stamp set. On my clear slide-on lid I used White Stazon ink. To create the tags I used a variety of punches along with the Movers and Shapers dies and the Christmas Punch (Level 2 Hostess set) & Delightful Decorations stamp sets.

My friends liked their little gift, and I had fun making them. Enjoy your day!

Wednesday, December 23, 2009

Wrappin' it up!

I always like to incorporate my stamping into my gift packaging when I can. This year for many of the women on my gift list I went to Bath & Body Shop and bought lotions, soaps and other products in my favorite scents and packaged them in stamped cello bags along with soft fuzzy slipper socks. Here is how they turned out.
Bath & Body Works gives the large cello bags if you ask for them. (they also gave me gift tags and ribbon printed with their name, but I opted to make my own tags and use wired ribbon) I stamped the entire cello bag, front & back, using White Stazon and the Serene Snowflakes stamp set. It doesn't show up the best in my photos, but I was really happy with the way they turned out. (click on pic for better view)
I also stamped some Ziploc containers and created matching tags for the cookie exchange party I hosted this past weekend. Again, I used White Stazon and the Serene Snowflakes stamp set to stamp on the plastic containers.To create the snowflake tags I stamped the image using White Craft ink onto Bordering Blue cardstock and embossed them using Winter Wonderland embossing powder. I punched them out using my 1-3/4" circle punch and adhered that to a scalloped circle cut from Shimmery White card stock using Nestibilities and my Big Shot. I finished off each tag with an adhesive backed rhinestone adhered to the center of the snowflake. Here's a photo of all the yummy cookies before we exchanged them.
I still have a few more gifts to wrap and some grocery shopping to do...so I better run! Have a wonderful day!

Tuesday, December 22, 2009

Bella Blue Dasher

Wow...here I am two days in a row! I feeling like I'm a little more caught up on Christmas things...shopping is done, most of the baking is done, my cards are sent...I don't know where the time went, but I didn't get as many Christmas cards made and sent as I usually do. Yesterday I showed you one of the designs I sent, this is one of the other designs that I made for our Christmas cards this year.
Dasher is embossed in Winter Wonderland EP on Shimmery White card stock so he looks so pretty & sparkly in real life. I dry embossed the background using my Big Shot and a snowflake texturz plate. On a few of the cards I even tried out my new toy...the Scallop Trim Border punch that will be available as a FREE selection during SAB starting next month. Since I was at crunch time trying to get these babies finished, I only used the punch on a few of the cards...but doesn't it add some nice detail? I'm going to love that punch! Here's close up view of the card.
Stamps: Dasher, Holiday Wishes
Card stock: Bordering Blue, Not Quite Navy, Shimmery White & Bella Blue DP
Ink: White Craft, Not Quite Navy
Accessories: Scallop Trim Border, Not Quite Navy brads, Snowflake punch (Martha S), Coluzzle, Texturz Plate, Winter Wonderland EP, Heat tool, Scallop Nesties

I got my shopping all done, but haven't wrapped one gift yet...so it's time for me to get busy wrapping! Have a wonderful day!

Monday, December 21, 2009

I'm a bad, bad blogger

Sorry it's been a while since I posted anything. I'm sure you can all relate as to how busy things get this time of year! With shopping, wrapping, baking, parties, etc...I never even posted the cards we made at my last class.

At my Christmas class the group made 9 cards - 3 each of each design plus the matchbox filled with tags. The ornament card using the Delightful Decorations stamp set had 3 different color schemes, shown below.
The middle card using the Bella Blue papers ended up being one of my Christmas cards this year. I'll show you the other card I sent out in my next post. Have a great day!

Friday, December 04, 2009

Lovely Oak in the Autumn Meadow

Well, if this tree was at my house it would have a dusting of snow on it! We got our first bit of snow here last night...makes me excited for a white Christmas! (that's about the only time I like snow...makes me wonder why I live in Michigan?!) Anyways...here's a quick card I made for a friend using one of my favorite stamps sets...I've had this one since I first became a demo five years ago. Each time SU! puts out it's list of retiring sets I hope it won't be included.
Stamps: Lovely as a Tree, Teenie Tiny Wishes
Ink: Basic Brown & various others to watercolor
Card stock: Not Quite Navy, Close to Cocoa, Very Vanilla and Autumn Meadows DP
Accessories: Texturz plate, Word Window & Modern Label punches

Have a wonderful weekend!

Thursday, December 03, 2009

Razzleberry Kitty

I've been doing a lot of stamping, I just have not been too good about blogging lately. I've been busy working on Christmas cards, decking the halls and of course Christmas shopping...this is such a busy time of year! I took a break from Christmas cards to make this card for my Aunt who unfortunately lost her kitty cat last week. She was 16 years old, so that is a long life for a kitty. She was well taken care of and very spoiled so she had a good life. My Aunt took it pretty hard, but this card cheered her up a bit.
Stamps: Peace Within, Patterned Pines & Teenie Tiny Wishes
Card stock: Melon Mambo, Rich Razzleberry, Whisper White and Razzleberry Lemonade designer papers
Ink: Black Stazon, Rich Razzleberry and various inks for watercoloring
Accessories: Rich Razzleberry Polka dot grosgrain, Modern Label & Word Window Punches, Aqua painter

Thanks for stopping by...enjoy your day!

Tuesday, November 24, 2009

Thanksgiving Splendor

I'm just loving the easel cards I've been seeing all over on other blogs and SCS, so I decided to make another one...this time for Thanksgiving.
The More Mustard base is cut to 4 1/4" x 8" and then scored at 2" and 4" to create the easel stand for the 4-1/4 square card to be adhered to. I used the Bright Blessings Jumbo wheel inked in Really Rust for the base. I also used Autumn Splendor along with the coordinating papers - Autumn Meadows. I really love the colors and the distressed look to these papers...I took that a step further by also distressing the edges of all my layers with Chocolate Chip ink. For even more texture, I used one of my Texturz Plates that looks like tree bark on the Really Rust layers and paper pierced the edges of Chocolate Chip layers. The greeting is from Teeny Tiny Wishes cut with the Word Window Punch and layered on a Modern Label punch. Also used: Aqua painter, Button Latte, Chocolate Chip Grosgrain, Copper Vintage Brads (retired), Copper Cord (retired)


Here's a close up view.

Love the colors, paper and the stamps, but just don't have much time? Here's a card we did at my last card class which uses the same supplies, but is much simpler.
Have a WONDERFUL Thanksgiving!!!

Saturday, November 21, 2009

Easel Card for a Friend

I created this 6x6 page using My Digital Studio (MDS) and then had it printed through Stampin' Up! I originally was going to put it in a frame and give it to my friend, but after searching for a 6x6 frame with no luck, I had to come up with something else. So I made it into an easel card.
I made the easel part of the card by cutting down a 12x12 piece of Baja Breeze textured card stock to 6x12 and then scoring it at 3" and 6". I used some of my favorite patterned papers which are now retired...Parisian Breeze. The only stamping on this card was the word friends shown inside the HPH Designer Label.

Since MDS uses some of the retired In Colors, like Kiwi Kiss and Baja Breeze, as shown on my layout, I pulled out some of the accessories I've been saving...Baja Breeze Corduroy Buttons, Kiwi Kiss Satin Ribbon & Baja Breeze Striped Grosgrain...I also used a chocolate chip flower button from the Button Latte pack. All of the "real"embellishmentss are used on the base of the easel card. The buttons and brads on the 6x6 layout are all digital...it's hard to tell, isn't it?
I'm going to have a lot of fun with this program! If you are interested in learning more about MDS, please contact me. I am now officially certified, or certifiable!? ;-) SU! just released several new digital downloads to use with MDS with a holiday theme. You can purchase these instantly from my demo website.

Well, need to run...I'm getting together later to celebrate my friends birthday (the reason for this card!) and I'm in charge of bringing the lasagna...so I need to get busy making it! Have a great weekend!

Saturday, November 14, 2009

Bella Blue Patterned Pines

I've been loving the colors of the Bella Blue papers so here's another version of the card I shared on my last post.


As you can see, I just changed the stamp set, using the Level 1 Hostess set Patterned Pines. I inked the stamp with Not Quite Navy Craft ink and then embossed it with Iridescent Ice Embossing Powder. It has such a beautiful sparkly look in real life. I tried to capture that in my photo, but it made the color look a bit off. I guess you'll just have to pretend. ;-) The Corduroy Button is one of the Baja Breeze buttons I had left...I used some NQN ink and my aqua painter to darken it up a bit. The paper pieced scalloped background was made my punching out 6 scalloped squares with the Scallop Square Punch and trimming down the sides so they fit together nicely.

Have a wonderful day!

Thursday, November 12, 2009

Double Delightful Decorations

This card was inspired by a scrapbook page shown on page 26 of the Holiday Mini. They used Bella Blue Designer papers cut with the scalloped square punch. I really hadn't noticed the papers before and I just loved the colors and patterns used for holiday/winter theme. I paired the paper with one of my fav new sets...Delightful Decorations.
I created this card with an upcoming card class in mind. However...I started adding too many details like the textured background using the Perfect Details Texturz plate, the paper piercing, and fussing with the cord, etc... I decided if I were to do this in a class, where they would be making several, I'd have to come up something a bit simpler. Also, I didn't have any SU! ribbon that worked with my design, so I also had to change my colors and work with what I had on hand. Here's the card that my class will be making tomorrow.

As you can see, I used the same stamps and idea, but totally changed the whole look of the project. The top one looks elegant and the bottom one looks fun & festive...I like them both and I hope you do too! Have a delightful day!

Tuesday, November 10, 2009

Christmas Cheer

I heard a heartbreaking story about an adorable five year old little boy who is in his last stages of a 2 1/2 year battle with cancer. This year his family is celebrating Christmas early, and Noah loves to receive cards, so I got busy and made him one I hope he will like. I just loved this old fashioned image of Santa and his reindeer from the instant I saw it.If you want to hear more about this story here is the link. If you would like to send Noah a card, here is his address:

Noah Biorkman
1141 Fountain View Circle,
South Lyon, MI 48178 USA

His family has asked that if you would like to, you can also include $1 inside Noah's card which they plan to donate to the Make-A-Wish Foundation and to U of M for Neuroblastoma research. They have already received thousands of cards and gifts from around the world.

I inked the stamp using my Colorbox petal point chalk inks (which SU! unfortunately retired several years ago.) These inks worked perfectly in that I could easily color the area on the stamp in the colors I wanted without it drying too quickly and then I could still watercolor the other areas without the ink bleeding like it would if I had just used my markers.

Stamps: Good Cheer, Christmas Punch (hostess set)
Card stock: Ruby Red, Old Olive, Chocolate Chip & The Write Stuff Specialty paper
Ink: Colorbox petal point chalk inks, Old Olive & various for water coloring
Accessories: Aqua painter, Boho Blossoms punch, Earth Elements brads, Chocolate Chip & Old Olive grosgrain ribbon, mat pack, piercing tool

Thanks for stopping by and if you send a card to Noah, thank you for that as well!

Saturday, October 31, 2009

Happy Halloween!

I've been busy playing with Stampin' Up!'s new My Digital Studio program. I have a LOT of photos from our Halloween party from last weekend so I thought I'd make a scrapbook. Let me tell you...this is the quickest scrapbook I ever made! I learned quite a bit about the program as I went along...so it's been a fun learning experience.


I downloaded the Cast A Spell designer paper add on and used those for my background. I also used the Eat, Drink & Be Scary stamps on most pages as well. The cool part is that I could even add music...so turn on your speakers if you like Alice Cooper. ;-)


When uploading as a movie and viewing at such a small size, you lose a lot of the quality & detail of the original, so here are a few pages to get a better idea of what it looks like.


Have a fun & safe Halloween!

Wednesday, October 21, 2009

Autumn Thank You

Here's an Autumn thank you card made with the Bright Blessings jumbo wheel. I took the photo quickly before I popped it in the mail and the card is kind of at a weird angle...but you get the idea.
This was a quick and easy card to make. The hardest part was inking the wheel. All I did was roll it over my More Mustard ink pad and then just added additional color where I wanted it using my markers. The More Mustard background was dry embossed using one of the Texturz plates and my Big Shot, then I just sponged the edges with Chocolate Chip ink. A little paper piercing along the edge add some detail and a scrap of Autumn Meadows DP and some Old Olive Grosgrain ribbon added the finishing touch.

Thank you for stopping by...sorry I haven't been posting much lately or visiting any of your blogs, I've just been super busy! After this weekend things should slow down a bit for me, and hope to visit you soon.

Saturday, October 17, 2009

Provincial Thank You

Here's a thank you card I made for some friends who invited us on a wine tasting...touring several vineyards in Northern Michigan last weekend. We had such a nice time...good wine and lots of laughs with several good friends...what could be better? This grape image from the retired hostess set Provincial worked perfectly for their card.

After water coloring the image I tore it using my Tearing Edge...I haven't used it in a while, but it's a great tool when you want "precision tearing". lol Then I sponged the edges.

Stamps: Provincial, French Script & Teeny Tiny Wishes
Ink: Black Stazon, Rich Razzleberry, Elegant Eggplant & various for water coloring
Card stock: Elegant Eggplant, Soft Suede & Rich Razzleberry
Accessories: Modern Label, Eyelet Border & word window punches, Soft Suede grosgrain, Vintage Brads, Perfect Details Texturz plate, Aqua painter,Tearing Edge

Here's one of my favorite photos I took over the weekend. This was taken in Sutton's Bay. I bet this weekend the colors are at their peak...they were just starting last weekend, but it sure was beautiful!

Have a great weekend!

Thursday, October 15, 2009

Dasher & Some Christmas Punch

It's looking and feeling like fall and our house looks like Halloween. I'm in the middle of getting ready for our 20th annual Halloween party coming up next weekend...but I changed gears and have a quick Christmas card to share today.
I used the Movers and Shapers die to cut a window on the front and glued the Cute & Curly label inside the card, so it was tricky to get a good photo. (with the sentiment centered inside the window.) The snowflake background, punched out snowflakes and the holly jolly sentiment were created using the Level 2 Hostess set - Christmas Punch. I love that the snowflakes can be punched out using the Boho Blossoms punch!

I used my Soft Suede, Real Red & Old Olive markers to ink the stamps. I used red stick-on rhinestones to turn Dasher into Rudolf and add some bling to the snowflakes.

Well now I need to make like a reindeer and Dash on outta here! I have a million things to do today. Hope to have something more to share again soon...thanks for popping in today!

Friday, October 09, 2009

Autumn Lillies

Wow! I guess it's been a while, huh? I've been super busy and unfortunately just haven't been able to find a whole lot of time to stamp or blog recently. I have been doing some painting around here and what I thought was going to be a small job ended up being much bigger...I'm sure you know how those home improvement projects can go! Well, enough excuses, right!? I want to share a card I made for a friend and I think the colors are perfect for an Autumn birthday.
I started by embossing the lillies in gold (which doesn't really show up in my photo) and then water coloring them. The Really Rust layer is dry embossed using the Perfect Details Texturz plate and then a window was cut using the Movers & Shapers die.

Stamps: Fifth Avenue Floral, Teeny Tiny Wishes
Card stock: Pumpkin Pie, Really Rust, Soft Suede & Whisper White
Ink: Really Rust, Pumpkin Pie & Ruby Red
Accessories: Soft Suede Polka-dot Grosgrain, Modern Label Punch,
Perfect Details Texturz plate, Movers & Shapers die & Dew Drops

Have a wonderful weekend! I know I'm looking forward to heading up north with a group of friends for a tour of the local vineyards. I'm hoping for NO RAIN (at least tomorrow) and some beautiful fall colors.

Friday, September 25, 2009

Holiday Mini Catty Cruise

Welcome to the Holiday Mini Catty Cruise! You probably just sailed in from my talented friend Wendy Janson's blog, It's All About Stamping . Didn't she create some wonderful projects using the Delightful Decorations set and the matching punch?

The first stamp set that caught my eye in the new Holiday Mini Catty was the beautiful new set Serene Snowflakes. I just love snowflakes, so I knew this was the set I wanted to share on the Cruise. These snowflakes look just gorgeous embossed. My first card shows the largest snowflake embossed in silver on Night of Navy and Brocade Blue.

Here's the medium sized snowflake embossed in Iridescent Ice on Elegant Eggplant for another look.
The base of this card is made of acetate and stamped in White Stazon. I made a little matchbox filled with gift tags to match. (Sorry for poor quality of photo...it is really hard to photograph the clear card...I'll give it another shot in the morning.) Here's a close up look of the cute little gift tag matchbox. Wouldn't this be a fun little gift to give somebody? Everybody can use cute gift tags at Christmastime...and handmade ones are better yet. I have one more project that I didn't quit finish, but hope to share it here tomorrow.

In the mean time, please sail on to Connie Collins blog, Constantly Stamping and enjoy the beautiful holiday projects she has created using Decor Elements.

Photobucket

Favorite Layout From the Crypt

Happy Friday everyone! Time for another Stamp Something Challenge. Sadly this will be my last one as part of the design team. To stay in compliance with the new policy by Stampin' Up!, I had to step down...but I still plan to play along every chance I get! This week, continuing on with our "favorites" theme, you'll need to stamp something using a favorite layout or sketch. So I dragged out my favorite new Halloween set from the crypt. OK, so I didn't really drag it out from the crypt...the set is actually called From the Crypt.;-)

I'm always drawn to designs that feature a circular main image and lots of opportunity to use several different patterned papers, so I decided to give this sketch from Mojo Monday another shot.
I stamped the skull and spider images on Glossy card stock using Black StazOn, then I sponged on colors found in the Cast-a-Spell Designer papers...Pumpkin Pie, Perfect Plum & Certainly Celery.
I love to use my round scallop dies to create mats for my circles, but thought a jagged edge circle would look more appropriate on a spooky Halloween card, so I cut it once, then ran it back through my Big Shot after turning it just slightly on the die to create the jagged edge. To finish off my design I used some Pumpkin Pie Grosgrain ribbon and a bit of black fun fur yarn to lend another spooky touch.
Now it's time for you to get busy and go Stamp Something using your favorite layout. Have a wonderful weekend!

Tuesday, September 22, 2009

Autumn Greetings

Today is the first official day of Autumn, so I thought I would share a card created with my favorite new Autumn set and papers...Autumn Splendor and Autumn Meadows Designer Papers.
To create the multi color foliage, I used the poppin' pastel technique. To do this, I stamped the maple leaf image using VersaMark onto Very Vanilla card stock, then with a light swirling motion I brushed over them with my Stampin' Pastels. I used the same color pastels as were used in the papers to have a coordinating look.

Speaking of coordinating, the matching button was made by punching out a bit of patterned paper with the 3/4" Circle Punch and adhering it to a small Clear Button with some Crystal Effects. The "thinking of you" sentiment was stamped in Chocolate Chip using the Teeny Tiny Wishes set and punched using the Word Window Punch.

Thanks for stopping by today!

Friday, September 18, 2009

Razzleberry Roses

Good morning! I turned around and it's Friday again! That means it's time for another Stamp Something Challenge! Continuing with this months favorites theme...this weeks challenge is to use your favorite color combo and/or favorite papers. I used both for my card.
I love the Razzleberry Lemonade papers and the beautiful colors used in them...especially the Rich Razzleberry, so it was a pretty easy choice to pick these papers along with Rich Razzleberry, Melon Mambo and Crushed Curry for my fav color combo...today anyways! ;-)

I used the Manhattan Flower Embossing Folder and my Big Shot to create the main image. I used my brayer inked first with Pale Plum and rolled lightly over the embossed image. I went back with both Melon Mambo and Rich Razzleberry adding layers of ink until I was happy with the color. If you want to see a great tutorial on how to do the brayered roses, you should visit Patty Bennett's Blog . That is where I first saw this wonderful idea.

Also used for this card: Oval All stamp set with Scalloped Oval Punch, Organza Ribbon, Rhinestone brad, and the mat pack with Paper Piercing tool to add the piercing around the edge.

I hope you'll pull out your favorite papers and use your favorite color combo on a creation this week so you can play along with us at Stamp Something.

Have a great weekend!

Thursday, September 17, 2009

Delightful Eggplant Ornaments

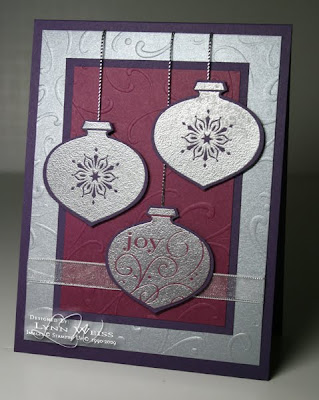
A quick post today to share a card I made last night. The new Delightful Decorations set with matching Ornaments punch is going to be a lot of fun to make quick cards and scrapbook pages with!
I love the combination of purple and metallic silver so I went with Eggplant, Razzleberry and Brushed Silver card stock, and Silver Embossing Powder for the ornaments. I used the Perfect Details Texturz Plate for the background.

Have a delightful day!

Friday, September 11, 2009

Embellished Circle Circus

It's Friday! You know what that means? Time for a Stamp Something challenge! This week we are continuing on with our favorites theme, and to play along you just need to stamp something and use your favorite embellishment(s). For me, it's hard to pick just one embellishment...but if pressed, I guess it would be ribbon. I LOVE the new polka-dotted grosgrain ribbon and I also love using brads...so that is what I used for embellishments on my card for this weeks challenge.

I had part of a "one sheet wonder" sitting on my desk I had stamped back when the pre-order stuff first came in using this years In Colors, so I used that. Circle Circus is a great set to stamp a one sheet wonder. I also love to use my punches to create embellishments. I used a couple of my circle punches and punched out the large Razzleberry circle, layered it and embellished it with a Filigree Brad and a Certainly Celery brad in the center. That's what I really like about the Filigree brads...you can use the silver brads that come with them or swap out a colored or rhinestone brad to match your project.

Stamps: Circle Circus
Cardstock: Bermuda Blue, Melon Mambo, Certainly Celery,Razzleberry Lemonade designer paper
Ink: Bermuda Blue, Melon Mambo, Certainly Celery, Rich Razzleberry
Accessories: 1-3/4" & 1-3/8" Circle punches, Bermuda Blue polka-dotted grosgrain ribbon, Filigree brads, Soft Subtle Brads, Mat Pack, Polka-dot Texturz Plate

Hope you'll play along with us this week at Stamp Something! Have a great weekend!

Wednesday, September 09, 2009

Autumn Splendor

Yesterday felt more like autumn...today feels more like summer...crazy Michigan weather! Anyways...playing around with some new goodies and here's what I came up with...with inspiration coming from this weeks Mojo Monday sketch.

I'm already in love with the gorgeous new Autumn Meadows Designer paper and the coordinating Autumn Splendor stamp set. I love the colors and the distressed look of the paper and the pretty detail of the stamps...perfect for watercoloring and other techniques.

I stamped the oak leaf image in Basic Brown, cut it out and watercolored it using my aqua painter and Classic inks. The Chocolate Chip card stock behind the leaf image was embossed with the Distressed Texturz Plate. I used a button from the Button Latte collection and attached it with a bit of Hemp Twine.

Thanks for stopping by...have a splendid day!

Monday, September 07, 2009

A Teddy for Paige

I read the story about a young girl named Paige on my friend Erin's blog. Paige was involved in a serious boating accident. Erin is hosting a card drive if you would like to help cheer Paige up by sending a card. Also, in an effort to raise some money to help with medical bills, my friend Denise and her company Whimsy Stamps are offering a special digital image called A Teddy for Paige. All proceeds from the sale of this image will go to Paige. Here is the card I made for Paige using the adorable "Teddy for Paige" image.
My heart goes out to Paige and her family. Hopefully receiving so many cards and know that so many people care will help cheer her up a bit during this difficult time.

Friday, September 04, 2009

Basket of Birthday Flowers

It's Friday...and time for another Stamp Something Challenge! This week to play along, you just need to stamp something using your favorite stamp set or image. I chose my fav new stamp set from the new catalog...Peace Within.
I water colored the image using my aqua painter and various colors of classic ink. The little birdie was stamped twice, cut out and popped up. I used my Big Shot and Perfect Details Texturz Plate to add texture to the background. I also cut the scallop using my Nestabilities set, the tag using Lots of Tags Sizzlet and the flower using the Daisies 2 die. I also used a few punches: Small Oval, Word Window and the Boho Blossoms to cut the center of my flower.

Card stock: Melon Mambo, Pumpkin Pie, Rich Razzleberry, Very Vanilla & Razzleberry Lemonade DP.

I know you must have a favorite stamp set or a favorite image...so I hope to see you play along with us this week at Stamp Something! Have a great weekend!

Friday, August 28, 2009

More Cow Bell

It's Friday...so that means it's time for another Stamp Something Challenge! This weeks theme is stamp something with an animal theme. Digital Delights by Looby Lou is our sponsor this week so I chose one of her cute images from the new Farmyard Collection.

This is a digital image, so I printed it twice...once on Whisper White and again on a piece of Thoroughly Modern designer paper so I could paper piece his spots and legs. The rest of the image I water colored.

Colors: Rose Red & Soft Suede
Accessories: Soft Suede polka-dot grosgrain ribbon, Vintage brads, Photo Corner, Modern Label & Word Window punches, and a little cowbell I had in my stash.

The whole time I was creating this card I kept thinking about the SNL skit "More Cowbell." It cracks me up so I thought I'd add a link here for your enjoyment. Hope you will play along with us this week at Stamp Something.

Thursday, August 27, 2009

Autumn Days in August

I sure have been slacking on my blog lately...sorry about that. Have had quite a few things going on around here...but not much in the way of stamping. I needed a masculine birthday card so that got me busy playing with my Autumn Days set.

This is such a nice set for manly cards don't you think? I stamped the sentiment from Teeny Tiny Wishes on the twill tape instead of using ribbon...it adds nice texture and doesn't look as feminine. To add texture to the card stock, I used my favorite retired jumbo wheel, Rough Around the Edges.

Colors used: Mellow Moss, Always Artichoke & Soft Suede

Thanks for stopping by for a visit!

Friday, August 21, 2009

Birthday Somethings

It's Friday again...and that means another Stamp Something Challenge! This week you must stamp something with a birthday theme, so I pulled out my new set Fifth Avenue Floral and stamped a feminine birthday card.
I embossed the ruffly cosmos images with White Embossing powder and water colored with my Aqua Painter and re-inkers to match the colors of the Razzleberry Lemonade papers. The "happy birthday" greeting is from the Teeny Tiny Wishes set.

I hope you can play along with us this week at Stamp Something...so get busy and stamp your birthday something. Enjoy your weekend!

Friday, August 14, 2009

Take a Hike

I hope you all have been enjoying your summer...I cannot believe that August is already half over...crazy! This weeks challenge at Stamp Something is to "Stamp Something From Summer Vacation" or with a summer theme. I decided to do a scrapbook page using photos I took last weekend while on vacation up north.
I used some natured inspired stamps from Penguin Pants to create the sign and the strip along the bottom. I inked the images in Soft Suede and stamped on Kraft card stock. For the title, I used my Big Shot and the Serif Essentials Bigz Dies and cut the letters twice - once from Thoroughly Modern DP and again from Mellow Moss to create the shadow. The other words were cut using Lipstick Love Letter Sizzlets. The background paper is Always Artichoke inked with the Rough Around the Edges jumbo wheel (retired) to add nice texture.

The photograph of my page shown here isn't the best...I have a really hard time photographing my pages...but the photos I scrapped were very nice. My favorite being of two fawns hiding in some ferns. If you would like to see them better, look here.

I hope you will play along this week with us and stamp something from your summer vacation. Enjoy you weekend!

Wednesday, August 12, 2009

Watercolored Blooms

It took me a while, but I finally broke down and got this beautiful floral set. I loved it from the start, but figured I already had lots of floral stamps, so I resisted. After seeing so many beautiful creations and realizing I didn't have a floral set to watercolor...I couldn't resist any longer! I had so much fun water coloring these flowers, so I'm sure you will see me using this set a lot.

I stamped the flowers with VersaMark on Whisper White card stock and embossed with white embossing powder. Then I used my aqua painter and re-inkers to watercolor the flowers and the background.

Stamps: Fifth Avenue Floral, Oval All
Ink: VersaMark, and various to watercolor
Card stock: Melon Mambo, Bermuda Bay, Whisper White
Accessories: Bermuda Bay Polka-dot Grosgrain, Scalloped Oval punch, white embossing powder, heat tool, aqua painter & X-acto knife (to cut slot for ribbon)

Sorry I've been posting so irregularly lately, but I've been busy enjoying the beautiful weather we've been having. Need to take advantage while we've got it, right? Thanks for stopping by to visit. :-)