Creations by Lynn Weiss ~ Independent Stampin' Up! Demonstrator

ENJOY ~ INSPIRE ~ CREATE ~ SHARE


Monday, April 30, 2012

Mixed Bunch Heart Easel Card

Today I have an easel card I created using some of my favorite products from the Occasions Mini...The Hearts Collection of Framelits, the Adorning Accents Edgelits with the coordinating Embossing Folders and the Mixed Bunch set with the coordinating Blossom Punch.

Just a reminder...today is the last day to order from the Occasions Mini Catalog...you don't want to miss out on any of the great products used here and many more. Visit my online store to place your order.

Have a great day!

Sunday, April 29, 2012

This handmade book is sure to melt the heart of any father who receives it. Each page features loving thoughts by the child or children about their dad, like; I know my dad loves me when… Each page also has room for photos that will bring back special memories for dad. And just to make sure that dad feels extra special, give him a gift card to his favorite place. When it’s given in this matching gift card holder, he will know just how special he is on his special day!

This special Father’s Day project comes to you designed by Carrie. To get the instructions for this project plus all the other projects featured this month, go to Craft Project Central and subscribe to April.

Saturday, April 28, 2012

Summer Smooches Note Cards & Gift Box

This set of pretty Note Cards and matching Gift Box makes a darling gift for just about anyone, and features a belly band for a fun twist! The box is deep enough to hold several note cards and envelopes. Make several sets and give them away and be sure to keep one for yourself!


This fun set using the Summer Smooches papers & stamp set was created by Laurie. To get the instructions for this project along with the rest of this months projects, get on over to Craft Project Central and subscribe to April.
The Summer Smooches promotion ends in just a few days, if you would like to get your hands on these great products, please visit my demo website.

Have a great weekend!

Thursday, April 26, 2012

Tea Time Gift Set

This Tea Box is perfect for Mother’s Day (which is only three weeks away!), as a teacher appreciation gift (school will be out soon too!), for tea drinkers or for anyone that you want to give a pretty little gift to! Makes for a fun class project too!

This pretty project comes to you designed by Heidi.

To get the instructions for Heidi’s project, just subscribe to April.

Wednesday, April 25, 2012

Workspace Wednesday - Plastic Drawer Makeover

Thanks so much for all the wonderful comments regarding my studio makeover on my first Workspace Wednesday posting last week. I even saw my room pinned on Pinterest (thanks Nancy!) so I guess that means I did a good job!

Today I want to share another view of my room. This first photo is taken from right behind where I sit to work. Look at the bottom right of the photo to see Stevie peeking out from where he had been napping on my chair. The other day Diana had left me a comment saying she was laughing while looking at my posts because it was like "Where's Waldo" with my cat. I think she is right! I didn't even notice him while I was taking the photo!

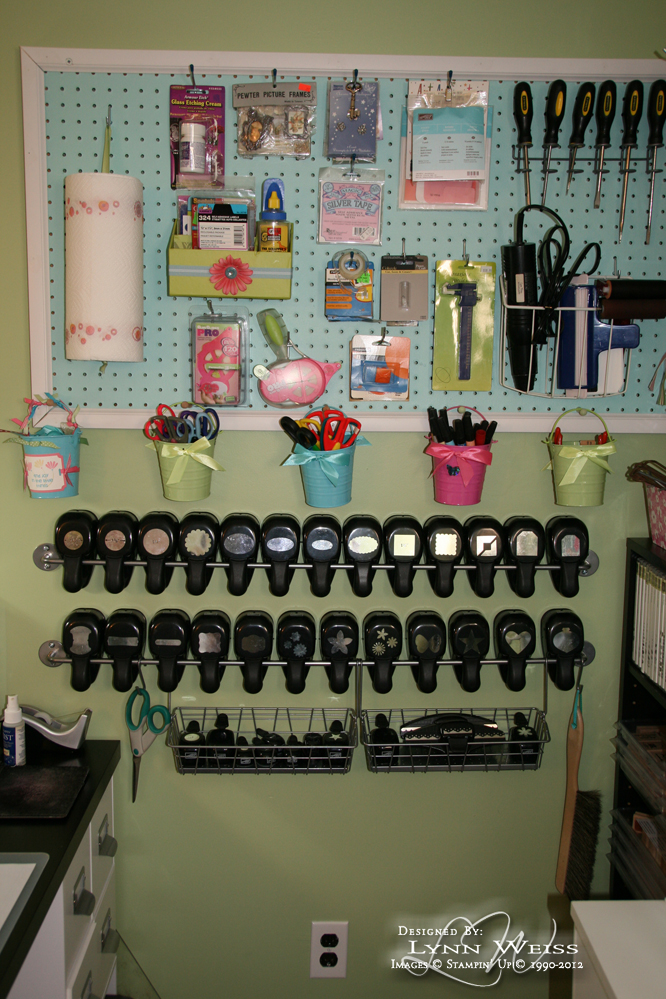
The shelving unit next to the door has stayed the same as before. It holds lots of books & magazines along with my ipod docking station (gotta have tunes while I'm busy creating!) and boxes of photos to scrap. Previously the three sets of plastic drawer towers shown above had been in my closet, so they were labeled and functional, but not much to look at. Once I moved them out into my room, the photo below is what I saw from my desk... I'm sure you'll agree they were not very pretty!
I didn't have another spot to put these and couldn't get rid of them...because look at how much junk good stuff they hold! So I decided to give them a make over with some pretty patterned paper to match my room. Now they are not only functional, but they also look clean and uncluttered. I really love how they turned out! If you would like to make over your plastic drawers this is what you will need:
First, I selected papers that matched my decor...and since I didn't have enough of the same prints in SU! papers for this project I bought some at the craft store...*gasp!* As it turns out, those lesser quality, lighter weight papers actually worked better for this project. Since they were not as thick they conformed to the rounded shaped of the drawers and ended up adhering better with not as many air bubbles. Lighter colored paper with more of an all over pattern looked best when dry as well, so you may want to consider this when choosing your papers.

After I selected my papers, I measured the drawers and cut them to size. (Note: It is better to cut the paper slightly shorter (about 1/16") than the depth of drawer vs having it slightly longer where it may rise even slightly above the plastic. If it's higher, eventually it will catch when opening & closing the drawers and the paper will easily start to come away from drawer front...don't ask me how I know! ;-)

After cutting to size, I then placed the papers into the drawers to get an idea of which papers looked best in which drawer position. After I liked the placement I repeated the same pattern on the other end set of drawers, and then slightly off set the middle set of drawers.

Because every brand of these type of drawers are going to be different, I am not going to bother giving you exact measurements, but I will tell you what worked best for me. My drawers are rounded and the handle juts into the inside of the drawer, so I had to cut a slit into each paper using my paper trimmer before adhering it.
Measure carefully both the width of the handle and where it is situated from the bottom of the drawer. You can make a scrap paper template if you wish. I found it worked best for my drawers to cut my slit approximately 1/8" longer than the handle actually was.
Next, you will need to remove the drawer and lay the front down on your work surface. Using a foam brush, apply a generous, but uniform coat of Glossy Mod Podge to the inside of the drawer front. (don't apply so thick that it gets gloppy)  I kept a damp sponge handy to wipe up any boo boos. My drawers are approx 13 inches wide, so there is about 1/2 inch on either side of the front that the 12" paper doesn't cover, so to those areas I did not apply any Mod Podge.
After the drawer front is covered with the Glossy Mod Podge, slide your paper into place. I smoothed out the paper lightly with my hand first and then used my bone folder to help smooth out any remaining air bubbles or ripples. I ran the bone folder along the surface of the paper right to the edge until the excess Mod Podge started to seep out the side, and then kind of burnished the edges with my fingertips using the extra Mod Podge that seeped out to help seal the edges.

After I got the main portion into place as shown above, I adhered the top portion around the handle into place last. Doing it this way I was able to fit the paper easily around the handle without getting any creases. (It took me a couple of drawers to figure this worked best for me...the first few do have a small crease or two, but even those are barely noticeable. Continue the process until all drawers are done. If you want extra protection, you can also cover the other side of your paper with a coating of Mod Podge as well. (I didn't...so hopefully it will hold up fine) Leave them open for approximately 24 hours to thoroughly dry before returning the contents to the drawers. While waiting you can create some labels for your drawers.
I used the label image from the Creative Elements stamp set and stamped them onto Avery mailing labels. I have a couple calligraphy tipped markers that are almost SU! colors so I used those to write the contents of each drawer. I sure wish SU! would sell markers in their colors with the calligraphy nib!  If you have scraps left after covering your drawers, use them to cover tin cans or small boxes to hold other supplies. Note: You can click on any of these photos to see a better detail if you wish.
I covered a couple tin cans to hold some of my paint brushes. A favorite old mug holds some colored pencils and some antique canning jars hold buttons and scraps of ribbon. The box in the center holds my card stock scraps...each file holds a different color family, and each pocket shares two colors. I've used this system for quite a while and it works out pretty well for me. The French memo board above is a project I made a while back...it holds cards I've received, photos, etc... You can read more about that here if you wish.

Here is another look from a different view.
Hope you have enjoyed this post! If you decide to cover your own plastic drawers I'd love to see how they turn out. If you have any questions, don't be afraid to ask. Thanks for stopping by today!

Monday, April 23, 2012

Bright & Cheery Greenhouse Garden

Here's a card I created for the Creating Pretty Cards Challenge over at Craft Project Central. Each month in addition to the great 3D projects that Craft Project Central have for you, they also host a monthly card challenge – Creating Pretty Cards!! This month is the 10th card sketch.

I used one of my favorite retiring sets...Greenhouse Garden along with the Hostess Set Perfect Words. I chose bright & cheery colors from the Brights Collection...Melon Mambo, Daffodil Delight, Pumpkin Pie & Rich Razzleberry. It's fun to have some Seam Binding Ribbon offered in Daffodil Delight...as you know I just {LOVE} that stuff! It's so easy to tie a bow and it's so soft that it doesn't make a big bump when mailing. This new ribbon is part of the Summer Smooches Suite which is a sneak peek from the upcoming new catalog.

I hope you are inspired by this card...I find it so much easier to create when I have a great sketch to inspire me first. So why don't you play along too...looking forward to seeing what you create!

If you like the Greenhouse Garden set but have not added it to your collection yet, you'll want to purchase it before it's no longer available. After May 31st it is retiring along with many other great sets. Click here to see the entire list.
 

Sunday, April 22, 2012

Tool Box Gift Card Holder & Card

Do you need the perfect box to give a gift card to a guy who works with tools? What about this Tool Box Gift Card Holder and Card? The tool box is complete with a working latch and tool tray. Inside there is a slot to insert that gift card and even room to maybe add some sweet treats or some small tools! The card is designed to look like a workshop pegboard with all the tools organized and hung. What guy wouldn’t love to get a gift card and a small gift in this cute little tool box?

This very creative project was created by Amanda. This is the bonus project for April so if you would like to get this tutorial just do one of the following:
  • Subscribe to two or more months in a row
  • Put the CPC badge on your blog
  • Refer a friend and let CPC know when they subscribe

If you would like to subscribe to the April edition of Craft Project Central just click HERE! You will get 10 fantastic tutorials for just $10!


Friday, April 20, 2012

Twitterpated Card Set & Tote

Give this pretty greeting card set to someone who loves to send out cards! Tucked into the tote are five different beautiful cards decorated with designer series paper, Dazzling Diamonds glitter and pretty pearls! The set makes a great gift for teachers and co-workers and would make a beautiful Mother’s Day gift too! 


This pretty set was created by Kim. To get this tutorial and 9 other fantastic projects, head over to Craft Project Central and subscribe for April.

Have a great weekend!

Wednesday, April 18, 2012

Workspace Wednesday - Rubber Room Reveal

Hello! I am excited to share my first Workspace Wednesday post! I decided to make a weekly post since I have so much to share. I think it will be easier to do a post each week showing the progress of my room makeover and how I have organized my tools and supplies. Hopefully you will find it helpful and maybe get some ideas to help get better organized along with me. If you have any questions just ask away and I'll answer them in my next installment of Workspace Wednesday.

It's been several weeks now since I took the plunge and decided it was time to makeover my workspace. Since I wanted to paint and get new carpeting, that meant everything had to be removed from the room. These were my main goals that I hoped to achieve by making over my space:

  • Less clutter/better organization
  • Lighter, brighter/more inspiring workspace
  • Have a desk where I could stamp with a friend without having to move to the next room
This is what my room looked like from the doorway on March 25, 2012. (the day before I started packing up.) 
BEFORE

As you can see, there were large pieces of dark furniture right up to the doorway. The throw rug was concealing a large India Ink Stain on the (ugly!) carpet beneath. Here's another angle shot from just inside the door way.
BEFORE

 Here's what it looks like today...
AFTER
I just love the bright, cheery color on the walls! Since my room is downstairs and only has one window, I didn't want to go too dark. I wanted a color that was just a little lighter than Certainly Celery...I was able to find that in this color called Fresh Guacamole. I also took a piece of Pool Party card stock with me up to Home Depot and had them color match that in a 2 oz tester and repainted my peg board with that. I also bought some wood trim which I cut and painted glossy white to frame my peg board to give it a more finished look. I used the same white to paint all the trim in the room as well.

I already had 8 of the Jetmax Craft storage cubes with the white shelf on top before my room make over, but I had to purchase 9 more to complete my room. I was lucky to get them at Michael's during their 40% off sale. I now have 6 of them on the back wall with the shelf, which is right behind where I sit. This makes it easy for me to swivel around in my chair to use the computer or have more space to spread out my projects while working.

Eight more of the cubes make the base for my desk. The top of my desk is was purchased at IKEA. It is their Vika Amon table top which measures 29 1/2 x 59 inches. It is quite sturdy and has a very nice finish on it. I also purchased a clear rubbery/plastic desk mat from IKEA to help protect my work surface. Speaking of rubbery/plastic stuff...I put that waffley Rubbermaid shelf liner stuff on top of my cubes before placing the desk top onto them. (good idea Mom!) This prevents the top from slipping and I didn't have to drill into my cubes or desk top to attach any sort of brace.

Here is how I was storing my punches before. Twelve were able to fit on this decorative curtain rod and then the extras went into the wire cart below.
BEFORE

After my visit to IKEA here is how it looks now.
AFTER
I purchased 2 Bygel Rails (2.99 each), 2 Bygel Wire Baskets ($1.99 each) and 1 pack of S-Hooks (.99). For only $10.95 + tax my punches are neatly organized and right at my finger tips. The rails hold 13 of the large punches (or 12 if you have the baskets connected to them). The baskets are perfect for holding the border and smaller punches. Thanks to whoever first came up with this genius idea of using these kitchen organization rods & accessories...it really is the perfect solution for storing my punches. Now you may be wondering how I plan to store the new style punches? I got that covered too...

As you can see, I don't have that many of this style (yet!), but the Jetmax 2 Drawer Cube with dividers works perfectly. If you remove one divider, 12 will fit perfectly in the double slot space. So...I still have room to add more! ;-)

Well, I've shared one corner of my room with you now. Hope you'll come back next Wednesday to see more. I'll answer any questions I may receive then too, so don't be afraid to ask. Today I hope to label the drawers on my cubes now that I have most things where I want them. Have a great day!

Tuesday, April 17, 2012

I can stamp again!

I'm still putting the finishing touches on my room. I have lots of labeling to do yet and I'm still trying to find space for some items...but it's getting there! Yesterday I had to make a few birthday cards, so it was the first stamping I've done in my new room so far. It's going to take a little while to get used to where everything is, otherwise I LOVE it! When I walk into the room for the first time each day it still surprises me. It's so bright & cheery and so much more open than before. I cannot wait to share it here with you all!

Since I have so much to share, I decided to do a post each Wednesday called Workspace Wednesday that I'll share photos and show what works for me as far as organizing, etc...I hope you'll check back tomorrow to see a little bit of my stampin' space makeover! Until then, let me share the first card I created in my new space, along with some of the goodies I picked up at IKEA last week.


I made this card for my son, so I was going for a masculine looking card. I used one of my favorite sets on the retiring list...Crazy For Cupcakes along with my favorite Hostess set this year...Happiest Birthday Wishes. The DSP is from the Brights Collection Paper Stack.

Have you ever been to an IKEA store? Up until last week I hadn't. I've been wanting to go for a long time because I've seen such great organizing ideas in other peoples craft rooms done with things purchased at IKEA. Plus someone gave me a good tip on checking there to get a desk top rather than using a door like I had planned. As it turned out, any standard sized door was going to be a little too long to use for my desk top, so I headed to IKEA. Here's some of what I bought.

All the goodies are resting on my beautiful new desk top. My favorite purchase, other than the desk top, has got to be the Bygel rails for my punches. (Look for more on that in my Workspace Wednesday posts! ;-) The white things in the back are sets of Kasset boxes...here's what those look like all put together.
I thought these were a really good buy...the largest boxes were on sale for only $6.99, and I think the smaller ones were $4.99. They come as a 2 pack in an assortment of sizes. The large ones are 13x15 and 11 3/4" high. I plan to use them to store 3-D paper items I've created for samples, or maybe scrapbook pages in progress, etc...They are intended for magazines so I may also store older scrapping mags in them.

If you are like me and have never been to IKEA, be prepared! It is HUGE and can be very overwhelming! Make sure to go to their website and make your shopping list ahead of time and that will be a real lifesaver. Don't forget to visit me tomorrow for my first Workspace Wednesday posting.

Sunday, April 15, 2012

Mixed Bunch Flower Pot & Double Pocket Card Set

Today I finally get to share the project I created as guest designer on Craft Project Central! My favorite set from the Occasions Mini is Mixed Bunch and I just love the words from Loving Thoughts so I combined the two. Hope you like it!


It’s a fun green project just in time for Spring! Recycle a can into a pretty pot holding a bouquet of flowers created using the Mixed Bunch stamp set. The whimsical pennant leaves stamped with inspiring words are the perfect accent. Make the matching double-pocket card, with a matching bookmark and tag, and give to someone creative in your life, or make it for your own craft studio!

To get the instructions for my project, plus all the other great projects this month, just subscribe to April. I'll be giving away a free April subscription to one lucky winner! Just leave me a comment here before midnight on April 16th and it could be you!

Friday, April 13, 2012

Spring Basket & Card

Who wouldn’t love this pretty Spring basket filled with a special treat and presented with the matching card. The set makes a great teacher, co-worker, or neighbor gift. Project includes instructions to make the pretty basket, flowers, paper bow and matching card! This is one that you’ll make over and over for a variety of different occasions!


This beautiful project comes to you designed by Amanda. To get the instructions for Amanda’s project, plus all the other great April projects, just visit Craft Project Central and subscribe to April.

Wednesday, April 11, 2012

Paisley Petals Note Set

Here is a pretty, yet useful note set I made using the Paisley Petals DSP and one of SU! clear mount stamp cases.


The post-it note holder is a clear acrylic photo frame with some paper cut to fit. This is a handy addition on my desk next to the computer, where before I was always searching for the post-it note pad that someone would walk off with (and forget to put back).
The case is handy to take with me to the store and the inner pocket keeps my lists, receipts and coupons handy. It's really helped me keep measurements, color swatches, etc...organized while I've been working on my studio makeover. Tomorrow I've got a trip to IKEA planned! Hopefully soon I'll have some photos or my room to share with you.

Thanks for visiting me today!

Tuesday, April 10, 2012

Summer Smooches Buckle Tote & Card Set

Do you need a quick little gift to give to someone just to let them know you appreciate them? Create this cute little buckle tote and card set, and make their day! The tote and cards are made with the brand new Summer Smooches Designer Series Paper, Bright Blossoms stamp set and more. The cards are perfect for just about any occasion and the project includes instructions for making matching envelopes as well! The set is a great gift for teachers, co-workers, you name it, and would make a great class project too.

This bright and cheerful project comes to you designed by Christy . If you would like to learn how to make this card set, you'll want to subscribe for the month of April. With your subscription, you'll get illustrated, step-by-step instructions for 10 wonderful projects for only $10! (You even have a chance to gain access to an 11th bonus project.) Visit Craft Project Central for all the details.

Sunday, April 08, 2012

Basketful of Cuteness

Happy Easter! It's a beautiful Spring morning here in Michigan. Expecting family this afternoon, so I know it will be a wonderful day! Hope yours is as well!

Check out this adorable project designed by Carrie. These Big Shot Softie Friends are easy to make and oh-so-cute! Every piece of each of the Softies is due cut using the Big Shot and a variety of dies. Any child would love to have a Softie Friend to play with! They would also make great gifts for a baby shower! Once you make one Softie and see how easy they are to make, you’ll want to make a bunch more!


For the complete instructions on how to make this basketful of cuties hop on over to Craft Project Central and subscribe to the month of April. Not only will you get this tutorial, but also 9 other great projects for the low price of $10 for the month.

UPDATE ON MY STUDIO MAKEOVER

I finished putting together the last of my cube organizers last night! All the large pieces are in place, with exception of the desk top, which I still need to purchase. Hoping to get that this week. I've got a lot of re-organization to work on, so that will keep me busy. Hope to have some photos of my room to share with you soon, but until then here's a shot of Stevie helping me put together my cubes.
Have a wonderful Easter, and thanks for visiting me today!

Friday, April 06, 2012

Baby Carriage & Card

Are you looking for a unique baby shower gift or baby shower favor? Make this super cute baby carriage shaped gift box and you have the perfect gift card box or goodie box to use as darling favors! Use the cute matching card as baby shower invitations, announcements, welcome baby cards, or thank you cards! After the celebrating is over, the lucky mom-to-be will want to hold onto the baby carriage and use it as a little keepsake box. 

That baby carriage box is just so sweet! This darling project comes to you designed by Monika. You can get the complete tutorial for this set when you join Craft Project Central for the month of April.

UPDATE ON MY STUDIO MAKEOVER

I'm still moving along on my room re-do. I'm at the point of moving things back into the room. Trying to keep it functional, yet still pretty and don't want it too cluttered, (which is difficult because I have so many things!)

Wednesday, April 04, 2012

Flower Pot Box

I'm excited to be a guest designer again at Craft Project Central for the month of April! Spring is here and CPC has got some great Spring projects for you this month...you need to check them out! 

To start off this Flower Pot Box is perfect for Mother’s Day or any special occasion. The Flower Pot Box would make a great favor for showers or other spring parties! Pair it up with the coordinating card and you have a cheery combo sure to put a smile on anyone’s face! This project is also a quick and easy class, club, or camp project!

I just love that flower pot box, don't you!? This adorable project is designed by Laurie. Get on over to Craft Project Central and subscribe to April and you can get the complete instructions for this set along with all the other fantastic projects this month...including mine. (I can't wait to share what I created, but I cannot just yet)

UPDATE ON MY STUDIO MAKEOVER

Thanks for the encouraging comments about my Rubber Room Renovations! I've got it all painted ...except for the baseboard trim. So it's getting there! A few of you asked me how to get paint in Stampin' Up! colors...It's super easy, just take a piece of card stock to Home Depot, or probably any paint center,  and they can color match it for you. I actually wanted a color a little lighter than Certainly Celery, so I was lucky to find a color called Fresh Guacamole that was just perfect...only it made me crave guacamole & chips the whole time I was painting! Mmmm...see what I mean? Fast, get me some chips!
Yesterday my hubby installed the carpet! It looks so nice and clean now...no more India Ink stain, WOO HOO! Today in goes the trim, hang mini blinds & curtains and then I can start bringing stuff back in. I also ran up to Michael's  yesterday because they have all their craft storage on sale this week for 40% off. I bought more of the white storage cubes, which wound up being only $20.99 each, a good deal and perfect timing for me. So if you need any of these, now is a great time to get them.  Here's a little sneak peek at the wall color & new carpet.
Stevie gives the new carpet two paws up! He looks very content relaxing here...maybe he was day dreaming of his online girlfriend Miss Boots? ;-)  Donna, I looked at the picture on your blog and your Boots looks so much like Stevie!

Have a good day all...I need to get downstairs and get busy with my room.