Creations by Lynn Weiss ~ Independent Stampin' Up! Demonstrator

ENJOY ~ INSPIRE ~ CREATE ~ SHARE


Showing posts with label Stamp Set - Labeler Alphabet. Show all posts

Tuesday, December 11, 2018

Snow is Glistening Advent Calendar

This project was a real labor of love. I had hoped to have it completed by December 1st, but it took me much longer than anticipated. I am really happy with the way it turned out though. The best part was giving it to my sweet granddaughter yesterday! Right now she is still a little young, but I hope it will become one of the holiday traditions she looks forward to each year. Here is the finished piece, along with lots of other photos below.


This is a kit from Kaisercraft that I purchased quite a while ago. I had forgotten I even had it but came across it when cleaning my studio one day this past summer. Wish I had started it then! The kit comes with a balsam wood frame, drawers and numbers made of chipboard, BUT absolutely no instructions! It only has one photo showing what it looks like completed. I thought perhaps my kit was packaged without the instructions by accident, but after searching online I found others complaining of the same thing. Unfortunately before I could get to the fun part of decorating there were several grueling steps that were required to start with. Let me tell you...this first part was absolutely NO FUN at all! I will share how I put this together to hopefully help others.


First, the wood parts came connected which required them to be cut apart. If I had access to a band saw it would have been a piece of cake. Instead, I had to snip each piece using tin snips. Honestly my hand hurt for days afterwards. I saw many others who created this project saying they used a pair of  Tim Holtz scissors which cut through easily...but I didn't have those. I tried my old SU! rubber cutting scissors but those didn't work, so I went with the tin snips. Each little nub had to be sanded afterward in order for it to fit into the slots on the main backing piece.


After the cutting and sanding, there was the task of painting each piece. I used red acrylic paint. I was careful not to paint the nibs or allow paint to drip into the slots. These pieces fit together quite snugly and even the slightest amount of paint would make assembly very difficult. As you can see, I wasn't too concerned about even coverage in the center of the piece because I knew that would be covered. After 2 coats of paint and allowing it to dry overnight I assembled the frame. Despite being careful while painting, several of the small pieces had to have the nibs sanded down to fit into the slots on the frame to create the cubbies for the drawers. After all the pieces were in place, I carefully applied wood glue to the slots from the back where each piece joined the wood backing frame.

Finally I could get to the fun part! I picked several patterned papers for the drawers...mostly retired SU!, but I also used a line from Simple Stories called Oh What Fun! that had adorable little characters like snowmen, reindeer and penguins on it. I cut each strip to cover three sides and a square of each for the back side to cover the seams.

The 3/4" Circle Punch worked perfectly for the notch in the center of each drawer. I used Tombo Multipurpose Adhesive to assemble the little chipboard drawers. As I assembled them I attached a small rubber band on each one to allow the glue to set. I also used the same glue on most of the paper so it would easily slide into place on the chipboard, but on each end I also used Tear & Tape Adhesive as well. This helped add strength to the drawers and really held the paper in place while the rest of the glue dried.

I decorated each drawer using a variety of punched and fussy hand cut pieces. Each one is numbered using die cuts, stickers and the Labeler Alphabet stamp set. Even though the kit came with nice chipboard numbers, I didn't use them because they were quite large and left little room for other embellishments.


After decorating all the little drawers I created a winter scene to fit into the center. I used the Snow Is Glistening stamp set embossed with White Embossing Powder for the trees and the coordinating snowflake dies for both this back ground piece and for many of the little drawers. Here's a closer look at the drawers...


and the bottom drawers...
The center part has some Evergreen Sprigs, Red Polka-dot Ribbon and some charms that were available from SU! during previous Holiday Catalogs.

The 3-D resin Santa figurine was something I found in my stash of craft supplies...not sure where I got it? He's holding one of the snowflake charms that were available last month with the Snowflake Showcase of products.

More detail on each of the little drawers.

The drawers are large enough to hold two little candies each


Next year when Madelyn is a little older, it will be fun to fill it with other little items besides candy. For now, I think she enjoyed looking at all the little drawers and eating the Reeses Peanut Butter cup.


Now that I have this project finished I can concentrate on getting other things done. It's such a busy time of year! Thanks for taking the time to visit me here.

Monday, March 19, 2018

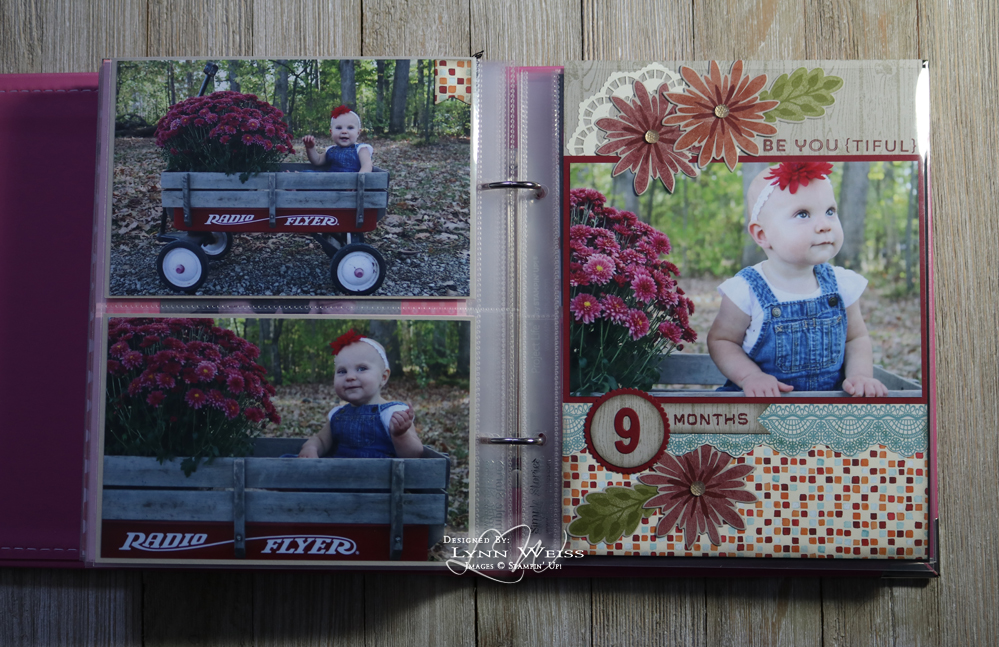
BE YOU (TIFUL)

One of my favorite photo sessions with my grand daughter to date was on this warm fall afternoon as we took her for a walk in our vintage radio flyer wagon. She was wearing little denim bib overalls and she was so happy being pulled around and taking it all in with her big wide eyes.


I used the retired Flower Patch stamp set and dies along with Painted Autumn DSP.


These photos are so cute I didn't want to crop them or add too much to them. They are just matted to fit into the pockets and a bit of the DSP was added to the corner of one photo. I plan to create a two page 12x12 layout in the future using these same photos. That way I can add more embellishments and some journaling to the pages.

Thanks for visiting.

Monday, March 05, 2018

Spooky Cat and a Bootiful Baby

Here we are on another Monday...and I have a four new scrapbook pages to share. The first two are from Maddy's 1st year album using Project Life pocket pages and the next two are traditional 12x12 pages. All four pages use items from the Spooky Night Suite of products that were in the Holiday Catalog.


I love the pop of Berry Burst used in this layout! While the Spooky Cat stamp set and the coordinating Spooky Night papers are no longer available, the Cat Punch is. I'm wondering if there is going to be another cat set in the next catalog that it will coordinate with?


Here's a look at the two pages in the album. I used the Labeler Alphabet to create titles for these pages and the next pages as well. For her 1st Halloween, Maddy couldn't have just one outfit! She was stinkin' cute dressed as a skunk, bootiful in her black cat jumper and even the cutest pumpkin in the pumpkin patch!


The scallop along the bottom was created by punching out circles of Spooky Night DSP with a 1" Circle Punch. I loved how the layered "bootiful baby" turned out for the first 8x6 page so I duplicated it for this page as well. I used the Stitched Shapes and Layering Ovals Framelits with the spiderweb label stamp included in the Spooky Cat set. Here's a closer look.


The pumpkin shown in the above photo was one I decorated several years ago using Black Flourish Designer Jewels.  All the details can be found in this post. You may also recognize this next page that I shared here back in October before I had any photos. Along with the sweet photo of Maddy, I also added a bat punched from Black Glimmer Paper to coordinate with the other page.


Here's a look at these two pages together. Make sure to click on these photos for a better look.


Thanks for joining me on another "Maddy Monday"!

Monday, February 26, 2018

You Make Me Smile

It's Monday again already! Also know as Maddy Monday at our house! Here are a couple more pages from Maddy's 1st year album. I just love the photos from this shoot. She looked so cute in her black lace tutu and she was in such a giggly mood that day. Her mama was off to the side making her laugh.


The "you make me smile" sentiment from Colorful Seasons was perfect for these pics as was the black lace trim which was from the holiday catalog a couple years back.


A couple more simple pages. I did fussy cut the little banner on the bottom left photo. It was cropped from another photo. Here's a closer look...


You may recognize the items used to create the canvas banner? Most of the supplies are all retired now. I loved those blank canvas banners! This one spells out Madelyn. I made it to hang in her room, but used it in a couple photo shoots first. I will share more when I scrapbook those photos.

Have a HAPPY Monday!

Monday, February 19, 2018

Pool Party Panda

Here we are on another Maddy Monday! I've got a few more pages to share from her 1st year album. This first page features one of my favorite photos I have taken of her so far. It was right after getting out of the pool and she had on an adorable panda towel...so I'm sure you can guess, without even seeing the page, which stamp set I used...


I used Layering Circle and Stitched Shape Framelits along with the Party Pandas stamp set to create this simple, yet cute page.  The page opposite of this in the album is a Father's Day page. I used Vintage Leaves and Thoughtful Banners stamp sets for that page. Here's a look at those two pages in the album.


The previous two pages feature Mother's Day photos. Here's a look at those pages as well.


I created a tone on tone paper for the background using the Flourishing Phrases stamp set and then die cut the pretty coordinating flourish using the Flourish Thinlits. I just love the pretty lilacs shown in the background...I sure am looking forward to Spring and all those blooms!

Monday, February 12, 2018

Maddy Monday - Baby's 1st Christmas Pages

Last week I shared a couple pages from the scrapbook album I made for my sweet granddaughter Madelyn. I think in the coming weeks, each Monday I will share another page or two and call it "Maddy Monday". Most people dread Mondays but I actually look forward to them because I usually have my Madelyn for the day.


I used mostly all retired Stampin' Up! products to create these pages. I'm so glad I still had some of the adorable Snow Festival Christmas paper left. The Primrose Petals color used ties in perfectly with the pink album...and of course the ornament print and Cherry Cobbler color work well with the photos. I used the Christmas Bliss set to create the title and the Labeler Alphabet for the month tag.


She loved being inside the big "present" I created for these photos. She would crouch down and then pop her little head up, playing peek-a-boo like the cutest little jack in the box ever! It sure is fun having a little one around again! (Especially one that goes home at the end of the day when Grandma is tired! ;-)

The adorable little reindeer tag adds the perfect playful touch...the DSP had a whole sheet of different tags...each one cuter than the next. Here's a look at the two pages together. I wish I would have photographed some of the elements before slipping them into the page protectors...hate the glare. Oh well...you get the idea.


Need to go child proof the living room before Maddy gets here...have a GREAT day!

Wednesday, February 07, 2018

Baby's First Birthday Pages

In January our darling little granddaughter turned a year old. This past year watching her grow and hit each milestone has brought such tremendous joy into our lives! Grandbabies really are the BEST!

I've been working on an 8x6 Project Life style album to keep track of her first year. Each month I would set up at least one photo shoot to capture her monthly photo and then I would add them to her album. My goal was to have it finished and ready to give her in January, so I spent a large chunk of my stamping time this past month finishing her album. Here are the last few pages.


No party is complete without balloons and the super cute Party Pandas! I used the little confetti stamp to add interest to the background of my page, stamping it in both Pink Pirouette and Regal Rose (retired).

I used papers from Echo Park's Bundle of Joy throughout the album and Regal Rose is a good match to those, so I also used some prints from the retired SU! Brights Pattern Stack from many years ago...I had about 1/2 sheet of each pattern in the Regal Rose so I used it sparingly...here on the balloon and also on the 12 month circle. I used the Labeler Alphabet a lot throughout this album, it's perfect for little titles. Speaking of titles, the "birthday girl" title is a stamp from the retired Hello stamp set. I keep anything I know that I can use in my scrapbooks.


Here's how the page looks in the album. To the left are a couple pocket pages, one is for journaling...I left that for Maddy's Mom to write and the other shows a photo of her beginning to walk. Now just a short month later she's everywhere! I used the Balloon Bouquet Punch to punch out various patterns of paper. 


The last page of her album shows her enjoying her birthday cake in a hot pink tutu. I used some retired SU! products to create this page...including Pretty In Pink cardstock and the Banner Blast and Party Pants stamp sets. Those were both free Sale-A-Bration sets from a few years ago. You can still get current Sale-A-Bration products right now...including the fun Party Panda set!

If you would like to see more pages from this album check back in the next couple weeks...I plan to share more. I also did a post a while back sharing many of the pages before the photos were added. You can see that here. 

Tuesday, October 31, 2017

Painted Autumn Pumpkin Patch

Happy Halloween! Instead of an autumn scene, like on this card, I have more of a winter scene going on outside my window right now. That white stuff is coming down like crazy! Luckily, so far, it's not sticking, but melting as it hits the ground.

This is a card created mainly with Designer Series Papers...all but the spooky cat are part of the Painted Autumn pack of papers. I created the "Happy Fall" sentiment using the Labeler Alphabet and then added some texture using the Timeless Textures stamp set.


Don't forget...today is the last day of the Designer Series Paper Sale!

Monday, October 30, 2017

Delightful Daisy So Very Loved

I think that the Delightful Daisy Designer Series Paper is my favorite paper from this years catalog (at least right now!)  When I first saw these papers I knew I had to scrap the photos I had taken of my sweet granddaughter just a month before the catalog came out. She was wearing an outfit that matched the colors in the paper and she was even holding a daisy!


I cut eight 3-1/2" squares of DSP to create the background for my page.. A 2007 Sale-A-Bration set, So Very was used to create a title, which is embossed in white on Night of Navy. I used the very handy Labeler Alphabet set to stamp the words on my list next to the largest photo. I used the tiny daisy image in the Daisy Delight set to create the bullets for my list and the largest daisy image with coordinating Daisy Punch for the large daisy embellishment. The center is one of the pretty Gold Faceted Gems. Here's a closer look.


Originally I had planned to use just one photo on this layout, but couldn't decide between two of the photos...so I ended up cutting 3 photos down into small squares using the Stitched Shape Framelits, and placed those photos along the bottom. 

Can you spot "something Stampin' Up!" in the photos themselves? I made little Maddy a bunch of headbands when she was only a month or so old using felt and the Spiral Flower Die. You cannot see in the photo, but there is a large Iced Rhinestone jewel in the center. Babies need bling too! (Both the die and the rhinestones have been retired, so they are no longer available)

After I was finished with my layout I realized I hadn't included the date or age of Maddy, so I used the Tiny Tag set with it's coordinating punch (both retired) and wrote her name and age on the tags which are hung from the bow created using Daffodil Delight Seam Binding Ribbon.

I used pretty much the same layout for a Halloween page using the Spooky Night DSP shown here.

If you too love these papers...you can get them for FREE!


But hurry...the Buy 3 Get 1 FREE Sale ends tomorrow!

Monday, October 23, 2017

Owen's Baby Bear

I went to a baby shower over the weekend and here is the card I made to go with the baby gift.


The adorable Baby Bear stamp set was an obvious choice. The color combo used is Basic Gray, Smokey Slate and Lemon Lime Twist, and it matched the diaper bag I gave for the gift perfectly! I like to buy a diaper bag and then use that as the "gift bag" to hold the rest of the baby gifts I give. I add lots of fluffy tissue tucked in between the gifts and always attach a cute toy and my card or tag to front of diaper bag to "embellish". I meant to take a photo to share with card, but I forgot.

I used the Layering Squares Framelits to cut both the Whisper White square and the scalloped square. I was able to create a personalized banner using the Labeler Alphabet & Thoughtful Banners stamp sets. The mommy-to-be loved that her babies name was on the card.

The Basic Gray & Black Bakers Twine was from last years Halloween combo pack of twine, so it's no longer available. The button was something I had in my stash and the color is a close match to Lemon Lime Twist so I used that as well.

Friday, October 20, 2017

Spooky Cat on a Spooky Night Layout

This is a great layout to showcase all the different patterns in a collection of paper. This page is all ready for a photo of my grand daughter on Halloween...who I'm sure will be more cute than spooky. I used the Spooky Cat Bundle (stamp set and cat punch) along with the coordinating Spooky Night papers.


The paper includes a sheet of squares with the spooky tree and full moon, all ready to stamp the owl if you choose. I cut all the other pieces the same size as this square.


I used the Labeler Alphabet to create my title and to make the BOO banner. I stamped the title strips with the pattern stamp from the Spooky Cat set...love that little stamp to add a little texture. The pumpkins and witch's hat were fussy cut from the Spooky Night DSP.


The little rat running across the pumpkins is a stamp included in the Spooky Cat stamp set as well...this set really is versatile and as you can see, works spooktacularly well with the DSP. The cat is punched out from the Spooky Nights paper and all I had to do was color the details on his face. The black Vintage Crochet Trim is part of the Spooky Night Suite which can all be found on pages 52 & 53 in the Holiday Catalog.

If you order 3 packs of Designer Series Paper right now, you can receive this pack (or any of the others offered) for FREE!


Thanks for visiting! Have a spooktacular weekend!