Creations by Lynn Weiss ~ Independent Stampin' Up! Demonstrator

ENJOY ~ INSPIRE ~ CREATE ~ SHARE


Showing posts with label Altered Items. Show all posts

Monday, June 25, 2018

Enjoy the Ride Travel Themed Tray

Today I have a fun project to share that I've been working on a little at a time over the past couple weeks. I'd add a few things here and there and play around until I liked it. I finally decided it was done (for now) and adhered everything into place over the weekend.


This piece was created to hang in our vintage camper. (we are still in the middle of renovating...and that's a whole other story!) Anyways...I found this 7 Gypsies Tray at a garage sale, brand new for around $4 everything else I had in my stash. These trays were super popular maybe 8 or so years ago? I remember that Stampin' Up! sold one in black for a little while...I think it was part of a kit. Not sure if you can still find these for sale anymore...other than garage sales that is! lol

Each compartment inside the tray measures 4x6 so that works out perfect if using photos or in my case beautiful DSP. The top 3 compartments I used a half sheet of gorgeous paper by Webster Pages from the Strawberry Fields line. I love the "always take the scenic route" quote...not in love with the die cut butterfly I added...might be swapping that out for more realistic shape.


The scrabble tiles were also a garage sale find...I think they are the perfect touch for this travel themed tray. I made the flower in the bottom corner using the now retired spiral flower die and added a Vintage Brad to the center...I think maybe those were my all time favorite SU! embellishment. They were a little bulky for cards, but I love them for 3D projects like this.

Thanks for visiting!

Monday, May 28, 2012

More Altered DVD Cases

It's been quite a while since I posted...did you miss me? I'm sure nobody noticed but the spammers...seems I get an abundance of spam messages when I don't post regularly...not sure why that is??? I've been busy working outside since we've had such beautiful weather here, so not as much time to stamp.

Anyways...I have some more of the altered Stampin' Up! Clear Stamp DVD Cases to share with you. These make such a nice little gift for someone...perfect for end of the year teacher's gifts, or maybe a stampin' friend to keep track of their wish list in the upcoming new catalog, etc... Everyone I've given them to so far have really liked them. It's been fun for me to make them because I used some of my favorite retired DSP.


The case on the left uses LeJardin papers and the one on the right, Spice Cake. Here's a look at the inside.

I couldn't find pads of paper the right size to fit inside, so I bought 5x8 pads at Staples and had them cut down to 4 1/2 x 7 so that they would fit inside the case along with the pen. (Note: next time I'll be sure to emphasize that it is the RIGHT side I want cut & NOT the margin side.) The pens are Pentel RSVP pens and I inserted a rolled piece of DSP into the barrel so it coordinates with the set. The pocket is perfect to hold receipts, coupons, etc. Here's a couple more...

The case on the right uses Thoroughly Modern DSP and the one on the right, Sweet Pea. Here's a peek at the inside...
For all four cases I also used: Adorning Accents Edgelits Die, Labels Collection Framelits, Designer Frame Embossing Folder, Letter It Alphabet - embossed with White Embossing Powder & coordinating Seam Binding Ribbon.

I thought you might like to see a family that has taken up residence at our house this Spring.
A Robin built this nest on the top of a grapevine wreath I have hanging on the side of our garage. I've tried not to bother them, but I have been checking on them each day and I think there are 4-5 of them in there. They sure keep their parents busy...they are constantly flying in and out of the nest feeding them. Guess who else is extremely interested in this nest...
That's our barn cat Stinker...I sure hope he doesn't get them! Once those babies get bigger and really fill up that nest I'm also worried they'll fall right out...look at how the nest is attached to the top/side of the wreath...I sure hope mama knew what she was doing when she chose this spot.
Have a beautiful day!

Wednesday, April 11, 2012

Paisley Petals Note Set

Here is a pretty, yet useful note set I made using the Paisley Petals DSP and one of SU! clear mount stamp cases.


The post-it note holder is a clear acrylic photo frame with some paper cut to fit. This is a handy addition on my desk next to the computer, where before I was always searching for the post-it note pad that someone would walk off with (and forget to put back).
The case is handy to take with me to the store and the inner pocket keeps my lists, receipts and coupons handy. It's really helped me keep measurements, color swatches, etc...organized while I've been working on my studio makeover. Tomorrow I've got a trip to IKEA planned! Hopefully soon I'll have some photos or my room to share with you.

Thanks for visiting me today!

Saturday, March 24, 2012

Fresh Vintage Note Case Giveaway

I cannot believe that there is only one week left of Sale-a-Bration! My absolute favorite SAB item this year would have to be the Everyday Enchantment papers! Love {love} LOVE them! Of course the coordinating stamp set Fresh Vintage is a favorite as well. I used both of those along with the Loving Thoughts set from the Occasions Mini to create this pretty, and very useful, notebook set. I will be giving this set away to a lucky winner! Read on for all the details...


This is one of Stampin' Ups! clear mount stamp cases decorated to hold a matching pen and note pad. Use it to jot down your wish list, draw up sketches or write down ideas for future projects.
Then keep your notes, coupons, etc... in the handy inside pocket.

Now you may be asking how can I win this? Everyone who places their SAB order with me this week (March 24-31st) will be entered in a drawing to receive this. (The winner will have their correct initial on it...so don't worry...your name doesn't have to begin with an "L" to enter. ;-) Each $50 SAB order will receive 1 entry. If your order totals $150 or more...you will also receive one as an extra hostess gift from me (along with your other Hostess Rewards).

Place your order by contacting me today or visit my online store. Hurry...there's only one week left to place your SAB order! I'll announce the winner here on April 1st.

Have a great weekend!

Wednesday, March 03, 2010

Balmy Breeze Travel Journal

Today is the big day! We are leaving on our long journey to Hawaii! I am not crazy about the idea of such a LONG flight, but I am sure it will be worth it! I made this little journal so I could keep track of where we go and things we do while we are on vacation.

I started with a little notebook I bought at Target a while back. (not sure if they still have these?) I used one of my favorite old retired sets, Balmy Breezes. I stamped the palm tree image using Basic Brown ink and watercolored it. Then I added a few more images, also stamped in Basic Brown, for a collage type feel. I inked the edges and then inked the whole thing in VersaMark. I embossed it with Glassy Glaze, and repeated this two more times to do the cracked glass technique. Once it has been embossed with the Glassy Glaze, stick it in the freezer for about 5-10 min. After your image has been chilled, remove from freezer and quickly bend your image until it cracks the glaze. You may need to chill and repeat to get the desired effect.

I like using this technique on 3D items that I know will be handled quite a bit because it protects the image and it looks really cool besides. Inside the Antique Brass Hodge Podge Hardware label (retired), I used the "journey" stamp from the Define Your Life set. I used a couple coats of Glassy Glaze over this as well, but did not crack this piece. On the background of my book I used French Script and more images from Balmy Breezes, and then inked the edges of my book for an aged look. I attached my finished pieces with Sticky Strip so they will hold well.

Aloha!

Thursday, March 26, 2009

Delicate Dots Hostess Gifts

We are getting new wood flooring installed today. I'm so glad this will finally be done as we have had our house torn apart for too long...over two weeks! It took longer than anticipated for the flooring to come in, and we had the old carpet torn up, furniture moved etc...It should be all done tomorrow! Today I'm kind of hanging in my computer room so I'm out of the way, but handy if the installer has any questions. So I thought I'd share a couple projects and then check out some of my fav blogs.

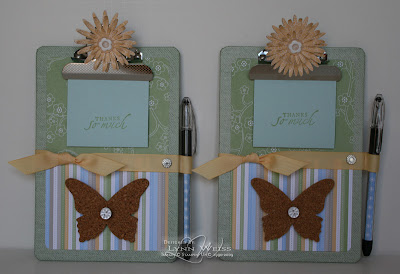
With the help of my Big Shot I decorated these clip boards as hostess gifts for my March hostesses. I used the Delicate Dots paper and the So Saffron grosgrain - both available as FREE selections during SAB, to decorate these clipboards. The Beautiful Butterfly is a Bigz die, so it allows you to cut through all sorts of material - including the cork board shown here. The base layer of the flower is cut from chipboard so that it will hold up better than just paper would on the clip. To make the pen holder more secure, I punched a hole right through the clip board and inserted a large brad from the Styled Silver HPH Kit. That will keep the ribbon from slipping.

See the tack in the center of the cork butterfly? That was a regular flat headed tack and I just attached one of the cute buttons from the Button Latte pack with a glue dot. I used another button for the center of the daisy.

I also demoed this matching card at all my March workshops. Stamps: Cute & Curly
Card stock: Certainly Celery, Bashful Blue & Delicate Dots DSP
Ink: Certainly Celery
Accessories: Curly Label & 1/2" Circle punches, Rich Regal brads, Certainly Celery twill ribbon (SAB ribbon bundle), Top Note and Daisy Bigz Dies & the Big Shot

Enjoy your day!

Tuesday, February 10, 2009

A Little Yummy

I'm excited to show you more from my SAB~New Catalog party I had over the weekend! I had such a good time...and from the feed back I've received, so did everyone who came. I had door prizes, make & takes, goodie bags for everyone who placed an order and these cute little yummy bags for everyone who came.I decorated the canister and the candle jar with Decor Elements. I ended up using the canister to hold door prize tickets and I gave away a jar candle during each session after showing how to apply the Decor Elements. Can you believe I found the yummy white chocolate scented candles at my grocery store? The Latte Buttons matched perfectly and with a bit of Linen Thread added a sweet little accent to both the candle and my canister. I so want that beautiful new tree Decor Element for my wall.


These are the little goodie bags that each person got to pick after they placed an order. Each bag is filled with patterned papers and coordinating embellishments. I used the new Lots Of Tags, Sweetest Stem Embosslit and Buttons dies, along with some punches to make each pack. The Yummy set works just beautifully with the Top Note die, and it sure helped me create some cute give aways for my party! Almost everyone who got to choose a free SAB set choose Yummy...so I guess I'm not the only one who thinks it's too cute!

I had a few questions regarding the little Scalloped Envelope purse I showed you yesterday. I plan to make some more of these for little Valentine treats, so hopefully I'll get to it later and snap some photos as I'm making one to give you a better idea of how it goes together. Have a great day!

Thursday, December 18, 2008

Framed Snow Swirled

I told you I've been getting a lot of use out of my Snow Swirled set! This is a little something I made for my upline & downline this year. We had our little stampin' Christmas get together last night, so I can show you without ruining the surprise.
The white frame was decorated with Ski Slope paper and a small Felt Flurry with a Build-a-Brad center. The tree was embossed with glittery white embossing powder...and really sparkles in real life.
I made the gift bags out of a catalog sized envelope. They each have a snowflake cut out of a 4" coaster using the Big Shot and the large Snowflake die. They are embossed and then added a Snow Flurry and rhinestone brad to the center.
I also put a little sampler pack of some embellishments together and tied it with a cute little punched reindeer tag. I'll tell you how I made him tomorrow. For now I need to run...so many more Christmas projects I need to get done...so little time! Have a great day!

Saturday, December 13, 2008

Christmas Hostess Club

Last night was my December Hostess Club meeting. I prepared some festive non-card holiday projects for the group. (I guess I couldn't bear doing another Christmas card this week!) You may remember the Thanksgiving frame I shared here a couple weeks ago? We did a Christmas version of that using the Ski Slope papers and Little Felt Flurries.
This time instead of using the On Board Book Basics, I used the Long Board Chip Board made for use with the Big Shot. (I found out after the fact that the Book Basics are a little thicker and not recommended for use on the Big Shot.) I certainly don't want to hurt my beloved Big Shot or my Top Note die! I didn't take a photo of the back this time, but if you check out the Thanksgiving version is shows the pocket for the photo and the stand created from chipboard using one of the Sizzix tag dies.


We also created this darling little ornament using the penguin from Punch Pals.
This is one of those little favor tins with the clear lid. Using White Stazon, we stamped the lid with the snowflake from Season of Friendship. A piece of Ski Slope paper was cut into a circle using the Coluzzle and adhered to inside of tin with Tombo Multi Adhesive. The penguin was stamped on Shimmery White, watercolored, cut out and adhered to the back with some stacked pop dots for extra dimension. Iridescent Buffalo Snow and some Clear Micro Beads were added to the inside, the then tin was sealed with some Sticky Strip around the outside of the lid. This also held the Baha Breeze Striped ribbon in place, and it was knotted at the top. Silver cord inserted before the ribbon was knotted acts as the hanger.

I made these Christmas boxes using the Scallop Envelope Bigz Die for each of my clubbers.
The box is made by attaching 4 of the scallop envelopes together. I wheeled each one with the Bold Snowflake jumbo wheel and finished them off with the cute images from the Deer Friends Level 2 Hostess set. Here's a closer look:
Inside the box was a snowflake ornament created with the large Snowflake die and 4" square coasters. Each one was embossed and finished with a Felt Flurry and rhinestone brad. Of course there was also chocolate in the boxes as well!

Have a wonderful day! Looks like we're in for another c-c-cooold one here.

Friday, October 31, 2008

Spooky Tree

Happy Halloween!

I thought today would be the perfect time to share a project I made earlier this month. With everything else going on, I never actually finished it, but at this point, it's as done as it gets!

I found this branch laying in our yard and thought it looked like the perfect spooky tree. I got busy with my Eat Drink & Be Scary & Batty For You stamps, along with my punches and decorated the tree. Click on photo to see more detail. It was hard to get a good photo of this since it's pretty large.

The base is a peanut tin covered with a piece of Cosmo Cricket's Haunted Halloween Eerie paper. I filled the covered tin with a piece of florist's foam, inserted the branch and then filled with Spanish moss. To make the tree look a little more spooky, I also added a bit of moss to some of the branches.

My favorite little ornament is the one created from a piece of On Board chipboard and Fine Cosmo Glitter. I used the retired Autumn Apparitions set for the word "boo!" and for all the bats. You can see a close up photo below.


All the bats and the Batty For You ornaments were embossed with Black Embossing powder. All the other images were stamped in Pumpkin Pie, Perfect Plum & Kiwi Kiss. Those coordinating card stocks were used as well. To hang the little ornaments, I used a fine fishing line, witch which I attached using mini glue dots.

Thanks for stopping by...have a spooktacular day!

Saturday, October 25, 2008

A Wicked Good Stamp Club

Last night my group got together for our October Hostess Club. It was a much needed, fun night for me...with everything that has been going on here lately. Michelle, our hostess for the evening, brought some hot spiced cider spiked with Buttershots Schnapps and some other delicious goodies. With a few mugs full of that cider and such good company I was definitely cheered up! On to the projects we made...

This card is cute from the outside, but it's the inside that makes it really spectacular spooktacular!
Stamps: House of Haunts, Batty for You, Canvas background & Haunting Jumbo Wheel
Card stock: Glossy White, Basic Black, Pumpkin Pie, Kiwi Kiss, Perfect Plum & Ghostly Greetings DP
Ink: Black Stazon, Pumpkin Pie, various inks for sponging
Accessories: Kiwi Kiss satin ribbon, Scallop, 1-3/8", 1-1/4" & 1" circle punches, coluzzle
Techniques: Sponging, Masking, Spiral Pop Up Card. (I found the complete instructions on how to make this type of card on SCS. )

Continuing on with our Halloween theme, we also altered some tins that I had picked up a while back at Michael's. We used the Ghostly Greetings Double-sided Designer Papers along with House of Haunts & Batty for You stamp sets.

We filled them with a mixture of candy corn & peanut M&M's and for an added surprise... a big black spider on top of the candy.

After finishing the candy, you'll see the stamped greeting on the bottom.

Along with these Halloween projects, we also made the Crazy For Cupcakes card shown in my last post.

On another note, I was excited to hear that a card I sent to Stampin' Up! for a monthly contest made it to Stampers Showcase yesterday. That is pretty cool! (not as cool as actually winning the contest...but still pretty cool!;-)You may remember this card that I recently made for a card swap...that's the card that was on Stampers Showcase.

Blog hop on over to my friend Denise's blog - Stampin With Denise...she is giving away some fabulous blog candy to celebrate her 1 year blogaversary.

Thanks for stopping by...have a wicked good weekend!

Saturday, October 04, 2008

Boo!

I did a workshop last night and had such a good time! My hostess loves Halloween just like I do, so I knew she would especially love her hostess gift and the first project I demo-ed. She has an adorable 5 month baby girl so I know she'll be taking lots of photos of her on her 1st Halloween, so I demo-ed this cute little 6x6 page along with a matching clip to hold it.
I used the Haunting jumbo wheel along with the super cute new Halloween set from the Holiday Mini - Eat, Drink & Be Scary. I used the Big Shot and the Bigz scallop die to create the jagged edge, black mat for my circle. I just ran it through my machine twice - the 2nd time off set to get the jagged look. See the cute star embellishment on the hat? It is a piece of On Board chip board with Cosmo Glitter applied using Heat & Stick powder.

Other supplies used: Perfect Plum designer Prints Paper, Pumpkin Pie grosgrain & Kiwi Kiss double sided satin ribbons, Outline Alphabet, Square Scallop & Photo Corner punch, Vintage Brads.
As a hostess gift I created a cute pack of Scrap Candy which included stamped images, ribbon, card stock and punched embellishments that can be used for Halloween cards or scrapbook pages. I packaged these together in a cello bag with a topper. Book a workshop with me today and I will create a Scrap Candy pack especially for you!

Enjoy your weekend!

Saturday, September 20, 2008

Sparkley Scrap Bucket

Isn't this the cutest garbage can you've ever seen? This is one of the projects my stamp club made last night. I've had a little altered bucket similar to this on my stamping table for scraps for a while now, and it has always gotten a lot of comments. One club member in particular has even threatened that she was going to take it home when I'm not looking. So...I had them all make one so I could quit worrying about mine coming up missing. ;-) After seeing Pam Morgan's great demo using Heat & Stick Powder, Fine Cosmo Glitter & chipboard on the SU! website, I've been dying to try it. The Heat & Stick Powder & glitter came in my last order, and I still had some pieces of chipboard left from the On Board Blossoms & Basics so that's what I used.

I bought the tin buckets from the Target's Dollar Spot and drilled a hole in the center. The glittery flowers are attached with one of the pretty brads from the Styled Silver HPH set. Then we just tied different ribbons on the handle. I had 3 different colored buckets for them to choose from and the flowers were different shapes and sizes, so it was fun to see how they all turned out.

This weeks challenge over at the Stamp Something blog is to "Embellish Something". I think this qualifies. :-) I'll be back tomorrow to show you the other project we did last night.

I started to put the glitter & chipboard away and decided while it was all out I may as well add a little glitz and glamour to another bucket and this metal container I keep my paper plates in. I think I'll also add some rub ons to go around the large one, but for now this is good. I better put away that glitter now before I go crazy and start putting it on everything!

Tuesday, April 01, 2008

What's Cookin'?

I mentioned in a previous post a few days ago that I was busy working on a project that I was really excited about. Here it is...an altered recipe box using the Afternoon Tea designer papers and the new Styled Silver Hodgepodge Hardware, along with matching recipe cards and an adorable clip to hold the recipes while cooking.

The inside of the box has 6 dividers to organize my favorite recipes. You know what this means? I'm finally going to have all my favorite recipes organized! If you want to get your recipes organized, sign up for my class to create this set for yourself or to give as a gift!

The class includes everything you need to make the box, 12 recipe cards with protective sleeves, 6 dividers, recipe clip, plus 1/2 package of Afternoon Tea designer paper- which is more than enough to complete this project and still have leftover paper to use for future projects. (Six 12x12 double-sided sheets = 12 patterns to choose from) You can also pre-order the From the Kitchen Of stamp set and I'll have it mounted and ready for you to use at the class.

I'll be preparing a couple of my favorite recipes to snack on during the class and invite you to bring a dish to pass (along with the recipe) if you would like. This class will be a lot of fun! Hope you can join me on May 18th from 11:30 - 4:00. Please contact me for more info.

Wish you lived closer and could come to my class? I am working on offering this as a class by mail. Please contact me if you are interested in taking this class by mail.

Tuesday, March 25, 2008

Morning Glory Notebook

I hope you all had a wonderful Easter! We had a really nice day even though it looked more like Christmas outdoors than it did the start of spring. Funny...we didn't have a "White Christmas" this past year but we had a white Easter! Oh well...I'm sure everything will be turning green and flowers will be popping up before we know it. Until then I'll have to be happy looking at stamped flowers!


I finally got around to altering a notebook for myself, and since I am thinking spring, this detailed, realistic image from the Morning Soft set was what I grabbed. Being that this image was going on the cover of a notebook which would get handled a lot, I wanted something that would provide a little protection to my finished work. I figured doing the cracked glass technique would be just the ticket. If you've never tried this technique you should give it a try...it's fun and the result is pretty cool. Here's how to do it:

  1. Water colored your image
  2. Cover it with ink applied directly to the paper from the Versa Mark pad.
  3. Cover with Glassy Glaze embossing powder
  4. Emboss using your heat tool - this provides an extra thick, clear coat.
  5. Place the embossed image in the freezer for a minute or two
  6. Here's the fun part: take it out and carefully bend and twist the embossed card stock...it will crack as you bend it creating a crackled look. Keep going until you get it cracked into a pleasing pattern. You may have to return the piece to the freezer again to stiffen up.
  7. If you want to highlight the cracks even more, you can sponge on some ink which will settle in the cracks. I did this on mine using So Saffron reinker.

Here's another photo showing a close up view of the cracked glass.


The background paper is from the Porcelain Prints collection of double-sided designer papers. I applied it using Royal Decoupage medium. I knew I wanted to use this notebook to keep track of my stamping stuff so I added some card stock category dividers using the Spiral punch and some tabs to the side with the Round Tab punch.

The notebook was purchased at Target. If you want to see what it looked like before I started click here. Now I can use this notebook to keep my business papers more organized. (no more post-its all over!)

Well, gotta run...I'm in the process of creating a project that I'm really excited about. Hopefully I'll have it ready to share later this week. Thanks for stopping by! Have a great day!

Friday, February 15, 2008

Playing Cupid

I hope you all enjoyed your Valentine's Day yesterday! I had so much fun stopping by and surprising some of my family and friends with some homemade Valentine goodies. I made some delicious M&M cookies and packaged them in ziplock baggies...of course I stamped them with White Stazon first! (the baggies, not the cookies!) I made some cute little 3x3 cards...if you look closely you can see that on one of those cards I changed the wording. Instead of reading "to an unforgettable friend", I eliminated the word "friend" and wrote in "aunt" instead.

I gave the mailboxes to the little ones of a friend of mine. They just loved them, and noticed right away that their initials were on them. They were so sweet...they gave me a couple of Hershey kisses they got as treats in school.

I must say, those cookies were really good! I tried a recipe I found online. It's almost the same as what is on the chocolate chip bag, but a little different. They came out crispy on the edges and nice and chewy in the middle. I used dark chocolate M&M's and also added semi sweet chips. I thought I'd share the recipe here:

M&M Cookies

INGREDIENTS
1 cup packed brown sugar
1/2 cup white sugar
1 cup shortening
2 eggs
1-1/2 teaspoons vanilla extract
2-1/2 cups all-purpose flour
1 teaspoon baking soda
1 teaspoon salt - I used only about 3/4 teaspoon
1-1/2 cups candy-coated milk chocolate pieces (I used 3/4 c dark chocolate M&M's and 3/4 c semi sweet chips)

DIRECTIONS
In a large bowl, mix sugar, eggs, shortening, and vanilla thoroughly. Add flour, salt, and baking soda to creamed mixture. Blend well. Add 3/4 cup of M&M candies.
Drop dough by teaspoonful onto cookie sheet. Slightly push a few candies on top of each dough ball with remaining candies.
Bake at 350 degrees F (175 degrees C) for 9 to 11 minutes, to your liking.


I promise...this is the last Valentine's Day oriented post from me until next year! Hope your day is a sweet one!

Thursday, February 14, 2008

Happy Valentines Day!

Since I don't really have any decorations for Valentine's Day I decided to make myself a cute little heart bouquet that I could display on my china cabinet. (click on photo for a better view)


The base is a terra cotta pot. First I painted the rim and about an inch down into the inside with white enamel paint. (No sense in doing the whole thing since I planned to cover the outside and fill the inside) After that was dry I adhered Berry Bliss DP to the outside using Mod Podge as my adhesive. I didn't do the best job at cutting my template, and it was a little off where the paper met the rim of the pot. No problem...I just covered it with some ribbon!


I embossed the heart from the Always set in white embossing powder and cut each one out. Then I glued them to lolly-pop sticks and tied on a bit of ribbon to each one. The bird was stamped in Pomegranate on Whisper White, cut out and then I embossed it with clear. Isn't he cute? I just love that little bird!

The hanging medallion was made by embossing the snowflake scallop image from So Many Scallops. The dotted edge of that stamp matches the dotted edge of the hearts in my bouquet almost perfectly. Then with varying sizes of circle punches I cut out circles from the Berry Bliss paper and layered them, with a clear rhinestone brad for the center.

I hope you are able to spend today with someone you love! Happy Valentine's Day!

Monday, February 11, 2008

Love Notes & Coaster Frames

Yesterday I held my Valentine Stamp Camp and it was bone-chilling cold outside with temps in the single digits and high winds making it well below zero. Thank you to everyone who braved the cold and came to my stamp camp anyways...I had fun showing you how to create these projects! I'd also like to thank everyone who purchased my Valentine Stamp Camp kit online - your feedback was valuable, and I plan to offer more kits in the future.
We made the projects shown here plus the altered mailboxes and candy containers I showed you last month. The coaster frame was my surprise project for the group. Everyone had the choice of using the Always stamp set with the Berry Bliss papers or the Happy Heart Day set with the Cutie Pie papers. Here is the coaster frame using Happy Heart Day.

I have a few other things I've been working on lately that I hope to share later this week. I've been busy with a painting job, so not much time to stamp, post here or visit other blogs. I'll be finishing the job today so hopefully I can finish my other projects soon.
Enjoy your day!