Creations by Lynn Weiss ~ Independent Stampin' Up! Demonstrator

ENJOY ~ INSPIRE ~ CREATE ~ SHARE


Friday, July 31, 2015

Best Thoughts

The beautiful large hydrangea image takes center stage on this simple card. The Best Thoughts set is one of the great host sets you can choose from in the new annual catalog.


I used my Aqua Painter and Wisteria Wonder, Perfect Plum and Lost Lagoon inks to color the flower and butterfly...it was so much fun to color! Thanks for bringing this set to our "play date" Rachel!

Do you love the look of water color but struggle with the technique? If you would like to learn more on the art of water coloring using your Stampin' Up! supplies, then you should check out one of my tutorials that feature water colored images such as Butterfly Basics, Moon Lake or my newest tutorial featuring The Wilderness Awaits. In all three of these tutorials I'll take you step by step with instructions and tips on how you can achieve great results using your Aqua Painter and you will make a great set of cards along the way.

Thanks for visiting today...have a wonderful weekend!

Monday, July 20, 2015

Colorful Birthday Blossoms

I'm loving the Birthday Blossoms set for quite a few reasons...first, the largest flower coordinates with the Pansy Punch...LOVE that! There is a set of pretty leaves...YES! The clusters of tiny flowers makes such a pretty background...AND the font used on the sentiments is just so pretty!


I inked up an acrylic block and misted it with water to create my background. The colors I used are: Pool Party, Cucumber Crush, Crushed Curry & Watermelon Wonder. More on that can be seen in this post.

Thanks for visiting!

Friday, July 17, 2015

Pretty Pink Peony

I've been busy coloring these beautiful flower from the You've Got This set.


I masked the flower portion of this image before stamping the background in Crumb Cake ink. Since the Crumb Cake ink is fairly light, it blended fine with the Wild Wasabi ink I used to watercolor the stem & leaves. Sponging the Typeset Specialty Paper gives this card more of a vintage feel.

Have a great weekend!

Sunday, July 12, 2015

Artistic Wilderness Card Set

With the arrival of the new catalog, many of you have been asking me if I would have a new tutorial soon. I have just completed a set of cards combining two of my absolute favorite new stamp sets – Awesomely Artistic and The Wilderness Awaits along with some fun embossed background techniques to create a beautiful set of nature themed cards sure to please any animal lover...and since you've been asking, a new tutorial to go with it!


You will enjoy re-creating this set of cards with the aid of my step by step instructions & clear photos included in this 17 page tutorial.  Detailed instructions on the embossed brick wall and embossed faux patina techniques, plus lots of great tips for water coloring and more.

You will need the Wilderness Awaits and Awesomely Artistic stamp sets along with ink, adhesive and basic tools including an aqua painter and heat tool to complete the set. If you have any questions regarding the additional supplies you will need to complete these cards, please feel free to contact me.

The Artistic Wilderness Card Tutorial can be purchased for only $5.99 by simply clicking on the Paypal button below.

After receiving payment, I will send the PDF file to the email provided with your PayPal payment. I usually check my email a few times daily, but please allow up to 24 hours for delivery to your inbox.

I'm sorry, but Stampin' Up! prohibits the selling of stamped images. You will need The Wilderness Awaits and Awesomely Artistic stamp sets to complete the cards. 

Friday, July 10, 2015

Grandma's Elegant Peony

Peonies are one of my favorite flowers. I'm sure it's because during my childhood, every year when my Grandma would come to visit for my birthday, she would bring a huge bouquet of beautiful peonies for my Mom. She had many different colors growing in her garden and they bloomed during the beginning of June just in time for my birthday. My favorite color she grew were a deep raspberry red color...which was the inspiration for this card.

I used Rose Red along with a little bit of Blackberry Bliss for shading. I masked the blossom part of the flower (but didn't worry about the leaves) before stamping the crosshatch background inked in Crumb Cake. You can read more about my experimenting with this background and flower in this previous posting (or keep scrolling down).

The background panel uses a pattern from the Typeset DSP along with the Boho Chic Embossing Folder. I added a strip of Gold Satin Ribbon to finish it off..BUT after looking at my finished creation I wondered if it needed an extra little something. So I made a bow...

The center of the bow is gathered up with a strip of Basic Black Card stock secured with Glue Dots. Then I added some Basic Pearls. Which version do you prefer? I'm still undecided. I guess my decision will be made when I give it to the intended birthday person...if I see her in person I'll leave the bow, if I need to mail it, then the flatter version would be better.

Thanks for visiting today! Have a wonderful weekend!

Monday, July 06, 2015

Flower Patch Gift Set

I just loved the adorable little journal shown on page 155 of the now retired 2014-15 catalog, but it took me a while to actually make one! The little grid journals are now retired, as well as a few of the other things I used, but there are always current products available to recreate something similar.


The little journal and card fits perfectly inside the decorated Chevron Gift Bag...these little bags are still available but they are now only available in plain kraft...ready for you to stamp any design you wish. These little bags are actually part of this weeks Weekly Deals offering.


The coordinating birthday card uses one of my favorite new embossing folders...Elegant Dots.

Colors used: Crumb Cake, Whisper White, Pool Party, Calypso Coral, Crushed Curry, Bermuda Bay & Pear Pizzazz.

Thanks for visiting!

Friday, July 03, 2015

You've Got This...

I've got this...we all have this! This stamp set just may be the most popular stamp set from the new catalog. It was available during the pre-order, and at the time I resisted. But...since I love flowers (especially peonies) and the large, cross hatch background that comes with it is so awesome...I knew I wouldn't be able to hold out for too long! Yes, I am weak!

So I sat down to play with it the other night looking for the easiest way to use the background behind the flower image. I experimented with a few different ways of doing this, and I thought I'd share because you might find it helpful.

On the left you see my first attempt...and the easiest. I stamped the cross hatch background in Crumb Cake ink - using the old style linen type ink pad, which later I found does make a difference. (more on that later) I then stamped the flower image in Black Stazon over the top of the background and water colored it using my Aqua Painter and Lost Lagoon, Certainly CeleryWild Wasabi inks. As long as you use a light color that mixes well with the colors you intend to color the flower, this can work well.  Using Crumb Cake ink, the result is a nice, antiqued sort of look...but as you can see, its definitely darker than the other samples.

For the middle flower I did exactly as with the first one, only this time I stamped a second flower head, painted it with Lost Lagoon ink and my Aqua Painter, then I carefully cut it out.

For the third flower, I cut a mask by stamping the flower head on a post it note and carefully cutting just inside the outline of the flower. (I didn't bother to mask the stem & leaves) Hint: cut 2-3 layers of post it notes at the same time so you have more than one mask for future projects. I store mine in the stamp case so it's handy for next time. Now back to the stamping...I stamped the full flower image in Black Stazon. Then, placed the mask I created over the flower head and stamped the cross hatch background over the flower image. Since the back ground is so large and fairly solid, I found the easiest way to do this is to ink the stamp by laying it face up on my desk then laying my image on top of the stamp, cover with scrap paper and run my bone folder over the top to be sure the image gets uniformly inked.

Once the mask is cut, you can use it over and over so in my opinion that is probably the easiest way to get a good result in the truest colors using this stamp set. However, using a couple different colors in the new firm foam pads to ink the back ground had less than stellar results. Even after working the inks deep into the pad, some of the detail was filled in. That wasn't too much of a deal breaker, but I also had issues with large gaps of white space all around the image, even though I inked it in the same manner as I had with the old style Crumb Cake pad. I didn't take any photos of those results, but I'll try again next time I stamp using this set to see if I get a better result.

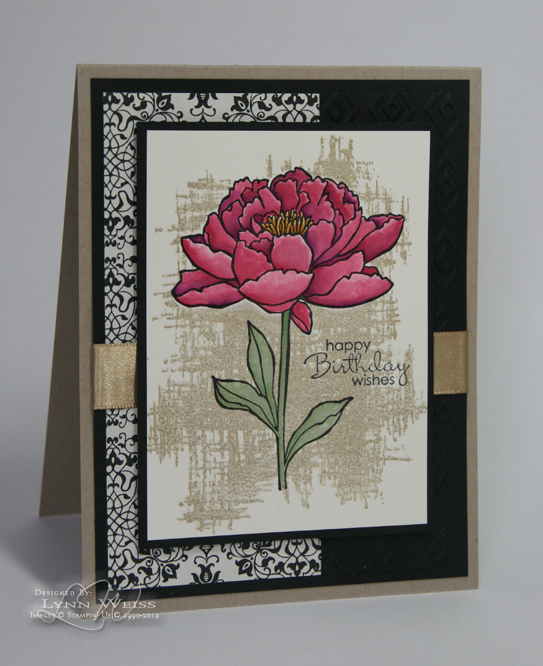
Obviously the steps taken to create the flower in the middle took the most time because it would have to be fussy cut each time, but since I did take the time to cut it out I figured I'd make a card with it before the flower got lost in my stamp room! lol

I popped it up on dimensionals. As you can see, the cross hatch background was also used on the Lost Lagoon background panel. The sentiment is from the Birthday Blossoms set...such a pretty font used with those sentiments. I'll have something more to share using that set very soon.

If you are looking for any retired stamp sets, you should check out my Retired Stamps for Sale page...I just updated it yesterday.

Have a wonderful and safe Fourth of July weekend! It's supposed to be beautiful!

Thursday, July 02, 2015

Retired Stamps for Sale

It's that time of year again! With so many new stamp sets finding their way into my craft room recently, I had to make some room by sorting through all my retired items and deciding if there were any I could part with...lucky for you I have quite a few I am offering for sale.


Check out my Retired Stamps for Sale page to see the photos of retired stamps along with DSP and some misc listed here as well.

All my items come from a smoke free home and are in very good condition. I am hoping they will find a good home with you and you will be helping me avoid being on the next episode of the show Hoarders!