Creations by Lynn Weiss ~ Independent Stampin' Up! Demonstrator

ENJOY ~ INSPIRE ~ CREATE ~ SHARE


Monday, October 15, 2012

Autumn Accents Candle & Frame Set

I'm really excited to share the project that I created as a guest designer for Craft Project Central this month! I used some of my favorite new fall products from the Holiday Catalog, along with some other old favorites, to make this set. Hope you like it!
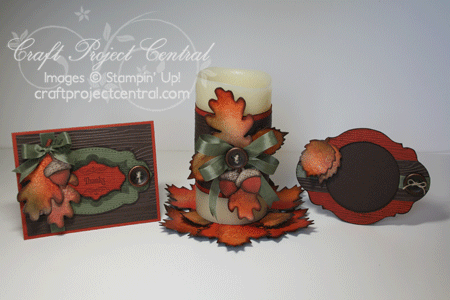

Rich colorful leaves with a touch of shimmer make this candle wrap with matching mat and chipboard frame the perfect addition to your autumn home décor. This would also make a lovely hostess gift during the fall season.
Wouldn't the candle wrap look lovely wrapped around a bottle of wine to give as a gift?


The chipboard frame would be easy to make for any holiday or occasion just by changing the colors. Check back to see a Halloween version of this frame tomorrow.

I actually made this set planning to give it as a gift...but I think I'm going to have to make another one, because I just cannot part with it now!

To get the complete instructions for my project just subscribe to October.

Leave me a comment here on this post before Friday afternoon and you could be the lucky recipient of a FREE month subscription to Craft Project Central!

Saturday, October 13, 2012

Fall Happiness Décor Gift Set

This festive fall set was created by Julie for Craft Project Central.


Celebrate the season of Autumn with this fun & festive fall set. Create it to use for your own fall décor or make it as a gift which is sure to be received with gratitude.

To get the instructions for Julie’s festive fall project, just subscribe to October!

Friday, October 12, 2012

In Color Butterflies

As you can see, I was kind of inspired by Andy Warhol on this one.

I used several In Colors, from both collections...Raspberry Ripple, Primrose Petals, Summer Starfruit, Island Indigo & Calypso Coral along with the Basic Black.

Thanks for stopping by today...have a GREAT weekend!

Wednesday, October 10, 2012

Little Critter Cards

Another fun project from Craft Project Central for you today! This one is created by Carrie.

Share your love of paper crafting with children with these adorable Little Critter Cards! You can make them for the little ones in your life or, even better, make them with the little ones! Each of the Little Critter Cards are easy to make with little or no help from an adult. The child who receives one of these cards will certainly smile, and the sense of satisfaction from making one, will stay with the child for a long time to come! What a fun kids’ class these cards would make too! Project includes instructions for making a penguin, mouse, lady bug, dinosaur, and not shown, an owl, monkey, bee, and dog!

To get the instructions for Carrie’s adorable project, just subscribe to October!

Sunday, October 07, 2012

Witch's Caldron Treat Box

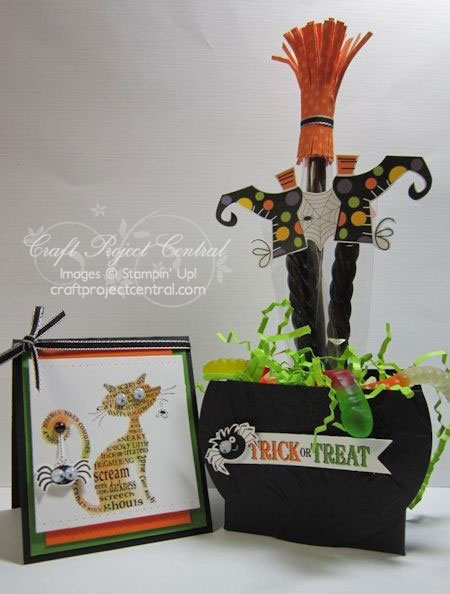
Another aweseome Halloween project for you from Craft Project Central! This one is created by Rae.


Halloween is such a fun time of year to decorate and give candy to friends and co-workers. Why not make your treats something special, and of course spooky this year? Replace the "Trick or Treat" label with a guest name and you have a place holder/party favor! And if you don’t celebrate Halloween, you can still use the instructions and template included to make favors for other occasions!

To get the instructions for Rae’s project, just subscribe to October!

Friday, October 05, 2012

Googly Ghouls Halloween Treats

Back again today with another adorable Halloween project from Craft Project Central. This one is created by Laurie.

Whether you decide to make one, two, or all three of these cute little projects, they are sure to be a hit this Halloween! This Halloween Ensemble includes an easy-fold gift box, a darling triangle treat bag, and a coordinating card! This project is also a quick and fun class, club or camp project! Or, how about a "ghouls just want to have fun!" night of crafting!? To get the instructions for Laurie's frighteningly cute projects, just subscribe to October!

Have a great weekend!

Tuesday, October 02, 2012

Witch's Cottage Luminary and Card

I am excited to tell you that I'm a guest designer this month at Craft Project Central! I cannot share the project I created just yet, but I've seen a few of this months projects and they are SUPER CUTE...like this spooktacular project designed by Amanda shown below.

Are you looking for a fun and whimsical Halloween decoration for your holiday display? Or maybe you just want to give someone a special Halloween gift? This Witch’s House Luminary is quite spooky when you have a flickering battery powered candle inside! It looks like the witch could step out at any time and go for a ride on her broomstick! The matching card makes this a great gift set.

To get the instructions for Amanda’s project, just subscribe to October!

Friday, September 28, 2012

Toxic Trick or Treat

With October only a few days away, I thought it was about time I shared something Halloweeny! Here's a cute, but simple card I created to demo for a workshop I had last week.


I have the clear mount Toxic Treats set, so it was easy to line up the "Happy Halloween" sentiment over the fence image right on my block and then stamp onto my card stock. After that I used the Apothecary Accent Framelits to cut the tag shape, and just cut the other rounded end at the bottom off. The rounded tab at the top is the perfect spot to add some sparkle using a Glimmer Brad.

Stamps: Toxic Treats
Card stock: Tangerine Tango, Basic Black, Lucky Limeade & Rich Razzleberry
Ink: Basic Black
Accessories: Apothecary Accent Framelits, Glimmer Brad, Spider Web Embossing Folder, 1/2" Striped Satin Ribbon, 3/4" Circle & 1-3/8" Square Punches

Hope you have a weekend full of treats!

Friday, September 21, 2012

Here's to the Last Day of Summer

Even though the calendar and all other signs point to the fact, it's hard to believe that tomorrow is the first official day of Fall. The weather certainly has cooled down and the trees are starting to change, but it just can't be...Summer just went by way to fast! So, for the last official day of Summer I have two cards to share that feature fun, summer colors along with flowers, a butterfly, and an ice cold cocktail.

As you can see, I was inspired by this card over at SCS. I  just changed up the colors and the DSP and added a few other details, like the piercing around the Label die cut and the pennant shape at bottom of each strip of DSP. This is a fairly simple, quick & easy card and was one of the cards we made at my last card class. To show how versatile this layout is and how easy you can change the look, here's another version using the Happy Hour set.
Both use Floral District DSP and the same layout, but look so much different.

Enjoy this last day of Summer and the weekend too!

Wednesday, September 19, 2012

Everything Eleanor in Pink & Chocolate

Here is one of the cards we made at my All Occasion Card Class yesterday.

I haven't used one of my fav color combos, pink & brown, in a while and I think it suits this pretty feminine set well. After I stamped the Apothecary Accent die cut, watercolored the flowers & inked the edges, I spritzed it with some Log Cabin Smooch Spritz...unfortunately a blob just had to land right on the sentiment! BOO! But after all the work I didn't want to have to re-do it...other than the little ink blob, I love the way it turned out. I guess that's why I rarely use the Smooch Spritz...it's too hard to control. I really need to make my own using the little Stampin' Spritzer bottles I bought a while back. I hear those work much better.

Stamps: Everything Eleanor & Sincere Salutations
Card stock: Chocolate Chip, Pink Pirouette & Whisper White
Ink: Basic Brown (to ink flowers to watercolor) Chocolate Chip, Pink Pirouette & Primrose Petals
Accessories: Primrose Petals Stitched Satin Ribbon, Apothecary Accents Framelits, Large Scallop Edgelits, Delicate Designs Embossing Folder, Log Cabin Smooch Spritz & Basic Pearls

If you like the pretty Primrose Petals Stitched Satin Ribbon used above...all this month you can get it for free with your $40 order!

Wednesday, September 12, 2012

Happy Hour CD Pockets

For almost 20 years now, a group of my girlfriends and I have a weekend getaway each summer. For the most part,  the destination has remained the same...near or on the water in beautiful Northern Michigan! We enjoy a relaxing weekend of fun in the sun, eating & drinking...probably more than we should, laughing until our stomachs hurt and just enjoying each other's company. Most of us have known each other since way back in high school, and I don't really remember who came up with the name, "Wild Women Weekend" but it has stuck! Anyways...I'm usually the photographer of the group, so this year after I went through all the photos, I compiled the best ones on a CD for each of my friends and made this cute little CD pocket to hold the disk.

I used some retired product here...Taken With Teal & Pear Pizzazz along with  Sweet Pea DSP, one of my all time favorite wheels...Lazy Days and the cute Happy Hour stamp set. Here's a closer look...
I had the girls who live local over last week for some wine & delicious appetizers I've been wanting to try that I found on Pinterest. We had fun...and they loved their CD's.
Have a great day!

Monday, September 10, 2012

Fossilized Autumn Accent

I'm baaaack! I hadn't realized I took such a long break from blogging until I signed in here this morning to make this post. I have been really enjoying the summer and getting some things done around here and I guess just not being particularly creative. The past week or so I've been back to stamping more, so I have some new stuff to share. Today I have a masculine birthday card I created using the Autumn Accents Bigz Die and the Faux Fossil Technique.


I just love the new Woodgrain Embossing Folder...I've been wanting an EF like this for quite some time! The Timber Wheel is also great...and works perfectly with this die and EF.

The Faux Fossil technique is a lot of fun...and so easy! I taught this at my Faux Much Fun Class yesterday and the ladies loved it! Besides your card stock & ink, all you need is a plastic page protector...
  • Cut off the bottom & one side seam (keep the side with the 3 holes attached)
  • pick out 2 colors of ink and ink up plastic...one color per side. (ink an area large enough to fit your card stock piece)
  • close the page protector and run hand along outside to blend colors. Air bubbles will form, and that's what will give you the fossil look.
  • Open page protector and insert two pieces of card stock (back to back) White or Vanilla works best.
  • Close the page protector and rub with fingers or a brayer to ink up your card stock.
  • Remove your two pieces of fossilized card stock and use as a background, stamp onto it or cut into shape as I did above.
I also added some sponging to my leaf to give it more of a vibrant fall color. Thanks to Carol at Crafty Cat for showing this great technique! I've been having lots of fun with it...and I hope you will as well!