
 Friday night was the start of another round of my hostess club. Since we won't be meeting in February until after Valentines Day, I designed this months projects with a Valentine theme. The first project was a masculine Valentine using the Always stamp set. A slight variation to the Joseph's Coat technique was used to create this card. If you've never tried this technique you should give it a try:
- Using a spectrum pad* brayer a piece of glossy white card stock with color. *This is where I deviated a bit from the technique - I randomly sponged on the colors I wanted instead of using a spectrum pad and brayer. Allow card stock to dry.
- Rub the Embossing Buddy over the glossy card stock, then randomly stamp your images with Versamark ink. (In this case I just stamped the one heart image.)
- Emboss with Clear Embossing Powder and allow to cool.
- Brayer over the top of the entire glossy card stock with Basic Black ink until evenly coated.
- Wipe excess ink from stamped images using a paper towel.
The other project I had the group do was an acetate card using the Happy Heart Day set. The acetate was stamped on the front panel with White Stazon ink. Then each layer is matted and adhered to a different panel of the acetate by applying double stick tape behind the previous smaller mat. This way all the adhesive is hidden by another layer and when the card is closed you see each layer of matting except the inside where your greeting is written. ![]() For example, my mouse image along with the Bashful Blue mat was adhered to the front (outside) of the card. I then opened the card, directly behind my blue mat I applied my double stick tape to the acetate, then I centered my Rose Red mat behind that, and proceeded to work my way back until each layer was properly centered and adhered to the acetate. I just love the look of these acetate cards ~ I'm glad I finally found the time to make one!I always give the hostess of the month a hand stamped gift. For this round of stamp club I decided to try something a bit different. I ordered the 12x12 craft keepers and everyone got to personalize one using white stazon & ribbon.
For example, my mouse image along with the Bashful Blue mat was adhered to the front (outside) of the card. I then opened the card, directly behind my blue mat I applied my double stick tape to the acetate, then I centered my Rose Red mat behind that, and proceeded to work my way back until each layer was properly centered and adhered to the acetate. I just love the look of these acetate cards ~ I'm glad I finally found the time to make one!I always give the hostess of the month a hand stamped gift. For this round of stamp club I decided to try something a bit different. I ordered the 12x12 craft keepers and everyone got to personalize one using white stazon & ribbon. 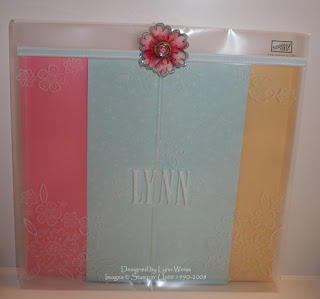 To finish off this project, a fun embellishment was added to the flap of the craft keeper. The large flower from Time Well Spent was water colored on whisper white card stock and then embossed with several coats of Glassy Glaze enamel. This created a hard acrylic coating over the flower image. Then using a Build a Brad for the center it was attached to the flap. Here's a close up look:
 When completed, this project is not only cute it is also useful!
January is a big birthday month in our family. I've been busy creating birthday cards. Tomorrow I will share some of those projects. I hope wherever you are you are staying warm...it is soooo cold here right now!


9 comments:
Thanks again for the awesome projects... :)
CV
Ok, so I'm totally CASEing your acetate idea! I love it! So cute! I love making acetate cards too and this set it perfect. Thanks so much for sharing! :)
Your club sounds like so much fun Lynn!! Great acetate card!
These are another amazing projects!! Love the clear card!! So cute!!TFS!
Wow they are so wonderful projects. Stunning. Love it.
Hugs
Sister Sandy
Love um!
I loved the project! Have a great time!
Stunning creations!!
Great idea to stamp on the craft keepers!
Post a Comment