Creations by Lynn Weiss ~ Independent Stampin' Up! Demonstrator

ENJOY ~ INSPIRE ~ CREATE ~ SHARE


Sunday, July 18, 2010

Personalized Wedding & Anniversary Cards

This has been a REALLY busy past couple of weeks for us! We've been to grad & anniversary parties, 4 concerts and also managed to complete a landscaping project here at home in between all the running. I received a new box of goodies from SU! and haven't had time to play with them yet...so sad! I did manage to make cards for all the celebrations we've been to.

Sorry about the weird angle of the card in this photo. I was trying to capture the shimmery background and the shiny embossed medallion. I embossed this using Clear EP on Shimmery White card stock. Then I sponged on Marina Mist and Baja Breeze. Here's another card I made for a 50th Wedding Anniversary party.

Doesn't the Brushed Gold card stock look gorgeous embossed with the new Vintage Wallpaper folder? Both cards use JustRite Monogram stamps to allow the personalization. I've always wanted to try these, and had the opportunity when stamping with a friend recently. (thanks Karman!) It is really tedious to set up all the lettering, but it's worth it to have the personalization.

Both cards also use the new adhesive backed Jewels available in the new catalog. They come in both rhinestones & pearls. Love those things! So glad SU! is finally carrying them! They have so many awesome new embellishments in this catalog. Here are the first ones I got in my first new catalog order.


The pearls & rhinestones come in 3 sizes and also in 3 connected strips. The Antique Brads are amazingly GORGEOUS! And the new assortments of Designer Buttons are way CUTE! I got the Brights collection...ooooh...Razzleberry buttons!!! I think this coming week I'll have time to play with some of my new goodies!
Photobucket

Saturday, July 10, 2010

Brayered Roses

A quick post to share a card I created using the Manhattan Flower Embossing Folder.

After embossing the roses using my Big Shot, I used my brayer inked first with Bashful Blue and rolled lightly over the embossed image. I went back with Marina Mist, Perfect Plum and Rich Razzleberry adding layers of ink until I was happy with the color. The embossed roses were then cut out and adhered over a background I created using the pretty swirl image from the Elements of Style stamped in Bashful Blue. Although you cannot tell from this photo, in real life this card is very shimmery because I spritzed it with Vanilla Shimmer Smooch Spritz before adhering it to the Rich Razzleberry card base.

Also used on this card: Oval All Stamp set with Scalloped Oval, & Large Oval Punches & White Organza Ribbon. A while back I shared basically the same card here, only I changed the colors for a totally new look.

If you want to see a great tutorial on how to do the brayered roses, you should visit Patty Bennett's Blog . That is where I first saw this wonderful idea.

Thanks for the nice comments regarding the hacking of my email account. I'm glad you are still stopping by to visit me. Have a great weekend!
Photobucket

Wednesday, July 07, 2010

I am not in London England!

I have not been held at gunpoint while all my belongings have been stolen, and I have not contacted you to wire me money so that me and my family could return home! Thank God! If you got an email from "me" stating the above, I AM SO SORRY! Some lowlife, scumbag hacked my google account and sent a message looking for money to all my contacts! I spent most of my day trying to get it straightened out. I was just now able to log into my blogger account to post something here.

I have received so many phone calls today from concerned family & friends, which I kind of expected. I was also very pleasantly surprised by several friends who only know me by reading my blog, who took the time to call me to make sure everything was OK. I was really touched by that, so I wanted say thank you to everyone who called...that was very kind. I sure hope that nobody fell for the scam! I feel bad enough that so many people were sent the email. They even went so far as to post to a message group that I belong to...can you believe that?


In the future, if this had been an actual message from me requesting money it would probably be due to the size of my wish list and all the items I want from the new IB&C. Combined with getting a glimpse of the fantastic upcoming holiday mini...it just pushed me over the edge! So please everyone...deposit $$ directly into my SU! account! (just kidding!!! :-)  Well, the begging for money part anyways...the wish list for the new IB&C combined with the upcoming holiday mini is WAY out of control...so that part was real. ;-)
 
But seriously, I am SO SORRY if you received that hoax email sent from my email account. I hope I will never be in a situation that desperate to have to resort to something like that, but it's nice to know that so many people cared.
Photobucket

Sunday, July 04, 2010

Cherry Pumpkin Delight

After all that cleaning and re-organizing of my stampin' space, I finally got in there to mess it up! Here's the first card I created using my new set Elements of Style. It arrived here in the middle of my cleaning frenzy and I've been dying to play with it.

I stamped the elegant floral image on Shimmery White card stock and used my Aqua Painter and Classic Inks to color the image.

Stamps: Elements of Style & Teeny Tiny Wishes
Card stock: Shimmery White, Daffodil Delight, Cherry Cobbler & Pumpkin Pie
Ink: Black Stazon, Daffodil Delight, Cherry Cobbler, Pumpkin Pie & Wild Wasabi
Accessories: Scalloped Square Bigz Die, Lots of Tags Sizzlet, Large & Small Oval Punches & White Organza Ribbon

I'm looking forward to a fun Fourth of July holiday today spent with family and friends at the lake. I hope you enjoy your day as well!

Photobucket

Monday, June 28, 2010

Rubber Room Renovation Part II

Yesterday I shared some photos of my newly cleaned stampin' space, but since the post was getting kind of long I decided to share the rest today. I saved my favorite part of my room for last. It's the wall with my stacking cubes. I got these at Michael's when they were on sale.  For the top, I bought a white laminated shelving piece at Lowe's and had them cut it to the size I wanted. The cubes were really easy to put together...except the ones with the four drawers, they were a bit time consuming to assemble.

Even though the four drawer units were a pain to assemble, they are my favorites. They hold my Sizzix Bigz dies perfectly. The Bigz XL do not fit in the drawers, but I have them on one of the open shelves and they fit perfectly there. I labeled the drawers using some DP and then wrote the contents on white card stock and punched it out with the Word Window Punch.
I store all of my cut up pieces of card stock in the expanding file folders on top of my storage unit. Each pocket holds 2 colors and each folder holds a Color Collection. That was a big job going through and removing all the retiring colors and re-labeling the files with the new colors...but glad it's done! I now have 2 more expanding file folders to hold all my retiring colors.
Above my card stock scraps I have a french memo board that I made. It was a fun project my Mom & I did one winter day.

All it took was a piece of foam core board, fabric, batting, ribbon, hot glue & buttons or large brads. I used Build-a-Brads for mine, and stamped the centers using my Always stamp set in colors to match my room...Certainly Celery, Tempting Turquoise & Regal Rose. It makes a great spot to hold photographs, sketches and cards my friends & family has made for me.

Next to my cube storage is my book case which has books - of course!, my most recent photos stored in photo boxes, mini photo albums & my music.
Next time I share my stampin' space with you I hope it's because I got ambitious enough to haul everything out of there to paint and replace the hideous carpet! I would love to paint the walls a lovely shade of celery. For now, I'm just happy to have an organized space to stamp in! Thanks for joining me on my tour!
Photobucket

Sunday, June 27, 2010

Rubber Room Renovation

Last time I posted photos of my stampin' space was right after the New Year in 2008. Since then I have made some more improvements, but never took the time to take photos and post. Over this past week I've spent most of my time in my room, BUT unfortunately NOT to stamp. With the new color renovation and the new catalog starting soon it was the kick in the butt I needed to get re-organized. While my room is still clean, I took some photos and thought I'd share my hard work with you.

Last time I posted photos of my room I ended with this comment: "The good news is...I got my things put back into place and made room to sit and stamp at my desk. The bad news is...when I sit down and look ahead, this is what I see. (insert photo of messy closet)" If you want to see my messy room photos, and what my room looked like before my latest improvements, click here.

Since I ended last time sitting at my clean desk staring at my messy closet, I'm starting with my new and improved view of my now organized closet. (you can click on any of the pics below if you want to see them enlarged)

When you walk into the closet, on the right are my collection of stamps. The overflowing shelving unit on the left are most of my retired stamps and on the right are most of the current sets in my collection. Notice that there is now some room for new stamps! ;-) (I have another couple smaller shelves near my desk where I keep my backgrounds, sentiments and alphabets...so they are within easy reach)

On the left side of my closet are these plastic stacking drawer units. I stamped the labels with Eastern Blooms to make them look prettier. These hold mostly non-SU stuff craft supplies.

My friend was moving a few years ago and gave me this awesome paper rack that she had acquired from a scrapbook store. I use it to store most of my card stock. I can fit 3 packs per shelf. I used to have this out in the main room, but I like it much better in the closet. This also helps keep the paper out of direct sunlight.
Here is a full view of my room standing in the doorway looking in.
On this side of the room the biggest improvement I made since my last room post was the rod for my punches. I store the ones I use the most on the rod and the rest are stored in this wire rack on wheels next to my desk. This rack also holds the wheel handles and some of the wheels. My big old oak desk isn't very attractive (mostly due to the previous owners attempt to add a faux finish) but it is nice and sturdy and holds a lot of stuff. I love the pull outs...especially the little shelf to my right which holds my stampin' scrub. Someday I will re-paint or perhaps strip it down to it;s natural oak. (the front was never painted and that part I like.)
Next to the punches is a holder I made for some of my most used embellishments. I took a metal sheet (not sure where it came from originally, but had it hanging around) covered it with some cute Razzleberry Lemonade paper, punched holes in the top with my Crop-a-dile and ran celery ribbon through the holes as a hanger. I glued magnets to the back of my embellishment containers and now they are at my finger tips.

My very favorite storage piece I have is for my ink storage. I bought these on line several years ago by a company called Dzyntec. Unfortunately they have since gone out of business. The four units sit on a lazy susan so it it easy to grab colors as needed. I printed up myself some little cards listing the inks by the color collection so that I can get used to what color goes where.
This is the biggest improvement I made to my room since last time. I removed the drafting table, moved my paper rack into the closet and scooted my bookshelf down the wall and added these great stackable cubes.
I'll share more photos of this side of my room tomorrow. Now time to go mess it up some! Enjoy your day!
Photobucket

Wednesday, June 23, 2010

Marina Mist Hydrangea

New goodies are so much fun to play with! I just wish I had more time to actually play instead of spending my time rearranging/re-organizing my stampin space...I should be done today, so that will be a relief! Plus it's always nice to work in a clean, organized room. This new Level 1 Hostess set, Because I Care, is so much fun to color.


I used one of my favorite new colors - Marina Mist, and paired it with a couple of my favorite returning colors...Certainly Celery & Not Quite Navy. The pretty hydrangea image was watercolored using my Aqua Painter and Classic Inks in above colors, plus a little Perfect Plum. The new Embossing Folder - Vintage Wallpaper, adds some nice texture to the background.

Wish me luck on completing my mission re-organization! It will all be worth it when I have more room for more new stuff! ;-)
Photobucket

Sunday, June 20, 2010

Masculine Tree for Father

Here is the third card we did at my last card class. Since the group makes 3 of each card and there is only a short time to complete them, I try to keep the designs fairly simple. For this one we used one of my very favorite stamp sets...Lovely As A Tree to create a masculine card for Father's Day or any occasion.

See the Chocolate Chip "brads" at the bottom of the card? Those were created by punching out Chocolate Chip card stock with the 1/4" Circle Punch and then covering them with Crystal Effects. This is a great alternative if you don't have brads in the color you want.

If you have a little more time to be creative, you can take the same basic card shown above and step it up. Here is another version of the same card.

I used the same colors and stamps but added some detail and texture. The added strip of Artichoke card stock under the ribbon is lightly distressed and then paper pierced. The bottom of the card has a little texture from the wood grain Texturz Plate. This time I used Vintage Brads in place of the faux brads.


Stamps: Lovely As A Tree
Ink: Always Artichoke, Mellow Moss & Chocolate Chip
Card stock: Always Artichoke, Mellow Moss & Crumb Cake (AKA Kraft)
Accessories: Soft Suede Polka dot Grosgrain & Vintage Brads
Hope you have a wonderful day with Dad!

Photobucket

Friday, June 18, 2010

Enjoy Every Moment

A few days ago I shared some cards that I designed for my All Occasion Card Class and promised to share the details in the future. Here's the second card out of the group of four. I used the soon to be retired set Enjoy Every Moment.

I used this years In Colors for my color combo - Bermuda Bay, Crushed Curry & Melon Mambo. Bermuda & Curry will be retiring but Melon Mambo will be part of the new Brights Collection in the new catalog. To get the word enjoy to fit exactly inside the center of the flower, I used the Stamp-a-ma-jig. I also should have used it for the words "YOUR DAY"...but I winged it and that's a bit off...darn it! The "YOUR DAY" stamp is actually from another retiring set...Celebrate Everything. I think that the two sets work well together. Patterned paper is from the Razzleberry Lemonade collection.

Here's another card I created using the same stamps & basically the same layout. I changed the colors and added some detail with a pierced edge and Jumbo Eyelet & Vintage Brads to put a masculine twist on it.
To create the stamped background I also used a stamp from the Circle Circus set. This time I used a brand new color that is part of the Regals Collection in the new catalog...Cajun Craze. I also used another "new" color...Crumb Cake - which was formally known as Kraft. Cool thing about Crumb Cake is that it has matching ink where Kraft never did. To round out this color combo is one of my fav blues...Not Quite Navy.
If you have My Digital Studio, you don't need to worry about Enjoy Every Moment retiring, because it's included in the stamps with that program. My friend Rachel made me this super cute hybrid card for my birthday using My Digital Studio and I think...Walk in the Park paper. She printed the image and then embellished with patterned paper, punches, brads and ribbon. I LOVE it!

Thanks for stopping by today. Enjoy every moment of your weekend!
Photobucket

Tuesday, June 15, 2010

Because I Care

Last week I got some new goodies that will be featured in the upcoming Idea Book & Catalog! It's been kind of wet & rainy here so I've been having fun playing with my new stuff. I absolutely LOVE hydrangeas and wish I had luck growing them in my garden. I guess I'll have to be content with this gorgeous new image from the Level 1 Hostess Set Because I Care.

I used one of the new colors...Marina Mist. Isn't it a pretty shade of blue? Both the Elegant Eggplant and the Marina Mist  panels are embossed with the new Vintage Wallpaper Embossing Folder. (I also used the Square Lattice EF behind the hydrangea image) The Scalloped Rectangle that the sentiment is matted on is also a new item for the Big Shot. It is a Clearlit Die. I also used Perfect Plum to round out this color combo.

There are lots more fun new accessories that will be available in the new catalog...I think the one I'm most excited about are the adhesive backed pearls and rhinestones, similar to what I've used here on the corners of my main image.  Each pack will have three different sizes, so that will be a nice to have a choice. The pearl brad is something that I've had in my stash for a while, but thought it worked nicely to finish off this card.

Hope you liked this little sneak peek.

ETA: Thanks for all the nice comments on this card! Several have asked about what I used to watercolor the hydrangea image. When I watercolor I just use what I have...and that is my SU! Classic ink (most of the time pooled in the lid of my ink pads) and my aqua painter. I always incorporate the same colors that I will be using for the base of my card, so in this case I watercolored with Marina Mist and Perfect Plum and then used Certainly Celery for the leaves and the centers of the flowers. This is a fun image to color!
Photobucket

Sunday, June 13, 2010

Boho Birthday

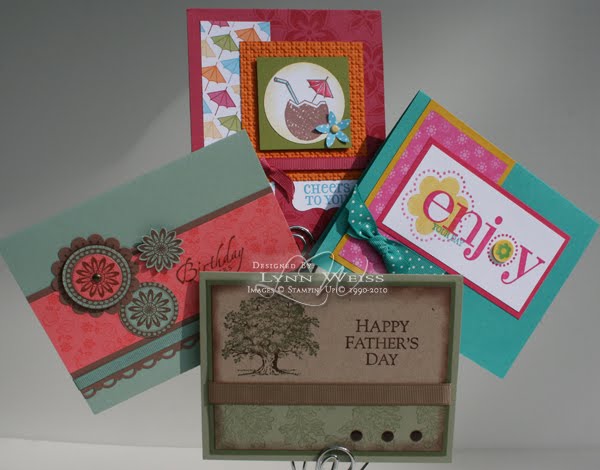
I had one of my All Occasion Card Classes during the week. I used many stamps and colors that will be retiring at the end of the month. Those that came to my class made three each of the four designs and choose the sentiments of their choice. I think this card was the group favorite of the night.

Boho Backgrounds is such a cute little set that I'm sorry to see retire. I'll also miss Sage Shadow & Close to Cocoa. I never used Cameo Coral very often, but LOVE it in this color combo. Here are the other cards we made at my class.


I'll share more about those in the coming week. Thanks for stopping by today.
Photobucket

Wednesday, June 09, 2010

Tropical Thank You

I got my veggie garden planted and my flower beds mostly back in order, so until all the weeds start popping up, I should have a little more time for stamping! Here's a card I made with some of the retiring colors and the Tropical Party set.

These colors...Taken With Teal, Gable Green & Pixie Pink will all be retired (along with 27 other core colors and 3 of the current In Colors) at the end of this month. Let me know if you need anything...I will be placing an order at the end of the week.

Stamps: Tropical Party & Teeny Tiny Wishes
Card stock: Taken With Teal, Gable Green & Pixie Pink
Ink: Taken With Teal, Gable Green & Pixie Pink
Accessories: Square Lattice Embossing Folder, Bermuda Bay Polka Dot Grosgrain, Large & Small Oval Punches, Scallop Trim Border Punch, Word Window Punch and Lots of Labels Sizzlet

I'm busy prepping for a card class I am having here later. Will share those cards in the upcoming days...so stop by again to see me. Have a good one!
Photobucket